I’ll bet you are using browser extensions right now. Some of them are extremely popular and useful, like ad blockers, password managers, and PDF viewers. These extensions (or “add-ons”) are not limited to those purposes — you can do a lot more with them! In this article, I will give you an introduction on how to create one. Ultimately, we’ll make it work in multiple browsers.
What we’re making
Table of Contents
- 1 What we’re making
- 2 Create a working directory
- 3 Define the entry point
- 4 More manifest.json information
- 5 Setting permissions
- 6 Managing translations
- 7 Adding a pop-up and options page
- 8 Installing the extension for development
- 9 Adding the content script
- 10 Adding a service worker
- 11 All done!
- 12 Conclusion
We’re making an extension called “Transcribers of Reddit” and it’s going to improve Reddit’s accessibility by moving specific comments to the top of the comment section and adding aria- attributes for screen readers. We will also take our extension a little further with options for adding borders and backgrounds to comments for better text contrast.
The whole idea is that you’ll get a nice introduction for how to develop a browser extension. We will start by creating the extension for Chromium-based browsers (e.g. Google Chrome, Microsoft Edge, Brave, etc.). In a future post we will port the extension to work with Firefox, as well as Safari which recently added support for Web Extensions in both the MacOS and iOS versions of the browser.
Ready? Let’s take this one step at a time.
Create a working directory
Before anything else, we need a working space for our project. All we really need is to create a folder and give it a name (which I’m calling transcribers-of-reddit). Then, create another folder inside that one named src for our source code.
Define the entry point
The entry point is a file that contains general information about the extension (i.e. extension name, description, etc.) and defines permissions or scripts to execute.
Our entry point can be a manifest.json file located in the src folder we just created. In it, let’s add the following three properties:
{ "manifest_version": 3, "name": "Transcribers of Reddit", "version": "1.0"
}
The manifest_version is similar to version in npm or Node. It defines what APIs are available (or not). We’re going to work on the bleeding edge and use the latest version, 3 (also known as as mv3).
The second property is name and it specifies our extension name. This name is what’s displayed everywhere our extension appears, like Chrome Web Store and the chrome://extensions page in the Chrome browser.
Then there’s version. It labels the extension with a version number. Keep in mind that this property (in contrast to manifest_version) is a string that can only contain numbers and dots (e.g. 1.3.5).
More manifest.json information
There’s actually a lot more we can add to help add context to our extension. For example, we can provide a description that explains what the extension does. It’s a good idea to provide these sorts of things, as it gives users a better idea of what they’re getting into when they use it.
In this case, we’re not only adding a description, but supplying icons and a web address that Chrome Web Store points to on the extension’s page.
{ "description": "Reddit made accessible for disabled users.", "icons": { "16": "images/logo/16.png", "48": "images/logo/48.png", "128": "images/logo/128.png" }, "homepage_url": "https://lars.koelker.dev/extensions/tor/"
}- The
descriptionis displayed on Chrome’s management page (chrome://extensions) and should be brief, less than 132 characters. - The
iconsare used in lots of places. As the docs state, it’s best to provide three versions of the same icon in different resolutions, preferably as a PNG file. Feel free to use the ones in the GitHub repository for this example. - The
homepage_urlcan be used to connect your website with the extension. A button including the link will be displayed when clicking on “More details” on the management page.
Setting permissions
One major advantage extensions have is that their APIs allow you to interact directly with the browser. But we have to explicitly give the extension those permissions, which also goes inside the manifest.json file.
{ "manifest_version": 3, "name": "Transcribers of Reddit", "version": "1.0", "description": "Reddit made accessible for disabled users.", "icons": { "16": "images/logo/16.png", "48": "images/logo/48.png", "128": "images/logo/128.png" }, "homepage_url": "https://lars.koelker.dev/extensions/tor/", "permissions": [ "storage", "webNavigation" ]
}
What did we just give this extension permission to? First, storage. We want this extension to be able to save the user’s settings, so we need to access the browser’s web storage to hold them. For example, if the user wants red borders on the comments, then we’ll save that for next time rather than making them set it again.
We also gave the extension permission to look at how the user navigated to the current screen. Reddit is a single-page application (SPA) which means it doesn’t trigger a page refresh. We need to “catch” this interaction, as Reddit will only load the comments of a post if we click on it. So, that’s why we’re tapping into webNavigation.
We’ll get to executing code on a page later as it requires a whole new entry inside manifest.json.
/explanation Depending on which permissions are allowed, the browser might display a warning to the user to accept the permissions. It’s only certain ones, though, and Chrome has a nice outline of them.
Managing translations
Browser extensions have a built-in internalization (i18n) API. It allows you to manage translations for multiple languages (full list). To use the API, we have to define our translations and default language right in the manifest.json file:
"default_locale": "en"This sets English as the language. In the event that a browser is set to any other language that isn’t supported, the extension will fall back to the default locale (en in this example).
Our translations are defined inside the _locales directory. Let’s create another folder in there each language you want to support. Each subdirectory gets its own messages.json file.
src └─ _locales └─ en └─ messages.json └─ fr └─ messages.jsonA translation file consists of multiple parts:
- Translation key (“id”): This key is used to reference the translation.
- Message: The actual translation content
- Description (optional): Describes the translation (I wouldn’t use them, they just bloat up the file and your translation key should be descriptive enough)
- Placeholders (optional): Can be used to insert dynamic content inside a translation
Here’s an example that pulls all that together:
{ "userGreeting": { // Translation key ("id") "message": "Good $daytime$, $user$!" // Translation "description": "User Greeting", // Optional description for translators "placeholders": { // Optional placeholders "daytime": { // As referenced inside the message "content": "$1", "example": "morning" // Example value for our content }, "user": { "content": "$1", "example": "Lars" } } }
}
Using placeholders is a bit more challenging. At first we need to define the placeholder inside the message. A placeholder needs to be wrapped in between $ characters. Afterwards, we have to add our placeholder to the “placeholder list.” This is a bit unintuitive, but Chrome wants to know what value should be inserted for our placeholders. We (obviously) want to use a dynamic value here, so we use the special content value $1 which references our inserted value.
The example property is optional. It can be used to give translators a hint what value the placeholder could be (but is not actually displayed).
We need to define the following translations for our extension. Copy and paste them into the messages.json file. Feel free to add more languages (e.g. if you speak German, add a de folder inside _locales, and so on).
{ "name": { "message": "Transcribers of Reddit" }, "description": { "message": "Accessible image descriptions for subreddits." }, "popupManageSettings": { "message": "Manage settings" }, "optionsPageTitle": { "message": "Settings" }, "sectionGeneral": { "message": "General settings" }, "settingBorder": { "message": "Show comment border" }, "settingBackground": { "message": "Show comment background" }
}
You might be wondering why we registered the permissions when there is no sign of an i18n permission, right? Chrome is a bit weird in that regard, as you don’t need to register every permission. Some (e.g. chrome.i18n) don’t require an entry inside the manifest. Other permissions require an entry but won’t be displayed to the user when installing the extension. Some other permissions are “hybrid” (e.g. chrome.runtime), meaning some of their functions can be used without declaring a permission—but other functions of the same API require one entry in the manifest. You’ll want to take a look at the documentation for a solid overview of the differences.
Using translations inside the manifest
The first thing our end user will see is either the entry inside the Chrome Web Store or the extension overview page. We need to adjust our manifest file to make sure everything os translated.
{ // Update these entries "name": "__MSG_name__", "description": "__MSG_description__"
}
Applying this syntax uses the corresponding translation in our messages.json file (e.g. _MSG_name_ uses the name translation).
Using translations in HTML pages
Applying translations in an HTML file takes a little JavaScript.
chrome.i18n.getMessage('name');That code returns our defined translation (which is Transcribers of Reddit). Placeholders can be done in a similar way.
chrome.i18n.getMessage('userGreeting', { daytime: 'morning', user: 'Lars'
});
It would be a pain in the butt to apply translations to all elements this way. But we can write a little script that performs the translation based on a data- attribute. So, let’s create a new js folder inside the src directory, then add a new util.js file in it.
src └─ js └─ util.jsThis gets the job done:
const i18n = document.querySelectorAll("[data-intl]");
i18n.forEach(msg => { msg.innerHTML = chrome.i18n.getMessage(msg.dataset.intl);
}); chrome.i18n.getAcceptLanguages(languages => { document.documentElement.lang = languages[0];
});
Once that script is added to an HTML page, we can add the data-intl attribute to an element to set its content. The document language will also be set based on the user language.
<!-- Before JS execution -->
<html> <body> <button data-intl="popupManageSettings"></button> </body>
</html>
<!-- After JS execution -->
<html lang="en"> <body> <button data-intl="popupManageSettings">Manage settings</button> </body>
</html>Adding a pop-up and options page
Before we dive into actual programming, we we need to create two pages:
- An options page that contains user settings
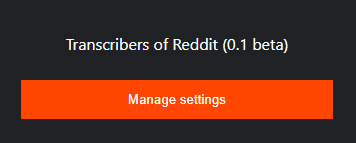
- A pop-up page that opens when interacting with the extension icon right next to our address bar. This page can be used for various scenarios (e.g. for displaying stats or quick settings).
Here’s an outline of the folders and files we need in order to make the pages:
src ├─ css | └─ paintBucket.css ├─ popup | ├─ popup.html | ├─ popup.css | └─ popup.js └─ options ├─ options.html ├─ options.css └─ options.jsThe .css files contain plain CSS, nothing more and nothing less. I won’t into detail because I know most of you reading this are already fully aware of how CSS works. You can copy and paste the styles from the GitHub repository for this project.
Note that the pop-up is not a tab and that its size depends on the content in it. If you want to use a fixed popup size, you can set the width and height properties on the html element.
Creating the pop-up
Here’s an HTML skeleton that links up the CSS and JavaScript files and adds a headline and button inside the <body>.
<!doctype html>
<html lang="en"> <head> <meta charset="UTF-8"> <meta name="viewport" content="width=device-width, user-scalable=no, initial-scale=1.0, maximum-scale=1.0, minimum-scale=1.0"> <meta http-equiv="X-UA-Compatible" content="ie=edge"> <title data-intl="name"></title> <link rel="stylesheet" href="../css/paintBucket.css"> <link rel="stylesheet" href="popup.css"> <!-- Our "translation" script --> <script src="../js/util.js" defer></script> <script src="popup.js" defer></script> </head> <body> <h1 id="title"></h1> <button data-intl="popupManageSettings"></button> </body>
</html>
The h1 contains the extension name and version; the button is used to open the options page. The headline will not be filled with a translation (because it lacks a data-intl attribute), and the button doesn’t have any click handler yet, so we need to populate our popup.js file:
const title = document.getElementById('title');
const settingsBtn = document.querySelector('button');
const manifest = chrome.runtime.getManifest(); title.textContent = `${manifest.name} (${manifest.version})`; settingsBtn.addEventListener('click', () => { chrome.runtime.openOptionsPage();
});
This script first looks for the manifest file. Chrome offers the runtime API which contains the getManifest method (this specific method does not require the runtime permission). It returns our manifest.json as a JSON object. After we populate the title with the extension name and version, we can add an event listener to the settings button. If the user interacts with it, we will open the options page using chrome.runtime.openOptionsPage() (again no permission entry needed).
The pop-up page is now finished, but the extension doesn’t know it exists yet. We have to register the pop-up by appending the following property to the manifest.json file.
"action": { "default_popup": "popup/popup.html", "default_icon": { "16": "images/logo/16.png", "48": "images/logo/48.png", "128": "images/logo/128.png" }
},
Creating the options page
Creating this page follows a pretty similar process as what we just completed. First, we populate our options.html file. Here’s some markup we can use:
<!doctype html>
<html lang="en">
<head> <meta charset="UTF-8"> <meta name="viewport" content="width=device-width, user-scalable=no, initial-scale=1.0, maximum-scale=1.0, minimum-scale=1.0"> <meta http-equiv="X-UA-Compatible" content="ie=edge"> <title data-intl="name"></title> <link rel="stylesheet" href="../css/paintBucket.css"> <link rel="stylesheet" href="options.css"> <!-- Our "translation" script --> <script src="../js/util.js" defer></script> <script src="options.js" defer></script>
</head>
<body> <header> <h1> <!-- Icon provided by feathericons.com --> <svg xmlns="http://www.w3.org/2000/svg" viewBox="0 0 24 24" fill="none" stroke="currentColor" stroke-width="1.2" stroke-linecap="round" stroke-linejoin="round" role="presentation"> <circle cx="12" cy="12" r="3"></circle> <path d="M19.4 15a1.65 1.65 0 0 0 .33 1.82l.06.06a2 2 0 0 1 0 2.83 2 2 0 0 1-2.83 0l-.06-.06a1.65 1.65 0 0 0-1.82-.33 1.65 1.65 0 0 0-1 1.51V21a2 2 0 0 1-2 2 2 2 0 0 1-2-2v-.09A1.65 1.65 0 0 0 9 19.4a1.65 1.65 0 0 0-1.82.33l-.06.06a2 2 0 0 1-2.83 0 2 2 0 0 1 0-2.83l.06-.06a1.65 1.65 0 0 0 .33-1.82 1.65 1.65 0 0 0-1.51-1H3a2 2 0 0 1-2-2 2 2 0 0 1 2-2h.09A1.65 1.65 0 0 0 4.6 9a1.65 1.65 0 0 0-.33-1.82l-.06-.06a2 2 0 0 1 0-2.83 2 2 0 0 1 2.83 0l.06.06a1.65 1.65 0 0 0 1.82.33H9a1.65 1.65 0 0 0 1-1.51V3a2 2 0 0 1 2-2 2 2 0 0 1 2 2v.09a1.65 1.65 0 0 0 1 1.51 1.65 1.65 0 0 0 1.82-.33l.06-.06a2 2 0 0 1 2.83 0 2 2 0 0 1 0 2.83l-.06.06a1.65 1.65 0 0 0-.33 1.82V9a1.65 1.65 0 0 0 1.51 1H21a2 2 0 0 1 2 2 2 2 0 0 1-2 2h-.09a1.65 1.65 0 0 0-1.51 1z"></path> </svg> <span data-intl="optionsPageTitle"></span> </h1> </header> <main> <section id="generalOptions"> <h2 data-intl="sectionGeneral"></h2> <div id="generalOptionsWrapper"></div> </section> </main> <footer> <p>Transcribers of Reddit extension by <a href="https://lars.koelker.dev" target="_blank">lars.koelker.dev</a>.</p> <p>Reddit is a registered trademark of Reddit, Inc. This extension is not endorsed or affiliated with Reddit, Inc. in any way.</p> </footer>
</body>
</html>
There are no actual options yet (just their wrappers). We need to write the script for the options page. First, we define variables to access our wrappers and default settings inside options.js. “Freezing” our default settings prevents us from accidentally modifying them later.
const defaultSettings = Object.freeze({ border: false, background: false,
});
const generalSection = document.getElementById('generalOptionsWrapper');
Next, we need to load the saved settings. We can use the (previously registered) storage API for that. Specifically, we need to define if we want to store the data locally (chrome.storage.local) or sync settings through all devices the end user is logged in to (chrome.storage.sync). Let’s go with local storage for this project.
Retrieving values needs to be done with the get method. It accepts two arguments:
- The entries we want to load
- A callback containing the values
Our entries can either be a string (e.g. like settings below) or an array of entries (useful if we want to load multiple entries). The argument inside the callback function contains an object of all entries we previously defined in { settings: ... }:
chrome.storage.local.get('settings', ({ settings }) => { const options = settings ?? defaultSettings; // Fall back to default if settings are not defined if (!settings) { chrome.storage.local.set({ settings: defaultSettings, }); } // Create and display options const generalOptions = Object.keys(options).filter(x => !x.startsWith('advanced')); generalOptions.forEach(option => createOption(option, options, generalSection));
});
To render the options, we also need to create a createOption() function.
function createOption(setting, settingsObject, wrapper) { const settingWrapper = document.createElement("div"); settingWrapper.classList.add("setting-item"); settingWrapper.innerHTML = ` <div class="label-wrapper"> <label for="${setting}" id="${setting}Desc"> ${chrome.i18n.getMessage(`setting${setting}`)} </label> </div> <input type="checkbox" ${settingsObject[setting] ? 'checked' : ''} id="${setting}" /> <label for="${setting}" tabindex="0" role="switch" aria-checked="${settingsObject[setting]}" aria-describedby="${setting}-desc" class="is-switch" ></label> `; const toggleSwitch = settingWrapper.querySelector("label.is-switch"); const input = settingWrapper.querySelector("input"); input.onchange = () => { toggleSwitch.setAttribute('aria-checked', input.checked); updateSetting(setting, input.checked); }; toggleSwitch.onkeydown = e => { if(e.key === " " || e.key === "Enter") { e.preventDefault(); toggleSwitch.click(); } } wrapper.appendChild(settingWrapper);
}
Inside the onchange event listener of our switch (aká radio button) we call the function updateSetting. This method will write the updated value of our radio button inside the storage.
To accomplish this, we will make use of the set function. It has two arguments: The entry we want to overwrite and an (optional) callback (which we don’t use in our case). As our settings entry is not a boolean or a string but an object containing different settings, we use the spread operator (…) and only overwrite our actual key (setting) inside the settings object.
function updateSetting(key, value) { chrome.storage.local.get('settings', ({ settings }) => { chrome.storage.local.set({ settings: { ...settings, [key]: value } }) });
}
Once again, we need to “inform” the extension about our options page by appending the following entry to the manifest.json:
"options_ui": { "open_in_tab": true, "page": "options/options.html"
},
Depending on your use case you can also force the options dialog to open as a popup by setting open_in_tab to false.
Installing the extension for development
Now that we’ve successfully set up the manifest file and have added both the pop-up and options page to the mix, we can install our extension to check if our pages actually work. Navigate to chrome://extensions and enable “Developer mode.” Three buttons will appear. Click the one labeled “Load unpacked” and select the src folder of your extension to load it up.
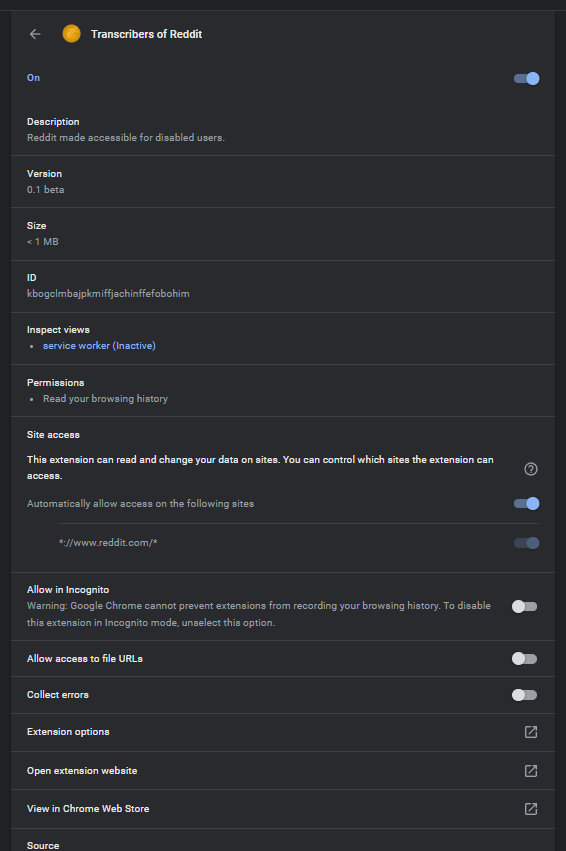
The extension should now be successfully installed and our “Transcribers of Reddit” tile should be on the page.
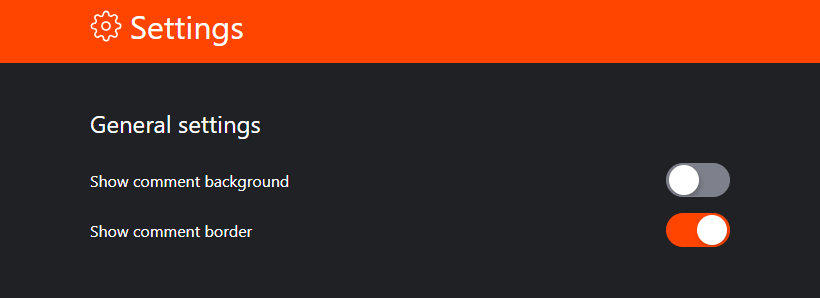
We can already interact with our extension. Click on the puzzle piece (????) icon right next to the browser’s address bar and click on the newly-added “Transcribers of Reddit” extension. You should now be greeted by a small pop-up with the button to open the options page.

Lovely, right? It might look a bit different on your device, as I have dark mode enabled in these screenshots.
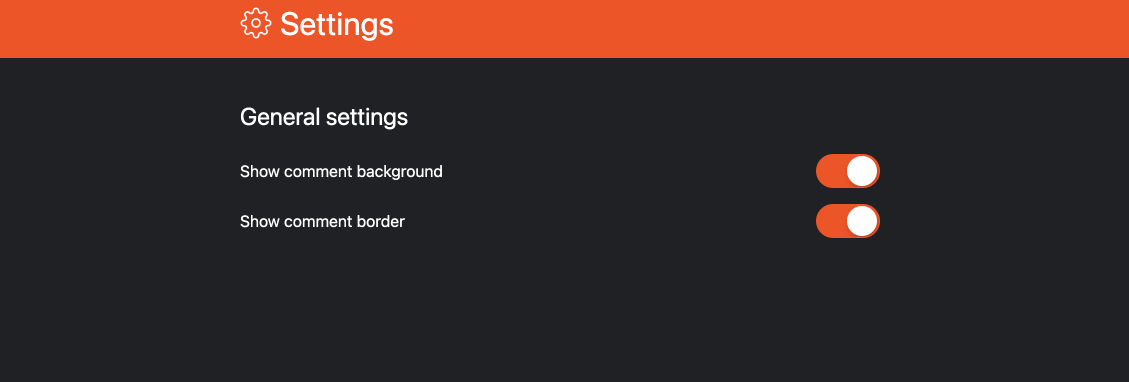
If you enable the “Show comment background” and “Show comment border” settings, then reload the page, the state will persist because we’re saving it in the browser’s local storage.
Adding the content script
OK, so we can already trigger the pop-up and interact with the extension settings, but the extension doesn’t do anything particularly useful yet. To give it some life, we will add a content script.
Add a file called comment.js inside the js directory and make sure to define it in the manifest.json file:
"content_scripts": [ { "matches": [ "*://www.reddit.com/*" ], "js": [ "js/comment.js" ] }
],
The content_scripts is made up of two parts:
matches: This array holds URLs that tell the browser where we want our content scripts to run. Being an extension for Reddit and all, we want this to run on any page matching://www.redit.com/*, where the asterisk is a wild card to match anything after the top-level domain.js: This array contains the actual content scripts.
Content scripts can’t interact with other (normal) JavaScripts. This means if a website’s scripts defines a variable or function, we can’t access it. For example:
// script_on_website.js
const username = 'Lars'; // content_script.js
console.log(username); // Error: username is not defined
Now let’s start writing our content script. First, we add some constants to comment.js. These constants contain RegEx expressions and selectors that will be used later on. The CommentUtils is used to determine whether or not a post contains a “tor comment,” or if comment wrappers exists.
const messageTypes = Object.freeze({ COMMENT_PAGE: 'comment_page', SUBREDDIT_PAGE: 'subreddit_page', MAIN_PAGE: 'main_page', OTHER_PAGE: 'other_page',
}); const Selectors = Object.freeze({ commentWrapper: 'div[style*="--commentswrapper-gradient-color"] > div, div[style*="max-height: unset"] > div', torComment: 'div[data-tor-comment]', postContent: 'div[data-test-id="post-content"]'
}); const UrlRegex = Object.freeze({ commentPage: //r/.*/comments/.*/, subredditPage: //r/.*//
}); const CommentUtils = Object.freeze({ isTorComment: (comment) => comment.querySelector('[data-test-id="comment"]') ? comment.querySelector('[data-test-id="comment"]').textContent.includes('m a human volunteer content transcriber for Reddit') : false, torCommentsExist: () => !!document.querySelector(Selectors.torComment), commentWrapperExists: () => !!document.querySelector('[data-reddit-comment-wrapper="true"]')
});
Next, we check whether or not a user directly opens a comment page (“post”), then perform a RegEx check and update the directPage variable. This case occurs when a user directly opens the URL (e.g. by typing it into the address bar or clicking on<a> element on another page, like Twitter).
let directPage = false;
if (UrlRegex.commentPage.test(window.location.href)) { directPage = true; moveComments();
}
Besides opening a page directly, a user normally interacts with the SPA. To catch this case, we can add a message listener to our comment.js file by using the runtime API.
chrome.runtime.onMessage.addListener(msg => { if (msg.type === messageTypes.COMMENT_PAGE) { waitForComment(moveComments); }
});
All we need now are the functions. Let’s create a moveComments() function. It moves the special “tor comment” to the start of the comment section. It also conditionally applies a background color and border (if borders are enabled in the settings) to the comment. For this, we call the storage API and load the settings entry:
function moveComments() { if (CommentUtils.commentWrapperExists()) { return; } const wrapper = document.querySelector(Selectors.commentWrapper); let comments = wrapper.querySelectorAll(`${Selectors.commentWrapper} > div`); const postContent = document.querySelector(Selectors.postContent); wrapper.dataset.redditCommentWrapper = 'true'; wrapper.style.flexDirection = 'column'; wrapper.style.display = 'flex'; if (directPage) { comments = document.querySelectorAll("[data-reddit-comment-wrapper='true'] > div"); } chrome.storage.local.get('settings', ({ settings }) => { // HIGHLIGHT 18 comments.forEach(comment => { if (CommentUtils.isTorComment(comment)) { comment.dataset.torComment = 'true'; if (settings.background) { comment.style.backgroundColor = 'var(--newCommunityTheme-buttonAlpha05)'; } if (settings.border) { comment.style.outline = '2px solid red'; } comment.style.order = "-1"; applyWaiAria(postContent, comment); } }); })
}
The applyWaiAria() function is called inside the moveComments() function—it adds aria- attributes. The other function creates a unique identifier for use with the aria- attributes.
function applyWaiAria(postContent, comment) { const postMedia = postContent.querySelector('img[class*="ImageBox-image"], video'); const commentId = uuidv4(); if (!postMedia) { return; } comment.setAttribute('id', commentId); postMedia.setAttribute('aria-describedby', commentId);
} function uuidv4() { return 'xxxxxxxx-xxxx-4xxx-yxxx-xxxxxxxxxxxx'.replace(/[xy]/g, function(c) { var r = Math.random() * 16 | 0, v = c == 'x' ? r : (r & 0x3 | 0x8); return v.toString(16); });
}
The following function waits for the comments to load and calls the callback parameter if it finds the comment wrapper.
function waitForComment(callback) { const config = { childList: true, subtree: true }; const observer = new MutationObserver(mutations => { for (const mutation of mutations) { if (document.querySelector(Selectors.commentWrapper)) { callback(); observer.disconnect(); clearTimeout(timeout); break; } } }); observer.observe(document.documentElement, config); const timeout = startObservingTimeout(observer, 10);
} function startObservingTimeout(observer, seconds) { return setTimeout(() => { observer.disconnect(); }, 1000 * seconds);
}
Adding a service worker
Remember when we added a listener for messages inside the content script? This listener isn’t currently receiving messages. We need to send it to the content script ourselves. For this purpose we need to register a service worker.
We have to register our service worker inside the manifest.json by appending the following code to it:
"background": { "service_worker": "sw.js"
}
Don’t forget to create the sw.js file inside the src directory (service workers always need to be created in the extension’s root directory, src.
Now, let’s create some constants for the message and page types:
const messageTypes = Object.freeze({ COMMENT_PAGE: 'comment_page', SUBREDDIT_PAGE: 'subreddit_page', MAIN_PAGE: 'main_page', OTHER_PAGE: 'other_page',
}); const UrlRegex = Object.freeze({ commentPage: //r/.*/comments/.*/, subredditPage: //r/.*//
}); const Utils = Object.freeze({ getPageType: (url) => { if (new URL(url).pathname === '/') { return messageTypes.MAIN_PAGE; } else if (UrlRegex.commentPage.test(url)) { return messageTypes.COMMENT_PAGE; } else if (UrlRegex.subredditPage.test(url)) { return messageTypes.SUBREDDIT_PAGE; } return messageTypes.OTHER_PAGE; }
});
We can add the service worker’s actual content. We do this with an event listener on the history state (onHistoryStateUpdated) that detects when a page has been updated with the History API (which is commonly used in SPAs to navigate without a page refresh). Inside this listener, we query the active tab and extract its tabId. Then we send a message to our content script containing the page type and URL.
chrome.webNavigation.onHistoryStateUpdated.addListener(async ({ url }) => { const [{ id: tabId }] = await chrome.tabs.query({ active: true, currentWindow: true }); chrome.tabs.sendMessage(tabId, { type: Utils.getPageType(url), url });
});
All done!
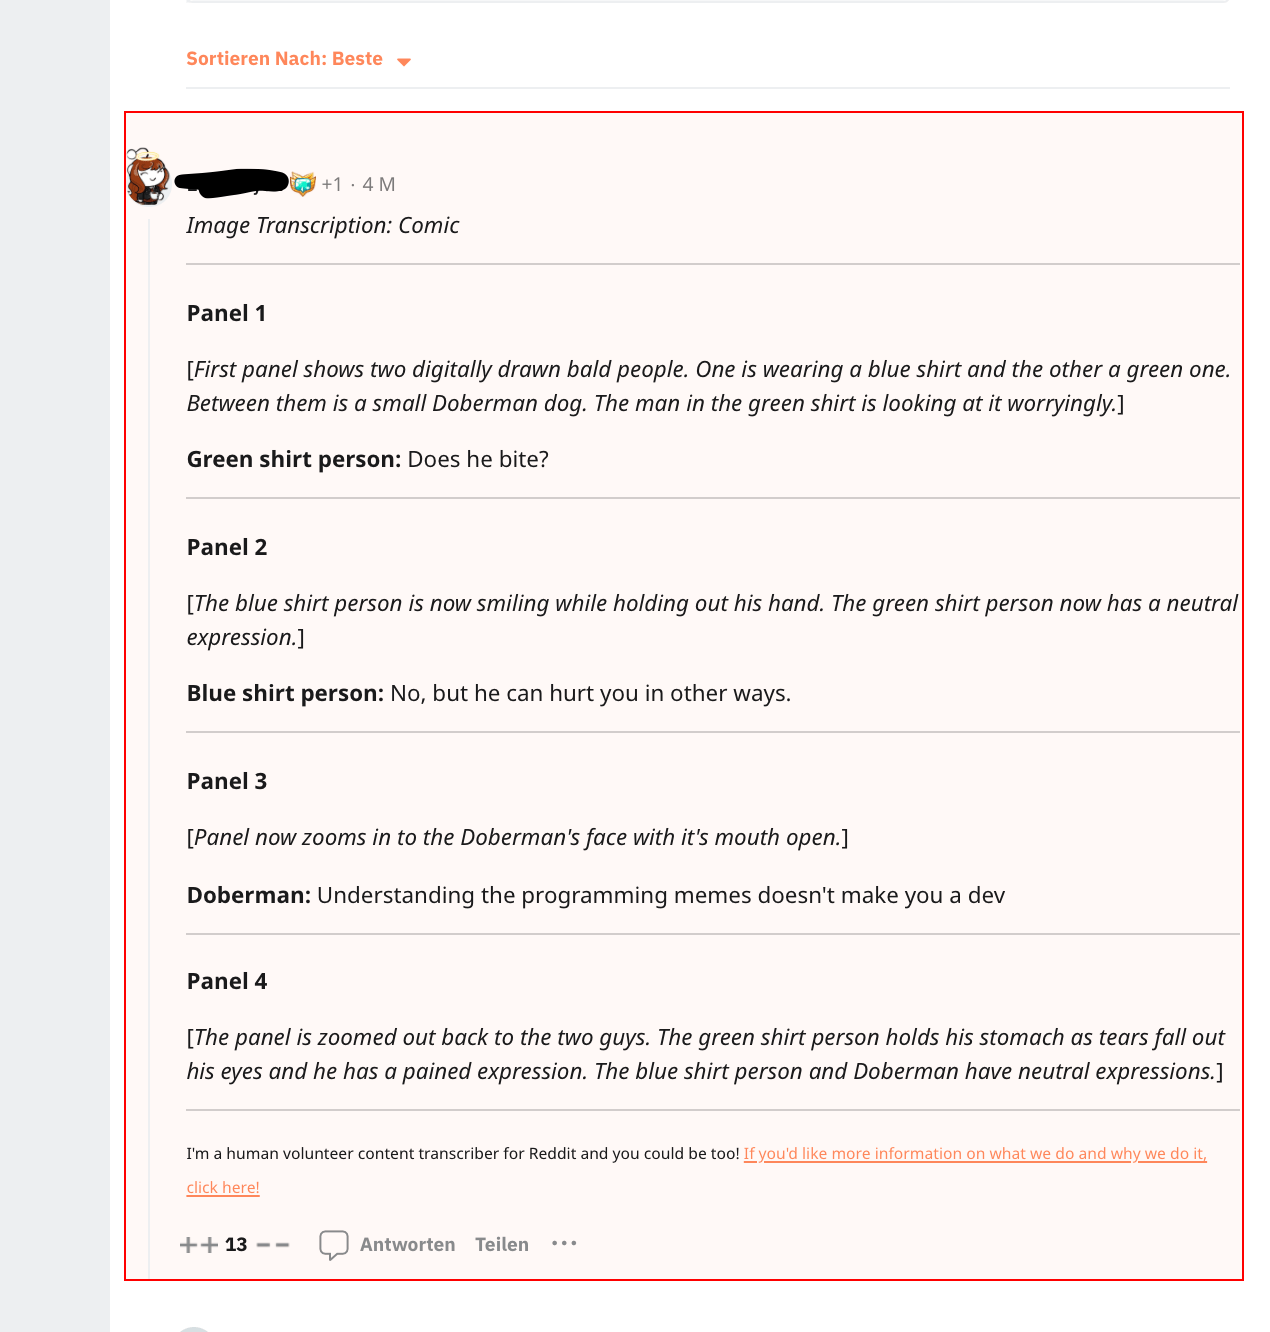
We’re finished! Navigate to Chrome’s extension management page ( chrome://extensions) and hit the reload icon on the unpacked extension. If you open a Reddit post that contains a “Transcribers of Reddit” comment with an image transcription (like this one), it will be moved to the start of the comment section and be highlighted as long as we’ve enabled it in the extension settings.
Conclusion
Was that as hard as you thought it would be? It’s definitely a lot more straightforward than I thought before digging in. After setting up the manifest.json and creating any page files and assets we need, all we’re really doing is writing HTML, CSS, and JavaScript like normal.
If you ever find yourself stuck along the way, the Chrome API documentation is a great resource to get back on track.
Once again, here’s the GitHub repo with all of the code we walked through in this article. Read it, use it, and let me know what you think of it!


