This is a good chance to learn more about plugins, dynamically generated content and some good coding practices. Moreover, with this technique we could apply different effects and a lot of variations since all these things are based on non-obtrusive and almost only decorative javascript.
Download and Preview
Table of Contents
- 1 Download and Preview
- 2 Your Designer ToolboxUnlimited Downloads: 500,000+ Web Templates, Icon Sets, Themes & Design Assets
- 3 Usability background
- 4 Getting started
- 5 Change our input type to text
- 6 Create our mask and bullets
- 7 It’s time to play with keyboard
- 8 Finally, hover-revealing field!
- 9 Are you hungry yet?
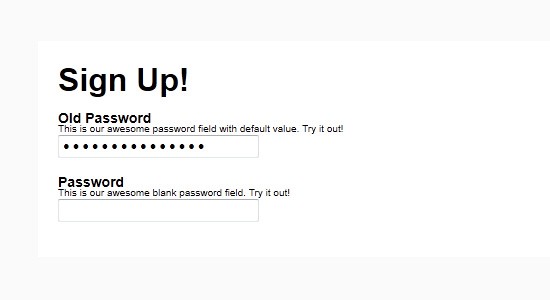
Let’s begin with the best part. You can see our working demo or download our files and jQuery plugin.

Your Designer Toolbox
Unlimited Downloads: 500,000+ Web Templates, Icon Sets, Themes & Design Assets

DOWNLOAD NOW![]()
Usability background
Before any coding I think it’s important to know why are we doing all these things. It is all about user experience and to make things the best they can be.
The man who started discussing masked passwords (as far as I know) is Jakob Nielsen, with his extremist opinion expressed in stop password masking article. But I really think we don’t need to stick with just two options. I think we can improve all these techniques, like what mobile developers have done, improving user experience by creating a “new” way to input password data.
Don’t get me wrong, sometimes we do need to just keep masking passwords for security reasons. You know, sometimes we are near suspicious people or jealous girlfriends just waiting for a single mistake to steal our password and make big damage to our online life. But sometimes we don’t. I mean, we don’t need to let our software ready only for the worst case.
We have to be ready for the worst and the best. From IE6 (argh!) to Chrome 14.0.803.2 beta. From jealous girlfriends to hurried surfers. This is the tricky part, trying to be the best in most cases.
This is why we can’t just let passwords to be masked by default. We have to give a better option to our loyal users.
Getting started
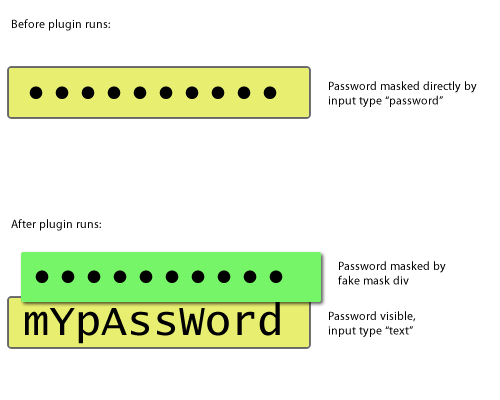
What we will do here is to get a common password field, change it to text and create a mask above it, which is filled as you type. With this you can do anything with the “mask” without affecting the input content itself.
Maybe this image will better explain how it works:

Well, finally, let’s get started on coding.
We will start with a pretty basic form markup. As you all know it’s quite simple, so let’s add two fields, one that should come with a default value and another in blank, for you to play with as you want.
<div id="container"> <h1>Sign Up!</h1> <form action="#" method="get"> <label> <span class="title">Old Password</span> <span class="desc">This is our awesome password field with default value. Try it out!</span> <input type="text" name="oldpassword" id="oldpassword" value="tHis1$myP4swrd." /> </label> <label> <span class="title">Password</span> <span class="desc">This is our awesome blank password field. Try it out!</span> <input type="password" name="password" id="password" /> </label> </form>
</div>
Ok, then we need to call our magic jQuery and plugin files. Let’s do that:
<script type="text/javascript" src="http://ajax.googleapis.com/ajax/libs/jquery/1.6.2/jquery.min.js"> // call jQuery from google! </script> <script type="text/javascript" src="jquery.hp.js"> // call plugin </script>
Well, let’s create our basic plugin file. You can see some tips about it in our jQuery Smooth Table of Contents Plugin, where we have a really simple structure.
(function($){ $.fn.hoverpass = function(options) { //Our default options var defaults = { bullet: "&bull;", //which should be the "masking" character font: "'Lucida Console', monospace", //please just use MONOSPACE fonts bg: "#fff", // background style for bullets free: "", // add your own additional styling here freeBul: "float: left; overflow: hidden;", // add your own additional styling for bullets here delay: 500, //how long it takes to create the bullet over the last character, in milliseconds delayHover: 3000, //how long it takes to hide again a hovered character animation: 500, //how long it takes the animation itself maxSize: 10 // maximum number of characters, to prevent bullets exploding input's size }; //let's extend our plugin with default or user options when defined var options = $.extend(defaults, options); return this.each(function() { //our action goes here }); };
})(jQuery);
Above we defined our default variables, let me explain some of them a little bit:
- bullet – Is what will mask our password. You can use any character but use just one character or HTML entity.
- font – This is really important, this plugin only works with monospaced fonts. Since in other types, each character has his own width, we can’t “mask” it.
- bg – If you use any background in your input, then you should apply it to your mask too, since it will be above the input.
- free – Here you should add margins in order to compensate any padding that your input has. Furthermore you should set your input’s font-size here.
- maxSize – This is important if your password field is too short. If you don’t adjust it you may get some extra bullets exploding your input’s size.
At this point you have a basic plugin, that is called via $(elem).hoverpass(), defined by our second line $.fn.hoverpass = function(){}.
I know, this name sucks. I would be glad if you send suggestions about better names :).
Change our input type to text
I don’t know if you’ve tried this before, but let me tell you something, you just can’t change the type of inputs. This happens due to security reasons, right? Well, seems that just IE will worry about it (you can do it via old JavaScript in real browsers).
Anyway, what we have to do then is create a “clone” of current input without type property.
There is several ways of doing this, I’ve done it this way:
return this.each(function() { //let's declare some variables, many as a "shortcut" for options var bullet = options.bullet, font = options.font, bg = options.bg, free = options.free, freeBul = options.freeBul, delay = options.delay, delayHover = options.delayHover, animation = options.animation, lastBul = ""; //since we just can't change a field's type, we'll remove it and append a brand new text input on it's place var oldElement = $(this); // caching element, much better performance var inputHTML = '<input type="text" style="font-family: '+ font +'; " />'; //this is our basic input text, with our monopace font var input = oldElement.after(inputHTML).next(); //appending our simple text field with our styling (font-family) AND caching it as var "input" /**** we are saying here: define the following variables: attr , i (zero), attrs (array with all oldElement attributes), l (size of attrs) while our counter (i) is smaller than attributes lenght (l) increase our counter and run this code */ for ( var attr, i=0 , attrs = oldElement[0].attributes , l =attrs.length ; i < l ; i++){ attr = attrs.item(i) if (attr.nodeName != "type" && attr.nodeName != "style") { //well, we defined our type as text and font-style! input.attr( attr.nodeName, attr.nodeValue ); } } oldElement.remove(); // bye, bye input type="password"!
});
Create our mask and bullets
Wow, at this point, when you define $(elem).hoverpass() it will turn into a monospaced text input. Pretty cool, huh? But we want more than this.
Now we will create our bullets container. The only really interesting thing in this two lines is that jQuery element caching again. You really should be using this simple technique:
// let the game begin var maskHTML = '<div class="hpMask" style="position: absolute; cursor: text; height: 1px; font-family: ' + font + ' ; ' + free + ' " />'; //our container with his styling var maskContainer = input.before(maskHTML).prev(); // appending our container for bullets with styling (font-family, free)
Now we’ll prepare our bullets HTML, since it will be used several times, and add some bullets when we have a “value” attribute defined.
var bulletHTML = "<span class='hpBullet' style='background: " + bg + "; " + freeBul + " '>"+ bullet + " </span> "; // our bullets HTML with styling (bg, freeBul) var countBullet = 0; // this is our counter, it is important to prevent our mask to get bigger / smaller than our input or its maximum size //since we use it from different places, it's better to add it via function function addBullet() { // add our last bullet, but hidden, and show anything that isn't last bullet lastBul = maskContainer.append(bulletHTML).find(":last-child").hide(); maskContainer.find(":not(:last-child)").each( function(){ $(this).show(); } ); //start timer to show lastBul lastBul.delay(delay).fadeIn(animation); countBullet++; } //first loop adding bullets when we have a default value for ( i=0 ; i < input[0].value.length ; i++){ addBullet(); }
Well, at this point you should see again a textfield but if you have a value attribute defined, you’ll see a lot of bullets and the last one fading after one second. Although, if you type, nothing happens.
It’s time to play with keyboard
We now need to append new bullets every time something is typed in our password field, and remove one bullet if the pressed character is delete or backspace.
We could do this via keypress, keyup or keydown.
Thinking about it a little bit with keydown and keypress (they are very similar) we bind “pressing key” and with keyup we bind “releasing key”. Looking a little closer, you might notice that in our case it means that keydown/keypress is called before we have any change in our field’s value but keyup is called after any change occurs.
This is why we need to use keyup here. We have to look at our field’s value and see “hey, have you changed your size?” in order to append or remove bullets. This is because we could have several scenarios when user selects part of the password, press delete in the beginning of the field and much other things that would be too painful to bind as separated actions.
So, let’s do it:
//let's bind all keydown and create / remove our bullets ; we need do use keydown in order to detect special characters in non-gecko browsers input.keyup( function(event) { //check if something was really typed if (input[0].value.length > countBullet) { addBullet(); } else { //ooops, delete or backspace? //then we check if something was really deleted while (input[0].value.length < countBullet) { maskContainer.find(":last-child").remove(); countBullet--; } } } );
Finally, hover-revealing field!
Well, now we just have to hide our bullet when someone hovers it. Kind of easy, right? Well, it isn’t that easy. It is because we have to hide our bullet, but we can’t lose it’s width, because if we do, our users would see only the last character of the password (not the ones in the middle).
What we can do is to fade it to an insignificant opacity (like 10%) and then change it’s height to 1px, so we still have width.
Ok, now it’s just to use elem.hover() and we’re done, right? Again, no. This is because we have dynamically generated content we should use live() or delegate() to bind it. In my tests delegate had a much better performance, so we will do it this way:
//hide bullets based on a jquery object function hideBullets(object) { object.stop().css({ "height": "auto"}).animate({ opacity: 1 }, animation).removeClass("hpHiddenBullet"); } //hover function for our bullets maskContainer.delegate(".hpBullet", 'hover', function(){ var item = $(this); if ( item.hasClass("hpHiddenBullet") != true ) { hideBullets( $(".hpHiddenBullet") ); item.stop().addClass("hpHiddenBullet").animate( { opacity: 0.01}, animation, function() { item.css({ "height": "1px"}); } ); setTimeout( function() { if ( item.hasClass("hpHiddenBullet") == true ) { hideBullets( item ); } }, delayHover); } } );
Are you hungry yet?
Wow, hope you guys liked it. Maybe you’re not going to use this effect itself but I’m sure we have a lot of good snippets here that are worth using in other cases.
Talking about the final effect, what do you think about it? Have you seen a better alternative?
This post may contain affiliate links. See our disclosure about affiliate links here.


