In this tutorial, I’ll lay out how to best get started with setting up a PHP development environment, walking you through how to get set up with Docker. There are so many ways to set up your PHP dev environment, but using Docker is the current best practice.
I’ll start with a brief history of how people have set up their PHP development environment over the years, leading up to where we are now. But if you’d rather skip all that and just get your server running, you can skip right to the configuration steps.
A Little Background
Table of Contents
One of the problems with web development is that things change at a rapid pace. CSS best practices change as new properties are added to the specification. (How did we ever cope without CSS Grid?) PHP is now on version 8, and even the tools we use to execute PHP scripts are being refined over time. As a result, a lot of the tutorials get outdated quite quickly.
Until a couple of years ago, I sent everyone I was teaching to Bruno Skvorc’s excellent article Re-introducing Vagrant: The Right Way to Start with PHP. At the time it was a fantastic introduction to the (then) best way to set up a local development environment.
That article is only from 2015, but five or six years is an eon in ever-moving web development timescales. The “right way” has moved on quite significantly since then.
I’ll quickly recap how things have changed over the years.
1. Manually installing PHP, MySQL and Apache
If, like me, you’re old enough to have been developing websites in the 90s, you’ll remember how frustrating the experience was. Back then, if you were in the minority who didn’t just develop on the live web server (yes, we really did this, yes it was a terrible idea), you would manually install Apache, PHP and MySQL on your development machine.
Getting a development environment set up required significant expertise. You needed to know how to configure the web server, how to configure PHP, and you had to go through the process of manually installing and configuring all the software you used. This was a time-consuming and daunting task in its own right for novice developers.
2. Preconfigured Packages such as XAMPP
By the early to mid 2000s, people had started putting together all the required software in a single package which installed and configured all the software you needed. These packages were things like XAMPP and WAMP, and at the click of a button they gave you a usable development environment.
If you hang around various PHP facebook groups, you’ll find that a significant portion of new developers still follow tutorials from this era and a large number of existing developers never moved on, so XAMPP is still used quite widely. If this describes you, it’s time to move on.
Using XAMPP made it very easy to get a web development environment up and running on your machine. Bruno’s article outlines the problems with this approach, but the main issue comes when you want to put your site live on the Web. The versions of PHP, MySQL and Apache (or NGINX) may be different from the ones you installed as part of your XAMPP package. In addition, there are a couple of minor, but frustrating, differences between Windows and Linux. If you’re developing your site on a Windows machine and uploading it to a Linux server, some of your code may not work at all once it’s uploaded.
3. Virtual Machines and Vagrant
In the late 2000s and early 2010s, the trend among developers was to move to a virtual machine. The idea was that you could run a copy of the real web server’s operating system with all its installed programs — the exact same configuration and setup as the actual web server you were going to eventually deploy your website to. That way, when you made the website live, there was no chance of it not working.
While many programmers saw the benefit of such an environment, the difficulty and time required to set this up meant that few did. That was until Vagrant (and associated tools like Puphpet) came along and took all the hassle out of doing so.
Take a look at the article I linked to earlier for an excellent description of Vagrant, Virtual Machines and the benefits of setting up a development environment in this way.
4. Docker
All this background brings us to today and the reason for this article. If Vagrant is so great, why use something else instead?
The main benefits of a virtual environment set up using Vagrant are:
-
Your development PC is not tied into a particular environment. You can host multiple websites: one using Apache, one using NGINX, one using PHP 7 and one using PHP 8.
-
When the site is made live, the website is being uploaded to exactly the same environment that it was developed on.
It’s easy to see why developers want this. Taking the next step up to Docker keeps these benefits while avoiding some of the drawbacks of Vagrant/Virtual Machine environments.
What’s wrong with Vagrant?
Despite the benefits, a Vagrant-based development environment introduces its own set of restrictions and problems.
-
System resources. Vagrant requires running a whole different operating system. You need to download and install the operating system that’s running on your web server, and all the packages it has installed. This uses significant amount of disk space and memory. A virtual machine will normally need at least 512 MB RAM. That’s not a lot for today’s computers, but it quickly adds up. If you want to host one website on PHP 7 and one on PHP 8, you need two different virtual machine instances installed and configured on your computer.
-
You have to ensure the virtual machine and the server are in sync. Whenever you update the server or change the server’s configuration, you have to remember to update your local development environment with the same changes.
-
It locks you tightly into a server OS and configuration. Moving a website from one server to another is a difficult task. A website is more than just the PHP scripts, images and CSS that make it up. A specific server configuration (such as installed PHP extensions and
nginx.conf/httpd.conf) are also required for the website to function correctly. -
There is a very limited choice of available packages. Depending on which Linux distribution your web server is running, you may not have any choice over which version of PHP you run. Unless you install packages from third-party repositories, you won’t be able to use the latest and greatest PHP version. At the time of writing, PHP 8 has recently become available. If you’re using CentOS 8/RHEL 8, you’re stuck with PHP 7.3 until you get a new version of the operating system. If you’re on Debian, the latest version available is 7.3. Other distributions will have different versions available.
-
The server configuration is global. PHP has a settings file called
php.ini. Changing this applies the updated configuration to every website hosted on the server. The same goes fornginx.conffor NGINX orhttpd.conffor Apache. The MySQL database instance has databases for all sites hosted on the server. Making any large-scale database configuration changes is far reaching. Updating a MySQL setting will affect every website using that MySQL server! -
The package versions are global on the real server. Although it’s possible to run multiple PHP versions on the same web server, it’s difficult to configure and can have bizarre side effects depending on what your script is doing (such as when you have a script you want to run in a systemd unit/cronjob and forget that you should be using
/bin/php72rather than/bin/php).
Although points 5 and 6 can be overcome on the development machine by running different Vagrant virtual machines, you’ll need a real web server that mirrors each configuration you’re running so that the websites work when you upload them.
Introducing Docker
Docker solves all the problems listed above. But just what is Docker and how does it work?
Let’s start with the intro from Wikipedia:
Docker is a set of platform as a service (PaaS) products that use OS-level virtualization to deliver software in packages called containers. Containers are isolated from one another and bundle their own software, libraries and configuration files; they can communicate with each other through well-defined channels.
Before getting too technical, the practical benefit to us as web developers is that Docker allows us to package up everything the website needs, all the PHP code along with the PHP executable, MySQL server and NGINX server in addition to the configuration files used by those programs.
All the website’s code, and the exact versions of the programs needed to run that code, are packaged together, effectively as a single application. This entire application can then be run on any operating system. When someone runs the packaged application, PHP, MySQL, NGINX and all the PHP files you wrote are all embedded in the application itself. Even better, the exact MySQL, NGINX and PHP versions are part of the package. When you run the application, the exact versions of these tools that the application was developed for are downloaded and installed.
“Isn’t that what a virtual machine already does?” I hear you ask. Yes it is, but there’s a big difference between the way Vagrant and Docker handle software installs.
With Vagrant, running a Virtual Machine, the complete operating system with a specific PHP version, MySQL version and (usually) server configuration is cloned from the real web server. When the server is updated, the virtual machine must also be updated.
When using Docker, however, the PHP/MySQL/NGINX version is provided as a single package known as an image, and the server can run as many different images as you like.
The benefit here is that the web server and your development machine are both running the exact same image. You just upload your image to the web server, run the entire application there and your website is up without needing any web server configuration at all.
Additionally, each image is entirely separate from other image on the server. Each image (one per website in this simplified example) is separate from each other. Each website will have its own NGINX configuration, its own php.ini and its own installs of PHP and MySQL. Each website can be running entirely different PHP versions. You can even have one website running on Apache and one website running on NGINX, on the same machine at the same time. Even when you’re running two different NGINX websites, you’ll have two different NGINX processes, with their own configurations, running at the same time.
This has a small memory overhead, but the flexibility it grants makes this a very worthwhile trade-off:
-
The entire website, with the required PHP/MySQL versions, all the configuration and all the code can be moved around with ease. Moving the website to a new server requires just copying a single folder. You don’t need to make any changes to the PHP or NGINX configuration on the new server. You don’t even need to install PHP or NGINX on the server itself. They’ll be automatically installed by Docker when you launch the application.
-
You can run the exact same image on your development machine. Using Vagrant, you’re effectively running a copy of the server’s configuration/installed packages on the same machine. With Docker, the same exact same image is run on your PC for development as is being run on the server.
-
php.initweaks,nginx.confconfiguration changes or updating PHP to the latest version is treated the same way as uploading updated PHP code to the server. You update the application, and it doesn’t matter whether that’s changing some PHP code or updatingphp.ini. -
Each image is self-contained in something called a “container”. A PHP script running in one image can’t access files running in another. Think
open_basedirbut much stricter. A container is like a very light-weight virtual machine. It acts like its own operating system and code running in a container doesn’t even know it’s being run inside one while not being able to see anything outside the container. If one of your PHP scripts is insecure and gives someone effective shell access, they can only access files on the server that you’ve given the container access to. -
Unlike a virtual machine, if two different websites are in completely different containers but use the same NGINX or PHP versions, disk space and RAM is shared between the two containers.
-
Because each image is self-contained, moving the website to a different server is easy. The application doesn’t rely on the server’s installed PHP version and it doesn’t care what packages are installed on the server. If you want to move a Dockerized application to a different server, it’s as simple as copying all the website files and launching the application.
-
You can run as many Docker images on the server as you like, each with their own PHP version, web server software, database and associated files.
Setting Things Up
That’s the theory out of the way. Now let’s jump in and create a server using Docker.
Prerequisites
Before we start, you’ll need to download and install Docker. Head over to the Docker website, then download and install it for your operating system.
If you’re on Linux, you should install the docker and docker-compose packages through your distribution’s package manager. Depending on your distribution, you may need to:
-
Add your user to the
dockergroup as outlined in the Docker manual here. -
Start the
dockerservicesystemctl start docker.serviceand enable it withsystemctl enable docker.
If you’re on Windows or macOS, the installer will do this for you.
Secondly, because we’re going to be running a web server inside Docker and forwarding some ports if you already have a web server (Apache, NGINX, XAMPP, IIS, etc.) or MySQL running on your machine, stop them before continuing.
Getting started
A web server usually consists of multiple different programs — such as NGINX, PHP and MySQL. In Docker’s terminology, each program you wish to install is a service.
There are several ways of creating these services in Docker. I’ll cover the most user friendly. Docker supports creating a configuration file using YAML (Yet Another Markup Language).
Although you can type in all the options on the command line, I recommend using the YAML configuration file for several reasons:
-
It’s a lot easier to read/understand.
-
You don’t have to re-type several long commands every time you want to run the server.
-
You can track changes to the file with Git.
docker-compose.yml for NGINX
Docker provides a tool called docker-compose that takes a configuration file called docker-compose.yml and launches the services listed inside it. Let’s start by adding a web server, NGINX.
Firstly, create a folder somewhere on your computer that will store your website. You’ll need to go back to this folder regularly so remember where it is. Create docker-compose.yml with the following contents:
version: '3'
services: web: image: nginx:latest ports: - "80:80"
Let’s take a look through the configuration one line at a time:
version: '3'
This tells docker-compose which version of the YAML specification to use. 3 is the latest, and different versions have a slightly different specification, keywords and structure.
The next line, services:, will be followed by a list of all the services you want to run.
In our example so far, there’s just one service called web (you can call this anything you like) using the official NGINX image nginx:latest. Note that the indentation using spaces (not tabs!) matters. YAML relies on the nesting level to determine the structure of the file.
If you wanted to specify a different NGINX version, you could specify that here like so:
version: '3'
services: web: image: nginx:1.18.0 ports: - "80:80"
I recommend using latest unless you have a good reason to use an earlier version.
The ports block sets up port forwarding. It forwards 80 on the local machine to 80 on the image. Any request on the host machine to http://127.0.0.1 will be forwarded to the NGINX server running in the container.
Running the Service
To start the server, you’ll need to open a terminal in your operating system and point it to the folder containing your docker-compose.yml file. On Windows 10, the simplest method is to use File Explorer (previously known as Windows Explorer and not to be confused with Internet Explorer). Navigate to the folder that contains your docker-compose.yml, then click File and then Open Windows Powershell. On Linux, most file managers have an Open Terminal Here or similar button. On macOS, you’ll need to enable this option first.
Once you have your terminal open at the correct location, type docker-compose up. You should see output similar to the image below.
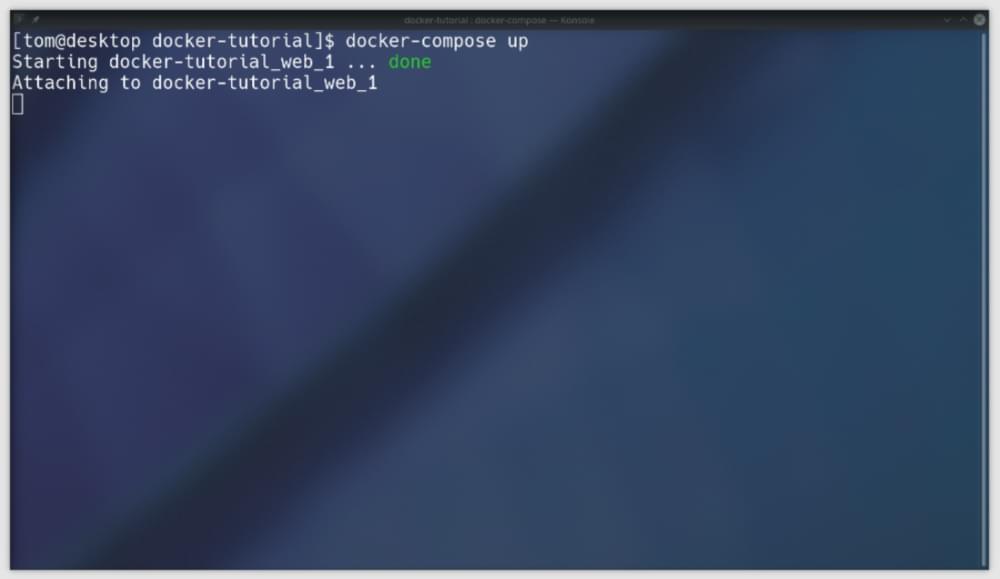
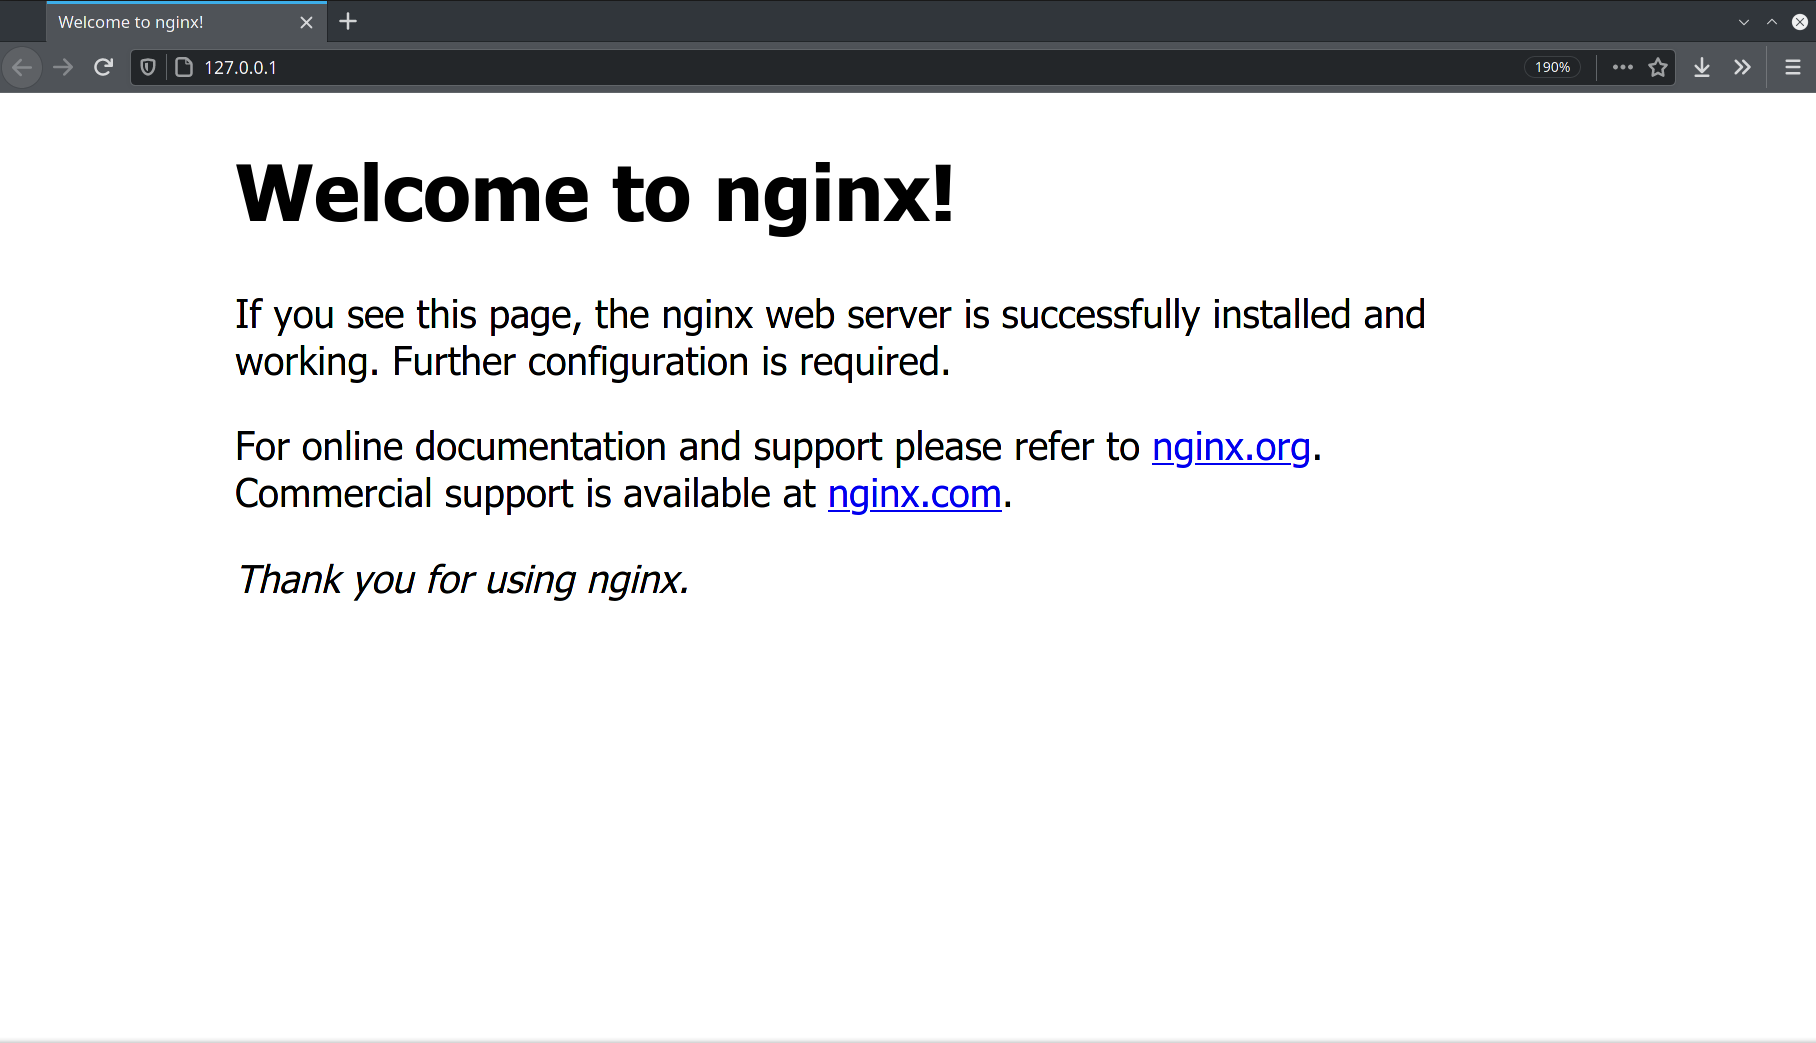
If you get any error messages, check that Docker is installed and running correctly. If you see output like above, you can connect to the server by visiting http://127.0.0.1 in your browser. If it’s working, you’ll see NGINX’s test page, as pictured below.
Why not Apache?
Before we continue, you might be wondering why I’m not using Apache here. If you’ve been using XAMPP or a similar package, the web server you’re using is Apache. The web server is the part of the server that listens to requests from a web browser and sends it files.
Apache is fine, and it works, but it’s been around forever. When Apache was created, the Web was a very different place. Apache is big, and there are lots of different features that have come and gone — but which Apache still supports. The web has changed a lot since Apache was created, and although it’s a capable server and will work fine, most websites these days tend to use NGINX. It’s easier to configure, more lightweight and better tuned for the kinds of tasks a lot of of modern websites make use of (such as video streaming) and as such its market share is growing rapidly at the expense of Apache’s.
My general advice is: if you already have a website running Apache, there’s no reason to go through the hassle of changing it, but if you’re starting a new project from scratch, use NGINX.
Putting files on the server
Now that the server is installed and running through Docker, we can make our files visible on the server. If you’re used to Apache, you’d put them in a httpdocs, htdocs or public folder somewhere on your computer.
As the server is running in a container, it doesn’t have access to any of the files on your computer. However, Docker allows you to specify a volume — a file or folder on your computer that’s shared with the container. You’ll need two volumes: the nginx.conf configuration file (which we haven’t created yet), and a folder that will store your website’s files. Amend your docker-compose.yml to include the two volumes:
version: '3'
services: web: image: nginx:latest ports: - "80:80" volumes: - ./nginx.conf:/etc/nginx/conf.d/nginx.conf - ./app:/app
This makes the file nginx.conf and app directory from the same folder as your docker-compose.yml available in the container. Any changes you make to files in the volumes are immediately changed in the container, and the files are shared between them.
The nginx.conf file from the host is placed at /etc/nginx/conf.d/nginx.conf inside the container. This is the folder where NGINX reads configuration files from. The app folder is created at the root of the container in /app and is where you’ll place all your website’s PHP scripts, images and JavaScript files.
Before restarting the server, create the file nginx.conf in the same directory as your docker-compose.yml with the following contents:
server { listen 80 default_server; root /app/public;
}
This tells NGINX that this is the configuration it should use for the default server and that it should serve files from the directory /app/public. We could just serve files from the /app directory, but it’s good practice to keep most PHP files out of the publicly accessible directory. As PHP scripts will need to load files using ../, we’ll put our public directory one level down.
To test it’s working, create a “Hello, World” page at app/public/index.html, creating the directories as you go. The contents can just be like so:
<h1>Hello, World!</h1>
Restart the server by going back into your terminal and pressing ctrl-c to stop the server, then run the command docker-compose up again to restart it. (You can press the up arrow and then Enter rather than re-typing it.)
Reload http://127.0.0.1 in your browser and you’ll see your Hello, World! test page. You now have a working web server with your files being served on http://127.0.0.1 from your app/public directory.
PHP
If you want to run PHP scripts, you’ll need to add another service for PHP in your docker-compose.yml and link it to nginx:
version: '3'
services: web: image: nginx:latest ports: - "80:80" volumes: - ./nginx.conf:/etc/nginx/conf.d/nginx.conf - ./app:/app php: image: php:fpm volumes: - ./app:/app
There’s a new service, php, which is using the image php:fpm-latest. For NGINX, you’ll need to use an fpm (FastCGI Process Manager) package, but you can choose any PHP version you like — such as php:7.4-fpm, php:7.3-fpm, php:8.0-fpm. If you don’t specify a version and use just php:fpm, it will use the latest version — which, at the time of writing, is 8.0.
Because PHP will need to access your .php files from the /app directory, you’ll need to mount the volume in the PHP image in the same way you did for the NGINX image. PHP doesn’t need access to the nginx.conf configuration file, so there’s no need to give it access to it.
The app folder is now accessible on the host machine, and in the nginx and php containers.
Before restarting the server with docker-compose up we need to configure NGINX to run .php files through the PHP service. Open up your nginx.conf and change it to the following:
server { listen 80 default_server; root /app/public; index index.php index.html index.htm; location ~ .php$ { fastcgi_pass php:9000; fastcgi_param SCRIPT_FILENAME $document_root$fastcgi_script_name; include fastcgi_params; }
}
The index line tells the server to look for index.php instead of index.html as the default page. The location block instructs NGINX to run any file with a .php extension through the PHP service (fastcgi_pass php:9000, where php is the name of the service configured in docker-compose.yml).
Create a phpinfo file at app/public/index.php:
<?php
phpinfo();
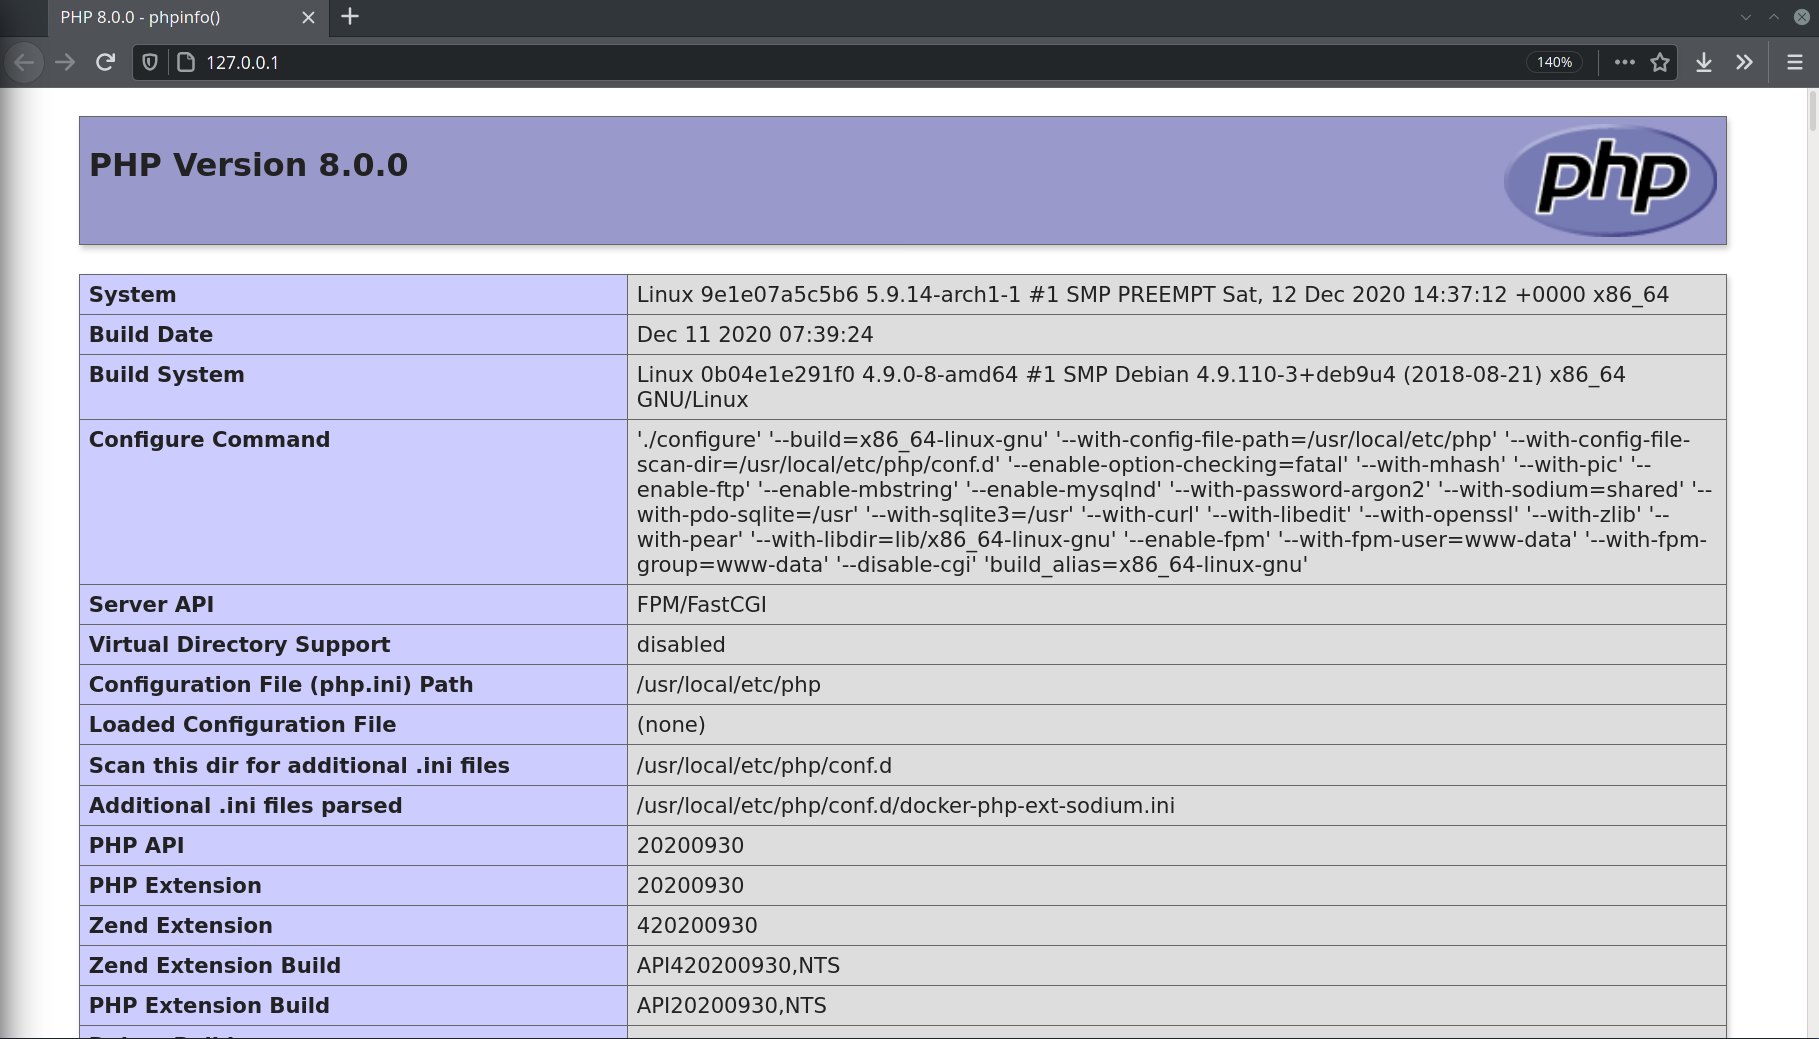
Restart the server by pressing ctrl-c in your terminal and re-run the docker-compose up command. If everything is set up correctly, when you visit http://127.0.0.1 you should see the phpinfo() output:
Assuming your website is using MySQL, if you look through the phpinfo() page you’ll notice that there’s no PHP MySQL driver installed. We’ll want to install the PDO package in PHP.
This is slightly more complicated, as we need to install the packages in the image. Luckily, the official PHP image contains a script for doing just that.
We’ll use the official php:fpm image as a base and install the PDO MySQL driver into it. This requires building our own image, but that’s not as hard as it sounds.
Firstly, amend your docker-compose.yml to instruct it to build an image for PHP rather than using the existing php:fpm image:
version: '3'
services: web: image: nginx:latest ports: - "80:80" volumes: - ./nginx.conf:/etc/nginx/conf.d/nginx.conf - ./app:/app php: build: context: . dockerfile: PHP.Dockerfile volumes: - ./app:/app
Rather than an image entry, there’s now a build line under php. The context directive is the folder that the configuration file is in, which in our case is ., the current directory (the same folder as our docker-compose.yml) and the dockerfile is the name of the file we’ll use to build our image.
Create PHP.Dockerfile in the same folder as your docker-compose.yml and add the following:
FROM php:fpm RUN docker-php-ext-install pdo pdo_mysql
This will install the pdo_mysql extension for PHP. The FROM directive tells Docker that it should use php:fpm as a base image and the RUN directive is used to run commands inside the image. You can run any Linux command here. In this case, we’re running the docker-php-ext-install script, which is conveniently provided as part of the official PHP package and allows us to install PHP extensions.
If you want to use the MySQLi library (though you probably should be using PDO), you can install that either instead of or alongside PDO:
FROM php:fpm RUN docker-php-ext-install mysqli
Restart your server with the docker-compose up command. This time, you’ll see a lot more output as it builds the image. It will only do this the first time you run docker-compose up. However, if you make any changes to the PHP.Dockerfile in future, you’ll need to manually rebuild it by running the command docker-compose build.
You can verify that the pdo_mysql extension has been installed by looking at the phpinfo() output on http://127.0.0.1.
While we’re installing extensions, let’s add the xdebug extension for nicer error messages on our development server:
FROM php:fpm RUN docker-php-ext-install pdo pdo_mysql RUN pecl install xdebug && docker-php-ext-enable xdebug
xdebug is installed through pecl, which is provided as part of the official PHP image. Rebuild the image with docker-compose build, then restart the server with docker-compose up. The output of phpinfo() should show that both pdo_mysql and xdebug are installed.
MySQL
We’re now ready to install MySQL. Once again, we’ll add it as a service in docker-compose.yml. However, instead of installing the official MySQL image, we’ll use MariaDB, a drop-in replacement with potentially better future licensing terms now that MySQL is owned by Oracle. If you’ve used MySQL before, MariaDB will work just the same:
version: '3'
services: web: image: nginx:latest ports: - "80:80" volumes: - ./nginx.conf:/etc/nginx/conf.d/nginx.conf - ./app:/app php: build: context: . dockerfile: PHP.Dockerfile volumes: - ./app:/app mysql: image: mariadb:latest environment: MYSQL_ROOT_PASSWORD: 'secret' MYSQL_USER: 'tutorial' MYSQL_PASSWORD: 'secret' MYSQL_DATABASE: 'tutorial' volumes: - mysqldata:/var/lib/mysql ports: - 3306:3306
volumes: mysqldata: {}
The image we’re using is mariadb:latest. As with NGINX and PHP, if you wish you can specify a particular version of MariaDB here.
This time there’s an environment block, which is used to pass some variables to the container when it’s created. These are used to configure the database with the following options. Set your own values for the following variables:
-
MYSQL_ROOT_PASSWORD: the root password for the database. You can use this to log in asrootand manage the database. -
MYSQL_USERandMYSQL_PASSWORD: the name and password for a MySQL user that gets created with limited permissions. You’ll want to use this from your PHP scripts. -
MYSQL_DATABASE: the name of a schema, which is automatically created, that the user defined above has access to.
The example above creates a database called tutorial, which can be access using the user tutorial and password secret.
You’ll also notice that there’s a volumes entry at the bottom. This creates a special type of volume which isn’t mapped to the local filesystem. This will be where the data for MySQL is stored — all your tables, records etc.
The reason we don’t want to use a folder in the local file system is that when the application is uploaded to a real web server, you don’t want to overwrite the real database with your test one. All your test/development environment records will be stored in here. This allows you to have a different database on the live server and development server when you come to uploading your website.
Finally, the ports block exposes port 3306 so we can connect to it with a client such as MySQL Workbench for managing the database. I strongly recommend using this over PHPMyAdmin if that’s what you’re used to, although you can place PHPMyAdmin in the app/public folder and run it from there if you wish.
Restart your server. It will take a minute or two to download and configure MariaDB the first time. Then, in a PHP script, try connecting to MySQL with PDO and your chosen username, password and database name:
<?php
$pdo = new PDO('mysql:dbname=tutorial;host=mysql', 'tutorial', 'secret', [PDO::ATTR_ERRMODE => PDO::ERRMODE_EXCEPTION]); $query = $pdo->query('SHOW VARIABLES like "version"'); $row = $query->fetch(); echo 'MySQL version:' . $row['Value'];
Run this script on the server. If you see the MySQL version and no error messages, you’re connected to your MySQL server and it’s all set up correctly.
Done!
As you just discovered, Docker takes a little setting up if you’re doing it yourself. If you use an existing docker-compose.yml and configuration files it can be just a couple of commands.
When you make your website live, you’ll just upload the entire project, including docker-compose.yml, nginx.conf and PHP.Dockerfile, run docker-compose up -d on the server (the -d flag runs it as service in the background) and it will be running the exact same website you’re seeing on your development machine! You won’t need to manually set up and install PHP, MariaDB and NGINX on the web server.
Once you get the hang of it, you’ll never look back. Docker makes the process of developing a website a lot simpler because everything is self contained.
TL;DR! Just Give Me the Files!
If you just want to boot a server with the configuration shown here, follow these steps:
- Install Docker.
- Open a terminal in the folder you want to store your website in (use File > Open Powershell on windows to open PowerShell in the currently opened folder).
- Run the command
docker run -v ${PWD}:/git alpine/git clone git@github.com:sitepoint-editors/sitepoint-docker-tutorial.git .(that final dot is important!). - Run
docker-compose up. - Navigate to http://127.0.0.1.
- Create your PHP scripts and files in
app/public.