In this article, I describe how I developed a JavaScript “Wheel of Fortune” game to make online meetings via Zoom a little more fun during the global pandemic.
The current pandemic has forced many social activities to go virtual. Our local Esperanto group, for example, now meets online (instead of in person) for our monthly language study meetups. And as the group’s organizer, I’ve had to to re-think many of our activities because of the coronavirus. Previously, I could add watching a film, or even a stroll through the park, to our mix of activities in an effort to avoid fatigue (constant grammar drills don’t encourage repeat attendance).
Our new Wheel of Fortune game was well received. Of course, SitePoint is a tech blog, so I’ll be presenting an overview of what went into building a rudimentary version of the game to screenshare in our online meetings. I’ll discuss some of the trade-offs I made along the way, as well as highlight some possibilities for improvement and things I should have done differently in hindsight.
First Things First
If you’re from the United States, you’re probably already familiar with Wheel of Fortune, as it’s the longest-running American game show in history. (Even if you’re not in the United States, you’re probably familiar with some variant of the show, as it’s been adapted and aired in over 40 international markets.) The game is essentially Hangman: contestants try to solve a hidden word or phrase by guessing its letters. Prize amounts for each correct letter is determined by spinning a large roulette-style wheel bearing dollar amounts — and the dreaded Bankrupt spots. A contestant spins the wheel, guesses a letter, and any instances of said letter in the puzzle are revealed. Correct guesses earn the contestant another chance to spin and guess, while incorrect guesses advance game play to the next contestant. The puzzle is solved when a contestant successfully guesses the word or phrase. The rules and various elements of the game have been tweaked over the years, and you can certainly adapt your own version to the needs of your players.
For me, the first order of business was to decide how we physically (virtually) would play the game. I only needed the game for one or two meetings, and I wasn’t willing to invest a lot of time building a full-fledged gaming platform, so building the app as a web page that I could load locally and screenshare with others was fine. I would emcee the activity and drive the gameplay with various keystrokes based on what the players wanted. I also decided to keep score using pencil and paper —something I’d later regret. But in the end, plain ol’ JavaScript, a little bit of canvas, and a handful of images and sound effect files was all I needed to build the game.
The Game Loop and Game State
Although I was envisioning this as a “quick and dirty” project rather than some brilliantly coded masterpiece following every known best practice, my first thought was still to start building a game loop. Generally speaking, gaming code is a state machine that maintains variables and such, representing the current state of the game with some extra code bolted on to handle user input, manage/update the state, and render the state with pretty graphics and sound effects. Code known as the game loop repeatedly executes, triggering the input checks, state updates, and rendering. If you’re going to build a game properly, you’ll most likely be following this pattern. But I soon realized I didn’t need constant state monitoring/updating/rendering, and so I forwent the game loop in favor of basic event handling.
In terms of maintaining state, the code needed to know the current puzzle, which letters have been guessed already, and which view to display (either the puzzle board or the spinning wheel). Those would be globally available to any callback logic. Any activities within the game would be triggered when handling a keypress.
Here’s what the core code started to look like:
(function (appId) { // canvas context const canvas = document.getElementById(appId); const ctx = canvas.getContext('2d'); // state vars let puzzles = []; let currentPuzzle = -1; let guessedLetters = []; let isSpinning = false; // play game window.addEventListener('keypress', (evt) => { //... respond to inputs }); })('app'); The Game Board and Puzzles
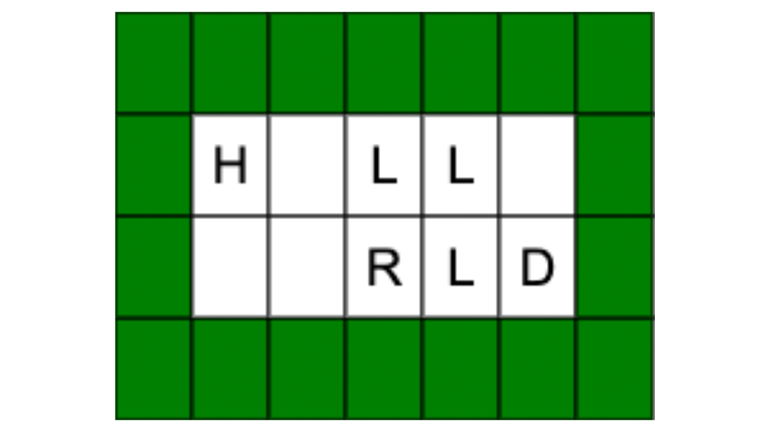
Wheel of Fortune’s game board is essentially a grid, with each cell in one of three states:
- empty: empty cells aren’t used in the puzzle (green)
- blank: the cell represents a hidden letter in the puzzle (white)
- visible: the cell reveals a letter in the puzzle
One approach to writing the game would be to use an array representing the game board, with each element as a cell in one of those states, and rendering that array could be accomplished several different ways. Here’s one example:
let puzzle = [...'########HELLO##WORLD########']; const cols = 7; const width = 30; const height = 35; puzzle.forEach((letter, index) => { // calculate position let x = width * (index % cols); let y = height * Math.floor(index / cols); // fill ctx.fillStyle = (letter === '#') ? 'green' : 'white'; ctx.fillRect(x, y, width, height); // stroke ctx.strokeStyle = 'black'; ctx.strokeRect(x, y, width, height); // reveal letter if (guessedLetters.includes(letter)) { ctx.fillStyle = 'black'; ctx.fillText(letter, x + (width / 2), y + (height / 2)); } }); This approach iterates through each letter in a puzzle, calculating the starting coordinates, drawing a rectangle for the current cell based on the index and other details — such as the number of columns in a row and the width and height of each cell. It checks the character and colors the cell accordingly, assuming # is used to denote an empty cell and a letter denotes a blank. Guessed letters are then drawn on the cell to reveal them.
Another approach would be to prepare a static image of the board for each puzzle beforehand, which would be drawn to the canvas. This approach can add a fair amount of effort to puzzle preparation, as you’ll need to create additional images, possibly determine the position of each letter to draw on the custom board, and encode all of that information into a data structure suitable for rendering. The trade-off would be better-looking graphics and perhaps better letter positioning.
This is what a puzzle might look like following this second approach:
let puzzle = { background: 'img/puzzle-01.png', letters: [ {chr: 'H', x: 45, y: 60}, {chr: 'E', x: 75, y: 60}, {chr: 'L', x: 105, y: 60}, {chr: 'L', x: 135, y: 60}, {chr: 'O', x: 165, y: 60}, {chr: 'W', x: 45, y: 100}, {chr: 'O', x: 75, y: 100}, {chr: 'R', x: 105, y: 100}, {chr: 'L', x: 135, y: 100}, {chr: 'D', x: 165, y: 100} ] }; For the sake of efficiency, I’d recommend including another array to track matching letters. With only the guessedLetters array available, you’d need to scan the puzzle’s letters repeatedly for multiple matches. Instead, you can set up an array to track the solved letters and just copy the matching definitions to it when the player makes their guess, like so:
const solvedLetters = []; puzzle.letters.forEach((letter) => { if (letter.chr === evt.key) { solvedLetters.push(letter); } }); Rendering this puzzle then looks like this:
// draw background const imgPuzzle = new Image(); imgPuzzle.onload = function () { ctx.drawImage(this, 0, 0); }; imgPuzzle.src = puzzle.background; // reveal letters solvedLetters.forEach((letter) => { ctx.fillText(letter.chr, letter.x, letter.y); }); 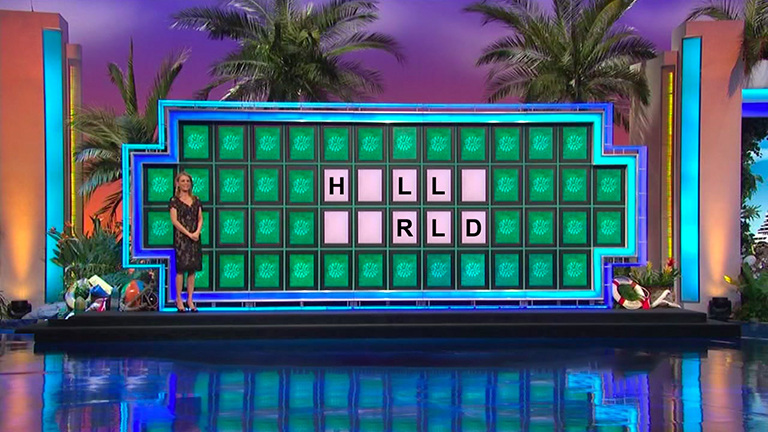
For the record, I took the second approach when writing my game. But the important takeaway here is that there are often multiple solutions to the same problem. Each solution comes with its own pros and cons, and deciding on a particular solution will inevitably affect the design of your program.
Continue reading How I Built a Wheel of Fortune JavaScript Game for My Zoom Group on SitePoint.