Images have become extremely important to the effectiveness of websites. They speak a 1000 words, attract attention, and stimulate emotions.
However, web performance is also a growing problem for most websites. And images are at the heart of many web performance issues. According to HTTP Archive, images are at least 50% of total website payloads.

If you have ever tried to lower the size of the images, then you know how painful the process is. Poorly optimized images can end up blurry or pixelated.
Thankfully, today we have a large number of external services just for this purpose. We will talk about the ImageEngine image CDN and how to implement it using Vue.js. But first, let’s learn about CDNs and ImageEngine.
What is an Image CDN?
Table of Contents
A content delivery network (CDN) is a global network of servers that optimizes web performance by using the node closest to the user for faster delivery of assets. An Image CDN adds real-time image optimization prior to delivering images from the CDN. An Image CDN decreases image payload, and instantly sends images from the edge of the network. The result is faster page loading that drives higher SEO ranking and better user experience.
What is ImageEngine?
ImageEngine is an image CDN with automatic, real-time image optimization. What makes ImageEngine stand out from the crowd is the way ImageEngine analyses the request to dynamically provide a visually high-quality image at the lowest possible byte size based on the device or browser’s capabilities. ImageEngine is the only image CDN utilizing mobile device detection to specifically optimize images according to the requesting device or browsers capabilities.
With ImageEngine, You don’t need to worry about URL parameters with quirky syntax or JavaScript libraries. Instead, you can just prefix the image URL with an ImageEngine Delivery Address, and the service will automatically detect the mobile device, optimize the image appropriately, and deliver the most efficient image with good quality possible.
We will show you how to use ImageEngine CDN inside our Vue.js application to deliver optimized images. What’s great is that you don’t need to re-upload images to use the service. You only need to point ImageEngine service at the existing storage location of images (or, as ImageEngine calls this an “Origin”).
Integrating ImageEngine Into Your Website for Better Web Performance
If you’d like to follow along, sign up for a free trial account before moving on. After signing up for a trial account, you’ll get access to a control panel where you can further configure ImageEngine for your website or app.
I’ve built a demo app to demonstrate how effortless the integration is at the app level. It takes only a few easy steps to get rolling.
Step 1 – Point ImageEngine at Original Images
Before we get into the code, you will need to point ImageEngine’s “Engine” at the host where the images are stored. This can be your website, Amazon S3, or Google Cloud Storage.
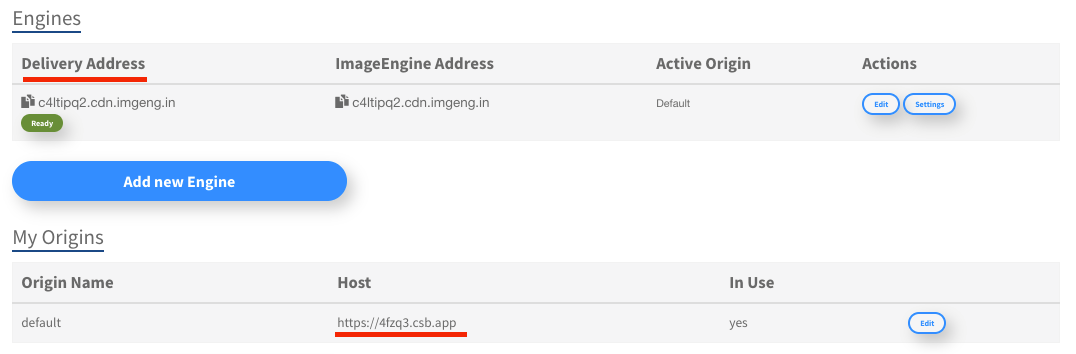
As you can see in the above screenshot of the Dashboard configuration. We added the origin (named “default”) with host pointing to our demo sandbox Vue application https://4fzq3.csb.app/
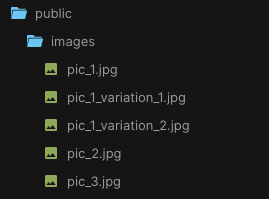
We don’t need to re-upload images to the CDN or anywhere else. If you take a look at the demo project’s structure, you’ll see that all the pictures sit inside the public/images folder:
ImageEngine will automatically take these pictures in the public/images folder, optimize them, and serve the optimized images from its own CDN. And with the Vue component we will show you, we don’t need to change URLs inside our code either.
Step 2 – Proxy Image Requests inside Vue application
Let’s start with Vue.js implementation. You have two implementation options. Both involve adding the Delivery Address ImageEngine provided. Your Delivery Address should end in .imgeng.in, so have it copied and ready for use.
Once you have your Delivery Address we can proceed with code implementation. Our Example Delivery Address is https://c4ltipq2.cdn.imgeng.in/
Option 1: Prefix Image Tags
To send image requests to ImageEngine, you will need to prepend the existing image src path with the new Delivery Address found in your account’s dashboard.
<img :src="imgengHostConst + '/images/pic_2.jpg'" />Option 2: Use ImageEngine Vue Component (Recommended)
We need to install the npm package @imageengine/vue and add it as a dependency.
In the terminal, write:
npm i @imageengine/vueYou have everything set, we are ready to do some coding.
You will need to import the ImageEngineProvider component from the npm package and pass the Delivery Address as the property deliveryAddress, and wrap it around your application or image components.
<ImageEngineProvider deliveryAddress="https://c4ltipq2.cdn.imgeng.in/"> …APP…
</ImageEngineProvider>
Replace all HTML image elements with ImageComponent components.
For example:
<img src="/images/pic_2.jpg"/> <!-- Changes to -->
<ImageComponent src="/images/pic_2.jpg" />
The image component requires only the src property to be passed in. Optionally, you can pass the srcSet and directives properties which give you more control of your image optimization. Using directives, you can set output format, width, height, compression and more.
After using the ImageEngineProvider component, your images are optimized and delivered through the ImageEngine CDN.
You can see all image directives, properties and formats that you can pass that impact compression and optimization on the npm package documentation page.
Below is a table that shows the image format conversion and image payload reduction that ImageEngine provided for our sample app
| Image Name | Original Format | Format With ImageEngine | Original Size | Size after ImageEngine | Payload Reduction |
|---|---|---|---|---|---|
| pic_2.jpg | JPEG | WebP | 4.8 MB | 570 kB | 88% |
| pic_2.jpg | JPEG | WebP | 3.3 MB | 141 kB | 96% |
| pic_1_variation_1.jpg | JPEG | WebP | 2.8 MB | 72 kB | 97% |
Step 3 (optional). Best Practices And Customization
To get the most out of ImageEngine, consider going through their list of best practices. In case you need to tweak your images (resizing, cropping, etc.), ImageEngine lets you apply manipulations via directives.
Code example using directives:
<ImageComponent src="images/pic_2.jpg" :directives="{ outputFormat: 'webp', rotate: 45 }"
/>
Using directives attributes, we specified an outputFormat of WebP and rotated the image 45 degrees. You can combine directives, use when you need, and where you need. It is fully dynamic.
In most cases, ImageEngine’s automatic default settings generate impressive results, so directives are usually not needed except for some customized requirements.
Conclusion
When you look at the effort invested vs. the web performance gains, ImageEngine is one of the few examples where the quality of service really gets what you want. You no longer need to worry about image size, format, resolution, etc… We made a separate package for Vue.js developers because we know how important it is to have good CDN support for the Vue.js framework. You can start using our service inside Vue.js applications in just a few steps.
Give your web/app visitors the best experience they deserve.