No matter what stage you’re at as a developer, the tasks we complete—whether big or small—make a huge impact in our personal and professional growth. Unfortunately, those tasks aren’t always recognized because they can easily get lost in the sea of other things that need to get done.
The unnoticed tasks we do fall under what is known as “invisible work,” a concept I stumbled across from a talk titled “Getting Credit for Invisible Work” by Ryan T. Harter. This type of work seeps into the cracks because our brains are not wired to remember things. Yet come review time, we find ourselves repeatedly stuck when trying to recall what we did over the past 6 or 12 months.
To solve this long-established problem, Julia Evans wrote an article suggesting that we keep our own “brag document.” A brag document is exactly what it sounds like. It’s a document where you give yourself permission to brag about all the valuable work you did. Whether it be:
- How you contributed to a project
- Helping others
- Improving existing processes
- Giving talks or running workshops
- What you learned
- Extra-curricular activities (e.g. blogging, talks, personal projects)
- Awards and career progression
There is no one way to write a brag document, but that didn’t stop Jonny Burch and the team at Progression from building bragdocs.com.
Using their site to build one is a great idea, but what better way to brag about your work than to create your own brag document from scratch?
Today I want to show you how I re-created bragdocs.com using the static site generator Eleventy. With a little bit of JavaScript and CSS, you can get your own up and running!
What are we going to build?
Table of Contents
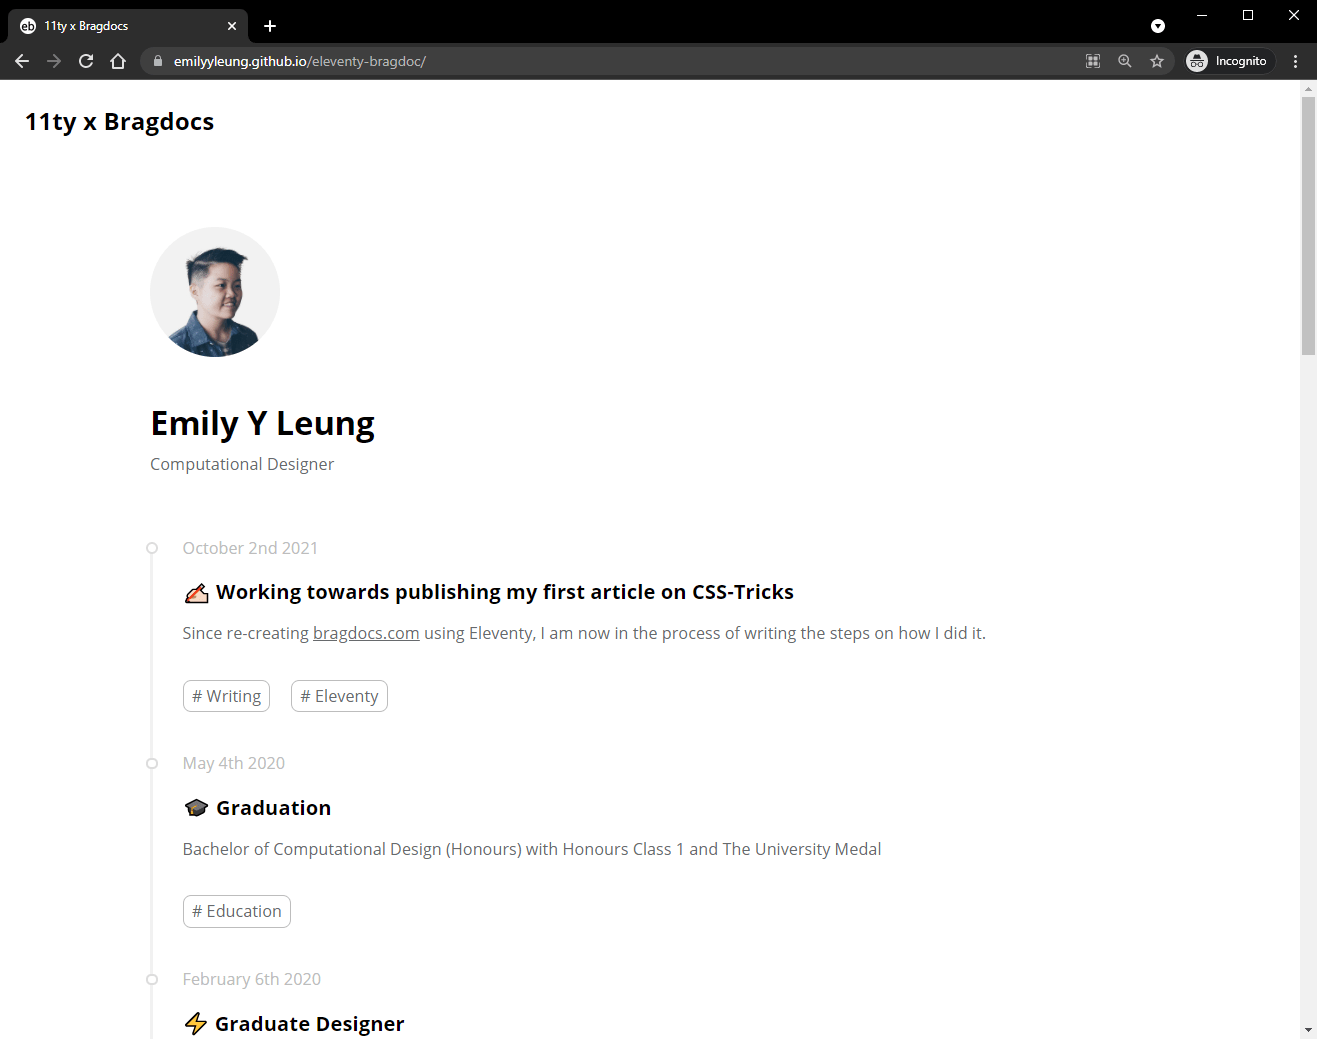
Below is the end result of following this tutorial. You can find the live demo here. It imitates bragdocs.com as a starting point for you to create one from scratch and make it your own.

Requirements
- Installing packages in Node.js (version 10 or higher)
- General understanding of HTML and CSS
- Markdown, Nunjucks templating, and JavaScript (all are optional, but helpful)
- Basic programming concepts, including
ifstatements, loops, and accessing variables in JSON
What is Eleventy?
Eleventy is a static site generator. This means that rather than building a full-stack website (front-end and back-end), you have flexibility to write content in any of the following templating languages accepted by Eleventy: HTML, Markdown, Liquid, Nunjucks, Mustache, etc. The content is then processed (using custom templates if you like) to generate static HTML pages, ready for hosting as a fully functioning site.
Setting up our “Hello, World!” Eleventy project
In this tutorial, the repository I’ll be referring to is eleventy-bragdoc, and the final product we’re working towards will be referred to as a “bragdoc.”
With a GitHub repository created with a README.md and .gitignore file for Node, I started setting up an Eleventy project.
Creating a new project
Inside eleventy-bragdoc, I began with the following files:
eleventy-bragdoc
├── README.md
└── .gitignore // .gitignore for node
With the terminal navigated inside of eleventy-bragdoc, I initialized the project by running the following command:
npm init -yThis created a package.json file for my node packages.
eleventy-bragdoc
├── package.json // new file
├── README.md
└── .gitignore
Next, I installed Eleventy.
npm install @11ty/eleventyThis gave me the following list of files and folders:
eleventy-bragdoc
├── node_modules // new folder
├── package.json
├── package-lock.json // new file
├── README.md
└── .gitignore
Configuring the Eleventy project
With Eleventy installed, I updated the scripts in the package.json file to include the following commands:
- The
startcommand serves the project during development which runs Browsersync for hot reload. - The
buildcommand creates production ready HTML files so that it can be hosted onto a server.
{ // ... "scripts": { "start": "eleventy --serve", "build": "eleventy" }, // ...
}
Next, I created the required configuration file called .eleventy.js to specify the custom input and output directories.
eleventy-bragdoc
├── .eleventy.js // new file
├── node_modules
├── package.json
├── package-lock.json
├── README.md
└── .gitignore
Inside .eleventy.js, I told Eleventy that it’s going to reference what’s inside of the src folder to build the HTML files. The output is then stored inside a folder called public:
module.exports = function(eleventyConfig) { return { dir: { input: "src", output: "public" } }
}
Creating front-facing content
To make my first page, I created the src folder that I declared as the input directory in .eleventy.js . Inside it, I added my first page, a Markdown file called index.md
Eleventy works with many templating languages that you can mix and match: HTML, Markdown, Liquid, Nunjucks, JavaScript, Handlebars, Mustache, EJS, Haml, Pug.
eleventy-bragdoc
├── src
│ └── index.md // new file
├── .eleventy.js
├── node_modules
├── package.json
├── package-lock.json
├── README.md
└── .gitignore
In Eleventy, any key value pairs written between the dashes (---) above and below is considered front matter.
In index.md , I included a title property with the value “11ty x Bragdocs” and some test content underneath the front matter.
---
title: "11ty x Bragdocs"
--- This is the home page.
Building templates
Next, I created a folder which Eleventy expects, called _includes inside of src. This is where the templates, or what Eleventy refers to as layouts, must live. Within that folder, I created a subfolder called layouts for my first template, base.njk
The .njk filetype refers to the templating language Nunjucks.
eleventy-bragdoc
├── src
│ ├── _includes // new folder
│ │ └── layouts // new folder
│ │ └── base.njk // new file
│ └── index.md
├── .eleventy.js
├── node_modules
├── package.json
├── package-lock.json
├── README.md
└── .gitignore
I added an HTML5 boilerplate inside base.njk:
<!DOCTYPE html>
<html lang="en">
<head> <meta charset="UTF-8"> <meta name="viewport" content="width=device-width, initial-scale=1.0"> <title>Document</title>
</head>
<body> </body>
</html>
Creating pages with templates and front matter
In base.njk , between the <title> tags, I wanted to pull in the title property defined in the front matter of index.md, so I used double curly braces, i.e. {{title}}, to access this variable. Similarly, in the body, I added <h1> tags and set it with the same title property.
Next, I brought in the rest of the body content from index.md using the content property. Using the provided safe filter, I told Eleventy to render instead of escape any HTML that lives inside the content of the Markdown file.
<!DOCTYPE html>
<html lang="en">
<head> <meta charset="UTF-8"> <meta name="viewport" content="width=device-width, initial-scale=1.0"> <title>{{ title }}</title>
</head>
<body> <h1>{{ title }}</h1> {{ content | safe }}
</body>
</html>
I then jumped back to index.md and added a layout property to the front matter and referenced base.njk
---
title: "11ty x Bragdocs"
layout: "layouts/base.njk"
--- This is the home page.
To give you an idea of what happens when we run the build, the template specified in the layout front matter property is used to wrap the Markdown content. In this example, the compiled HTML will look like what is shown below:
<!DOCTYPE html>
<html lang="en">
<head> <meta charset="UTF-8"> <meta name="viewport" content="width=device-width, initial-scale=1.0"> <title>11ty x Bragdocs</title>
</head>
<body> <h1>11ty x Bragdocs</h1> <p>This is the home page.</p>
</body>
</html>
Connecting CSS and image folders in build
While this part might not be necessary for all Eleventy projects, CSS and self-hosted images are always good features to add. So, I created two folders in the src directory: css and images.
eleventy-bragdoc
├── src
│ ├── css // new folder
│ ├── images // new folder
│ ├── _includes
│ │ └── layouts
│ │ └── base.njk
│ └── index.md
├── .eleventy.js
├── node_modules
├── package.json
├── package-lock.json
├── README.md
└── .gitignore
Then, in .eleventy.js, since I wanted the content inside these folders to be accessible when hosted, I referenced these folders by adding the following configurations:
addWatchTargettells Eleventy that it should recompile when we make a change to a file in this directory (e.g.styles.cssin thecssfolder).addPassthroughCopytells Eleventy that once the files are compiled, to take the contents of the directory and pass it through to thepublicdirectory.
You can read more about how passthrough file copy works in the documentation.
Since I was using the Nunjucks templating system, I added the markdownTemplateEngine property and set it to njk to make sure that it knows to go through Nunjucks first before anything else.
module.exports = function(eleventyConfig) { eleventyConfig.addWatchTarget("./src/css/") eleventyConfig.addWatchTarget("./src/images/") eleventyConfig.addPassthroughCopy("./src/css/") eleventyConfig.addPassthroughCopy("./src/images/") return { dir: { input: "src", output: "public" }, markdownTemplateEngine: "njk" }
}
Then I created a styles.css file in the css folder and gave it something to test with to make sure it worked.
* { color: teal;
}
Since I already configured the css and images folders in .eleventy.js, I was able to reference these files using Eleventy’s URL filter.
To access these self-hosted files I used Eleventy’s URL filters in the href and src property of the css and image tags, respectively.
<!DOCTYPE html>
<html lang="en">
<head> <meta charset="UTF-8"> <meta name="viewport" content="width=device-width, initial-scale=1.0"> <title>{{ title }}</title> <link rel="stylesheet" href="{{ '/css/styles.css' | url }}"> </head>
<body> <h1>{{ title }}</h1> <img src="{{ '/images/test_image.jpg' | url }}"> {{ content | safe }}
</body>
</html>
Now I was ready to serve my Eleventy project.
Serving Eleventy in development
Since I had already defined the custom development scripts in package.json, I was able to run the following command:
npm startThis compiled index.md in the src directory and generated a HTML file in the public folder. Additionally, it launched a hot reload server through Browsersync where I could see the result at http://localhost:8080/

With Eleventy running in development, I could start building the rest of the bragdoc.
Building the bragdoc system
With a base Eleventy project in a folder structure similar to what’s shown below, I began building out my bragdoc.
eleventy-bragdoc
├── src
│ ├── css
│ │ └── styles.css
│ ├── images
│ │ └── test_image.jpg
│ ├── _includes
│ │ └── layouts
│ │ └── base.njk
│ └── index.md
├── .eleventy.js
├── node_modules
├── package.json
├── package-lock.json
├── README.md
└── .gitignore
Creating a collection for bragdoc entries
Eleventy has the ability to create collections that group similar content together. Therefore, I created a folder called posts for my bragdoc entries. Inside that folder, I created multiple Markdown files to represent each entry.
The filenames post-1.md, post-2.md, post-3.md don’t affect anything that is rendered on the webpage
eleventy-bragdoc
├── src
│ ├── posts
│ │ ├── post-1.md // new file
│ │ ├── post-2.md // new file
│ │ └── post-3.md // new file
│ ├── css
│ │ └── styles.css
│ ├── images
│ │ └── test_image.jpg
│ ├── _includes
│ │ └── layouts
│ │ └── base.njk
│ └── index.md
├── .eleventy.js
├── node_modules
├── package.json
├── package-lock.json
├── README.md
└── .gitignore
The custom properties that I thought would be useful to include:
- Title
- Date (by default, posts are sorted chronologically)
- Categories (a list of values to organize entries)
- Public / Private (a boolean value—true or false—to determine whether you want to show it on the bragdoc )
- Icon (a Notion-inspired design element to visually organize entries)
I decided that the description for each entry would be the body content of the Markdown file, as this would give me freedom to add paragraphs, images, code blocks, etc. Additionally, I was not limited to Markdown elements as I could also include HTML and style it using CSS.
Below is an example of a bragdoc entry in a Markdown file:
---
title: Build my own Bragdoc using Eleventy
date: 2021-09-19
categories: - Learning - Eleventy
public: True
icon: ????
--- I learned how to use Eleventy to build my own bragdoc!
Some things to note:
- Links written in Markdown by default do not open in a new blank window. So after some research, I stumbled upon a snippet by Mark Thomas Miller, which I added just before the closing
<body>tag inbase.njk. This might not be your thing (it’s definitely not Chris’ thing) but just in case you need it:
<script>
// Making all external links open in new tabs
// Snippet by Mark Thomas Miller (function () { const links = document.querySelectorAll("a[href^='https://'], a[href^='http://']") const host = window.location.hostname const isInternalLink = link => new URL(link).hostname === host links.forEach(link => { if (isInternalLink(link)) return link.setAttribute("target", "_blank") link.setAttribute("rel", "noopener") })
})()
</script>- The
datefront matter property must be written inYYYY-MM-DDformat. - You can assign as many custom front matter properties as you’d like. Just make sure that if you plan on accessing the property in the template, that the property exists in all of the Markdown files using the same template; otherwise it may break the build.
- Lists in front matter can be written in multiple ways (e.g. an array or single line).
Assigning front matter properties to a collection
Instead of repeatedly assigning front matter properties with the same value in each Markdown file, I created a data directory JSON file to assign the same key-value pair only once across a collection.
To create a data directory file, it must have the same name as the collection, i.e. posts.json. Additionally, the file must also be placed inside the collection folder, i.e. the posts folder.
eleventy-bragdoc
├── src
│ ├── posts
│ │ ├── posts.json // new file
│ │ ├── post-1.md
│ │ ├── post-2.md
│ │ └── post-3.md
│ ├── css
│ │ └── styles.css
│ ├── images
│ │ └── test_image.jpg
│ ├── _includes
│ │ └── layouts
│ │ └── base.njk
│ └── index.md
├── .eleventy.js
├── node_modules
├── package.json
├── package-lock.json
├── README.md
└── .gitignore
At this point, the posts for the bragdoc had not been defined as a collection yet. To do this, I added the tags property in posts.json. Here I assigned the value “posts” to that property so that I could access the collection by calling collections.posts
And since I didn’t need each post to have its own page, i.e. http://localhost:8080/posts/post-1/, I switched off it’s auto-generated permalink.
{ "tags": "posts", "permalink": false
}
Listing bragdoc entries
Simply put, the bragdoc is a page made up of the entries in the posts collection. To access the front matter properties and body content of the Markdown files, the entries are looped through via Nunjucks.
To do this, I went back to index.md and changed the filetype from Markdown to Nunjucks, i.e. index.njk
eleventy-bragdoc
├── src
│ ├── posts
│ │ ├── posts.json
│ │ ├── post-1.md
│ │ ├── post-2.md
│ │ └── post-3.md
│ ├── css
│ │ └── styles.css
│ ├── images
│ │ └── test_image.jpg
│ ├── _includes
│ │ └── layouts
│ │ └── base.njk
│ └── index.njk // changed filetype
├── .eleventy.js
├── node_modules
├── package.json
├── package-lock.json
├── README.md
└── .gitignore
Next, I replaced the content of index.njk with a Nunjucks for loop.
A Nunjucks function (for loop, if statement, etc.) must include start and end tags.
Since the order of posts by default was in chronological order (oldest first), I added the reverse filter to show the most recent at the top.
To access front matter and render it in HTML (such as the date and title of a post), I had to go through another “data” layer. Accessing properties in front matter requires double curly braces.
---
title: "11ty x Bragdocs"
layout: "layouts/base.njk"
--- {% for post in collections.posts | reverse %} <p> {{ post.data.date }} - {{ post.data.title }} </p>
{% endfor %}
Filtering bragdoc entries
To filter certain entries, I used the front matter data to check if the public property was set to True. If the property was set to False, the entry did not appear in the bragdoc.
Similarly, when accessing front matter properties, such as public through a Nunjucks function, I again needed to go through another “data” layer.
---
title: "11ty x Bragdocs"
layout: "layouts/base.njk"
--- {% for post in collections.posts | reverse %} {% if post.data.public %} <p> {{ post.data.date }} - {{ post.data.title }} </p> {% endif %}
{% endfor %}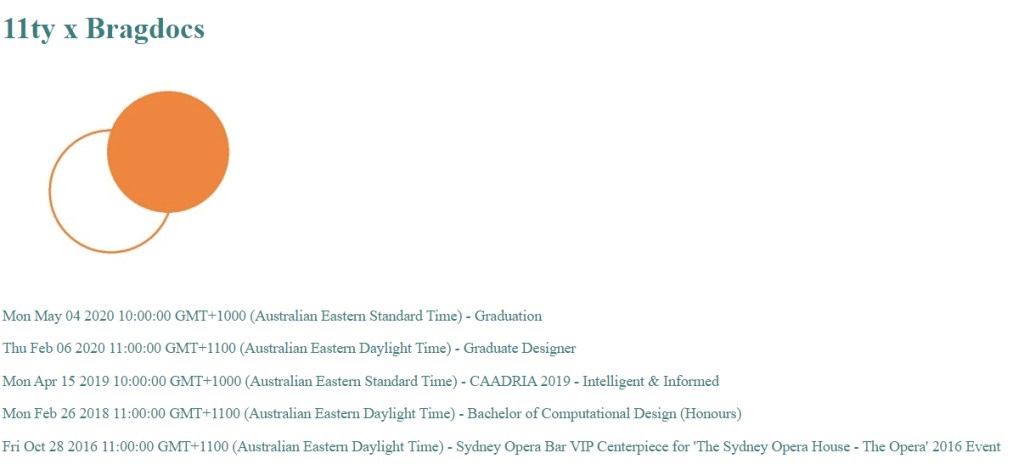
Adding custom data filters
By default, the date property renders something that we’re generally unfamiliar with. So, after some research, I found a custom filter written by Phil Hawksworth. To use the filter, I created a file called dates.js and placed it in a new folder called _filters
eleventy-bragdoc
├── src
│ ├── _filters // new folder
│ │ └── dates.js // new file
│ ├── posts
│ │ ├── posts.json
│ │ ├── post-1.md
│ │ ├── post-2.md
│ │ └── post-3.md
│ ├── css
│ │ └── styles.css
│ ├── images
│ │ └── test_image.jpg
│ ├── _includes
│ │ └── layouts
│ │ └── base.njk
│ └── index.njk
├── .eleventy.js
├── node_modules
├── package.json
├── package-lock.json
├── README.md
└── .gitignore
Then, inside dates.js, I added the following:
/*
A date formatter filter for Nunjucks Written by Phil Hawksworth
*/
module.exports = function(date, part) { var d = new Date(date); if(part == 'year') { return d.getUTCFullYear(); } var month = [ "January", "February", "March", "April", "May", "June", "July", "August", "September", "October", "November", "December" ]; var ordinal = { 1 : "st", 2 : "nd", 3 : "rd", 21 : "st", 22 : "nd", 23 : "rd", 31 : "st" }; return month[d.getMonth()] + " " + d.getDate() + (ordinal[d.getDate()] || "th") + " " +d.getUTCFullYear();
}
To access the date filter in the project, I added a new filter in .eleventy.js where I can call it using the custom name dateDisplay
module.exports = function (eleventyConfig) { // Add filter eleventyConfig.addFilter("dateDisplay", require("./src/_filters/dates.js") ); eleventyConfig.addPassthroughCopy("./src/css/") eleventyConfig.addPassthroughCopy("./src/images/") eleventyConfig.addWatchTarget("./src/css/") eleventyConfig.addWatchTarget("./src/images/") return { dir: { input: "src", output: "public" }, markdownTemplateEngine: "njk" }
}
In index.njk, I assigned the dateDisplay filter to the date variable, rendering it in a human-readable format.
---
title: "11ty x Bragdocs"
layout: "layouts/base.njk"
--- {% for post in collections.posts | reverse %} {% if post.data.public %} <p> {{ post.data.date | dateDisplay }} - {{ post.data.title }} </p> {% endif %}
{% endfor %}
The server needs to be restarted every time you change something in the configuration file.

To return the body content of a post, I called templateContent and added the safe filter so that it rendered any HTML in the Markdown file rather than escaping it.
---
title: "11ty x Bragdocs"
layout: "layouts/base.njk"
--- {% for post in collections.posts | reverse %} {% if post.data.public %} <p> {{ post.data.date | dateDisplay }} - {{ post.data.title }} <br/> {{ post.templateContent | safe }} </p> <br/> {% endif %}
{% endfor %}
Finally, I included another for loop to list the values in the categories front matter property.
---
title: "11ty x Bragdocs"
layout: "layouts/base.njk"
--- {% for post in collections.posts | reverse %} {% if post.data.public %} <p> {{ post.data.date | dateDisplay }} - {{ post.data.title }} <br/> {{ post.templateContent | safe }} {% for category in post.data.categories %} <span># {{category}}</span> {% endfor %} </p> <br/> {% endif %}
{% endfor %}
Having finished extracting data from the posts collection, it was time to build out the HTML structure.
Structuring the bragdoc
Partials in Eleventy allow us to repeatably use bits of HTML or templating. This also simplifies the code from one massive template file to manageable pieces that fit together.
Inside the <body> tags of base.njk , I removed everything except the content and snippet.
<!DOCTYPE html>
<html lang="en">
<head> <meta charset="UTF-8"> <meta name="viewport" content="width=device-width, initial-scale=1.0"> <title>{{ title }}</title> <link rel="stylesheet" href="{{ '/css/styles.css' | url }}">
</head>
<body> {{ content | safe }} <script> (function () { const links = document.querySelectorAll("a[href^='https://'], a[href^='http://']") const host = window.location.hostname const isInternalLink = link => new URL(link).hostname === host links.forEach(link => { if (isInternalLink(link)) return link.setAttribute("target", "_blank") link.setAttribute("rel", "noopener") }) })() </script>
</body>
</html>
Next, I created bragdoc-entry.njk which lives inside a new folder called partials
eleventy-bragdoc
├── src
│ ├── _filters
│ │ └── dates.js
│ ├── posts
│ │ ├── posts.json
│ │ ├── post-1.md
│ │ ├── post-2.md
│ │ └── post-3.md
│ ├── css
│ │ └── styles.css
│ ├── images
│ │ └── test_image.jpg
│ ├── _includes
│ │ ├── partials // new folder
│ │ │ └── bragdoc-entry.njk // new file
│ │ └── layouts
│ │ └── base.njk
│ └── index.njk
├── .eleventy.js
├── node_modules
├── package.json
├── package-lock.json
├── README.md
└── .gitignore
Inside bragdoc-entry.njk, I brought over the content that make up the bragdoc entry, written in index.njk. Notice that it doesn’t require any front matter since it is treated as a snippet.
Partials do not extend a template, so they do not need any front matter.
<p> {{ post.data.date | dateDisplay }} - {{ post.data.title }} <br/> {{ post.templateContent | safe }} {% for category in post.data.categories %} <span># {{category}}</span> {% endfor %}
</p>
<br/>
Then, between the if statement in index.njk, I added an include tag that references the bragdoc-entry.njk partial. By doing this, the content inside bragdoc-entry.njk is repeatably added until the for loop finishes.
---
title: "11ty x Bragdocs"
layout: "layouts/base.njk"
--- {% for post in collections.posts | reverse %} {% if post.data.public %} {% include 'partials/bragdoc-entry.njk' %} {% endif %}
{% endfor %}
Next, I wrapped the entire for loop with some custom HTML, including a header, profile container and footer. At this point, I also included a profile picture in the images folder and referenced it in the custom HTML using Eleventy’s URL filter.
---
title: "11ty x Bragdocs"
layout: "layouts/base.njk"
--- <div class="bragdoc__section" id="bragdoc__section">
<h1 class="bragdoc__header">{{ title }}</h1>
<div class="bragdoc__container"> <div class="bragdoc__profile"> <img class="bragdoc__photo" src="{{ '/images/profile_picture.jpg' | url }}"> <h1 class="bragdoc__name">Emily Y Leung</h1> <div class="role">Computational Designer</div> </div> {% for post in collections.posts | reverse %} {% if post.data.public -%} {% include 'partials/bragdoc-entry.njk' %} {% endif %} {% endfor %} </div> <footer> <div><a target="_blank" href="https://www.bragdocs.com/">Bragdocs</a> inspired theme built with <a target="_blank" href="https://www.11ty.dev/">11ty</a></div> <div>Made with ♥ by <a target="_blank" href="https://emilyyleung.github.io/">Emily Y Leung</a></div> </footer>
</div>
Then, inside bragdoc-entry.njk, I updated the HTML structure and included classes for styling:
<div class="bragdoc__entry"> <div class="bragdoc__entry-milestone"></div> <div class="bragdoc__entry-block"> <span class="bragdoc__entry-date"> {{ post.data.date | dateDisplay }} </span> <br/> <h2 class="bragdoc__entry-title"><span class="bragdoc__icon">{{ post.data.icon }}</span> {{ post.data.title }}</h2> <div class="bragdoc__entry-content"> {{ post.templateContent | safe }} </div> </div> <div class="bragdoc__taglist"> {% for category in post.data.categories %} <span># {{category}}</span> {% endfor %} </div>
</div>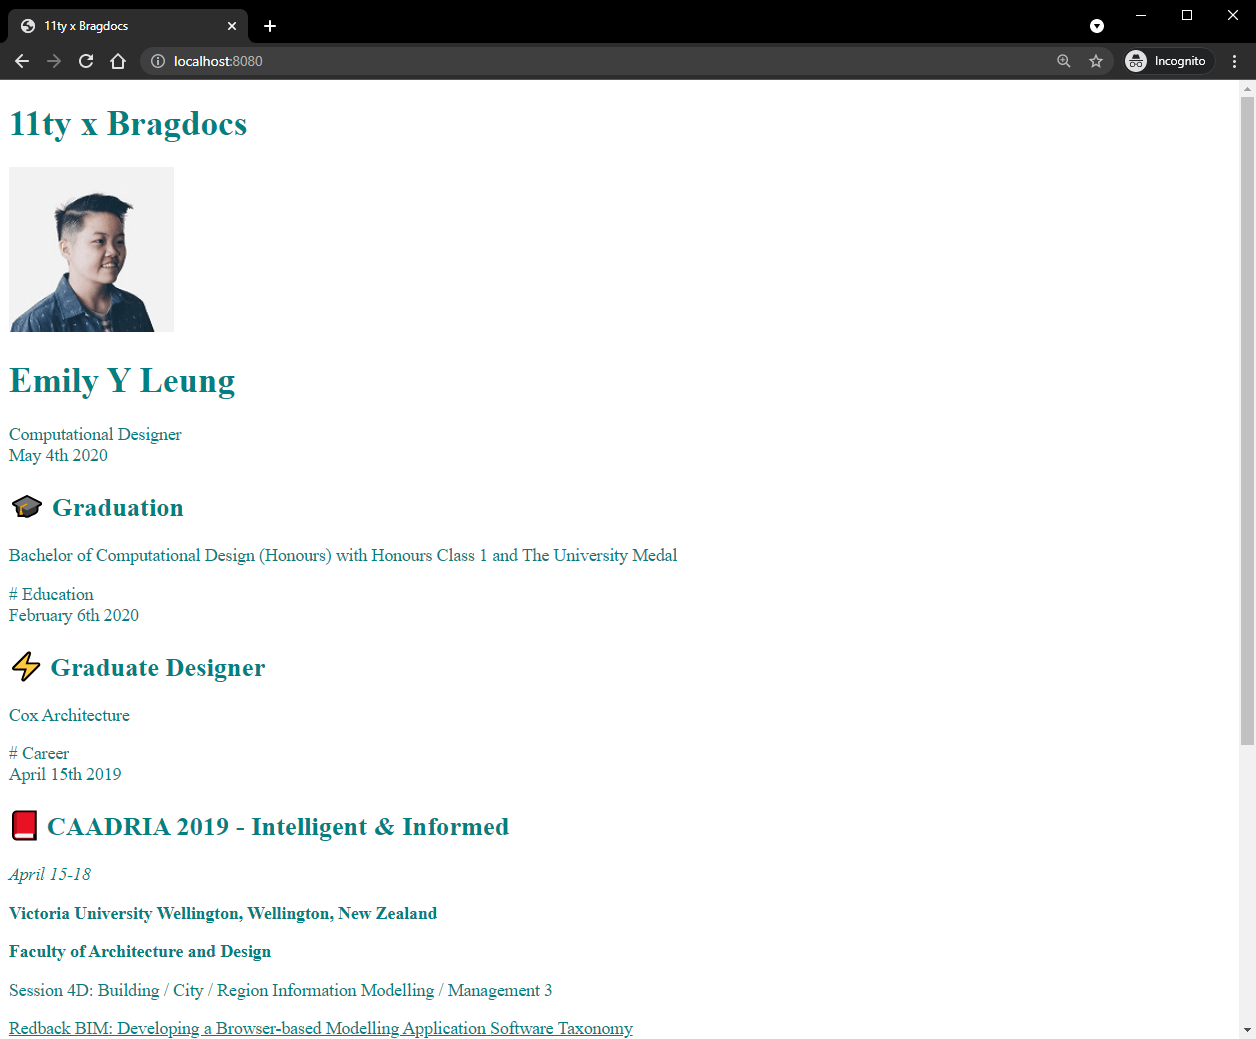
Accessing global data
A good way to understand global data is to imagine building a HTML template that someone could use as a base for their website. Rather than searching for specific HTML tags to replace the text, they only need to replace certain values in an external file which then updates the content. This is one of the many things a global data file can do for us.
Eleventy can access global data files written in JSON when they are placed in a folder called _data. So, I created a data.json file that is accessible when I call {{data}} and then pick out whatever properties I had provided in the JSON object.
eleventy-bragdoc
├── src
│ ├── _data // new folder
│ │ └── data.json // new file
│ ├── _filters
│ │ └── dates.js
│ ├── posts
│ │ ├── posts.json
│ │ ├── post-1.md
│ │ ├── post-2.md
│ │ └── post-3.md
│ ├── css
│ │ └── styles.css
│ ├── images
│ │ ├── profile_picture.jpg
│ │ └── test_image.jpg
│ ├── _includes
│ │ ├── partials
│ │ │ └── bragdoc-entry.njk
│ │ └── layouts
│ │ └── base.njk
│ └── index.njk
├── .eleventy.js
├── node_modules
├── package.json
├── package-lock.json
├── README.md
└── .gitignore
Inside data.json, I included properties that were reused throughout the project:
{ "mywebsite": "https://emilyyleung.github.io/", "myname": "Emily Y Leung", "myrole": "Computational Designer"
}
One great use case was to replace the content in the profile and footer in index.njk
<!-- Profile -->
<div class="bragdoc__profile"> <img class="bragdoc__photo" src="{{ '/images/profile_picture.jpg' | url }}"> <h1 class="bragdoc__name">{{ data.myname }}</h1> <div class="role">{{ data.myrole }}</div>
</div>
<!-- Footer -->
<footer> <div><a target="_blank" href="https://www.bragdocs.com/">Bragdocs</a> inspired theme built with <a target="_blank" href="https://www.11ty.dev/">11ty</a></div> <div>Made with ♥ by <a target="_blank" href="{{ data.mywebsite }}">{{ data.myname }}</a></div>
</footer>
Styling the bragdoc
With the bragdoc structure completed, I updated the styling in styles.css
To imitate bragdocs.com, I selected some of their colors and stored them in a root variable.
Additionally, I wanted to create multiple themes, so I added a custom data-theme property on top of the :root variable. In this case, the default color theme is “light” regardless of whether data-theme is assigned to the <html> tag. But that also means that if I wanted to create a “dark” theme, I could create a new selector html[data-theme="dark"] in my CSS, and assign alternative colors to the same variables as specified in :root
:root, html[data-theme="light"] { --logo: black; --name: black; --entry-title: black; --date: #BDBDBD; --text: #676a6c; --entry-line: #f1f1f1; --entry-circle: #ddd; --background: white; --text-code: grey; --code-block: rgba(0,0,0,0.05); --link-text: #676a6c; --link-hover: orange; --quote-block-edge: rgba(255, 165, 0, 0.5); --quote-block-text: #676a6c; --table-border: #676a6c; --footer: #BDBDBD; --tag: #BDBDBD;
}
To reference root variables, call var() where the argument is the name of the property.
Here is an example of how we can use root variables to style the color of text in a <p> tag:
:root { --text: teal;
} p { color: var(--text)
}
For fun, I added a dark version inspired by Google Material.
html[data-theme="dark"] { --logo: #FFF; --name: #FFF; --entry-title: #dedede; --date: rgba(255,255,255,0.3); --text: #999999; --entry-line: rgba(255,255,255,0.2); --entry-circle: rgba(255,255,255,0.3); --background: #121212; --code-text: rgba(255,255,255,0.5); --code-block: rgba(255,255,255,0.1); --link-text: rgba(255,255,255,0.5); --link-hover: orange; --quote-block-edge: rgb(255, 165, 0); --quote-block-text: rgba(255, 165, 0,0.5); --table-border: #999999; --footer: rgba(255,255,255,0.3); --tag: rgba(255,255,255,0.3);
}
To control what theme you want to use, add the data-theme property to the <html> tag in base.njk. From there, assign the value associated to the corresponding CSS selector, i.e. “light” or “dark.”
<!DOCTYPE html>
<html lang="en" data-theme="light">
Next, I added styling to the <body>, <footer>, bragdoc section, and logo.
body { font-family: "open sans", "Helvetica Neue", Helvetica, Arial, sans-serif; font-size: 13px; color: var(--text); background-color: var(--background); margin: 0; height: 100vh;
} footer { margin: 0 auto; max-width: 500px; padding-bottom: 1.5em; text-align: center; color: var(--footer); padding-top: 2em; margin-top: 2em;
} /* Bragdoc Logo */ .bragdoc__header { margin: 0; padding: 1em; font-size: 1.5em; color: var(--logo)
} /* Bragdoc Body */ .bragdoc__section { height: 100%; display: grid; grid-template-rows: auto 1fr auto; margin: 0; padding: 0;
}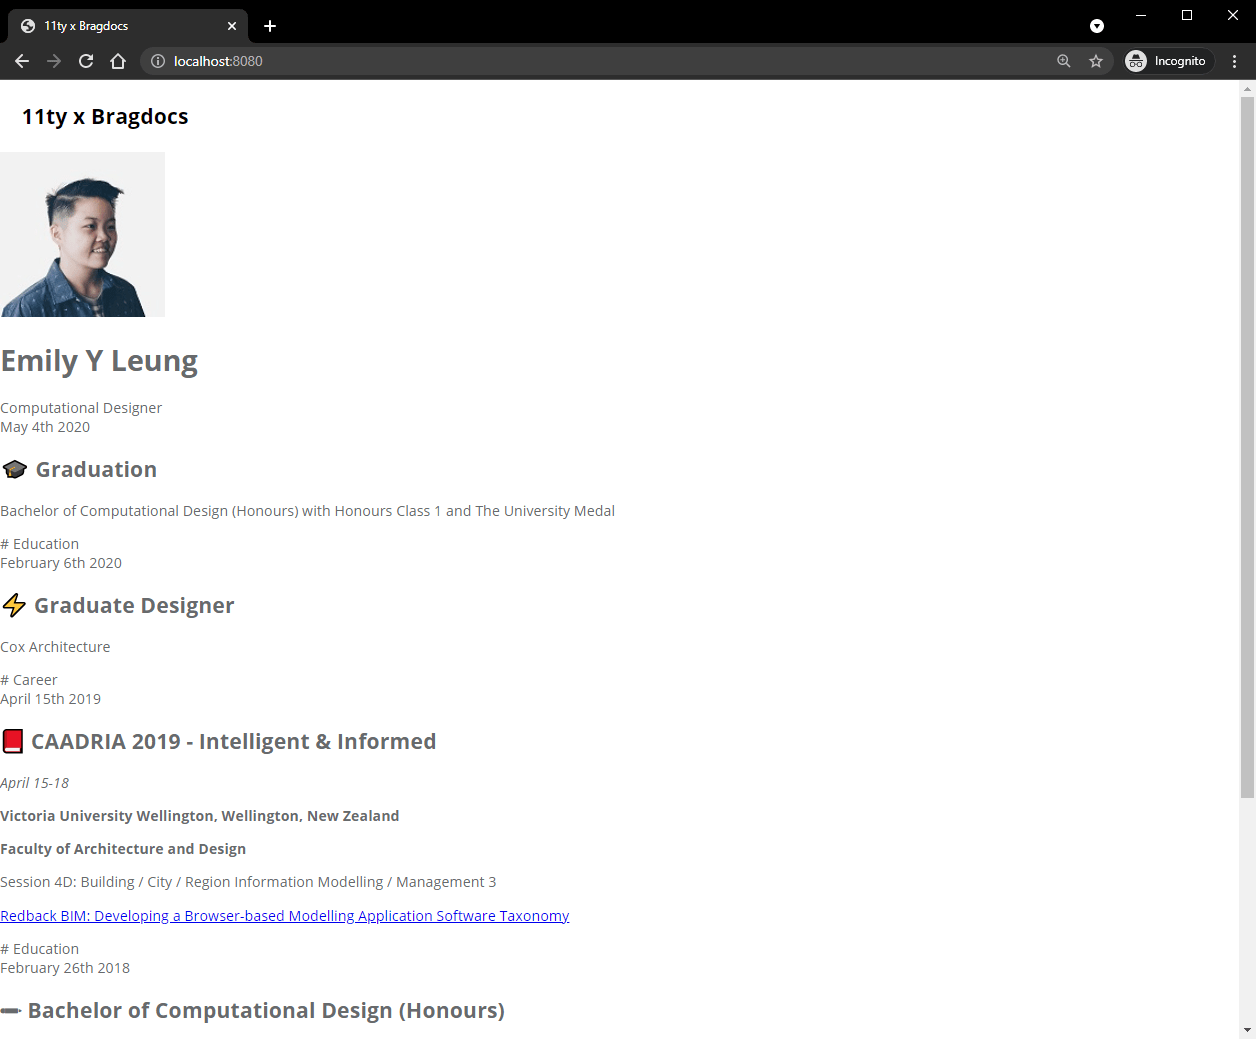
At this point, the custom tags and classes in the HTML made it simple to replicate the bragdoc layout.
/* Bragdoc User Profile */ .bragdoc__profile { padding-top: 3em; padding-bottom: 2em;
} .bragdoc__photo { width: 8em; border-radius: 100%; padding: 0; height: 8em; object-fit: cover;
} .bragdoc__name { color: var(--name); margin-bottom: 0.25em;
} .bragdoc__icon { font-family: "Segoe UI Emoji", Times, serif;
} .bragdoc__container { max-width: 800px; margin: 0 0 0 30em; height: 100%;
} .bragdoc__profile-role { margin: 0;
}
Next, I styled the entries to replicate the bragdocs.com timeline design.
/* Individual Bragdoc Entry Blocks */ .bragdoc__entry { position: relative;
} .bragdoc__entry:first-child { margin-top: 0;
} .bragdoc__entry:before { height: 100%; position: absolute; background-color: var(--entry-line); width: 2px; content: ""; top: 30px;
} .bragdoc__entry:last-child:before { background-color: var(--background);
} .bragdoc__taglist { margin-left: 1em; padding: 1em;
} .bragdoc__taglist > * { border: 1px solid var(--tag); padding: 0.25em 0.5em 0.25em 0.5em; border-radius: 0.5em; margin-right: 1em;
} /* Entry Content */ .bragdoc__entry-block { margin-left: 1em; padding: 1em;
} .bragdoc__entry-title { margin-top: 4px; color: var(--entry-title); font-size: 1.5em;
} .bragdoc__entry-date { line-height: 3em; color: var(--date);
} /* Bragdoc milestone circle */ .bragdoc__entry-milestone { position: absolute; height: 5px; width: 5px; border: 2px solid var(--entry-circle); background-color: var(--background); left: 0; top: 30px; margin-top: -2px; margin-left: -3px; border-radius: 100px;
} /* Bragdoc Entry Content */ .bragdoc__entry-content > * { margin-bottom: 0.5em; margin-left: 0;
} .bragdoc__entry-content > h1 { font-size: 1.15em;
} .bragdoc__entry-content > h2, h3, h4, h5, h6 { font-size: 1em; color: var(--text);
}
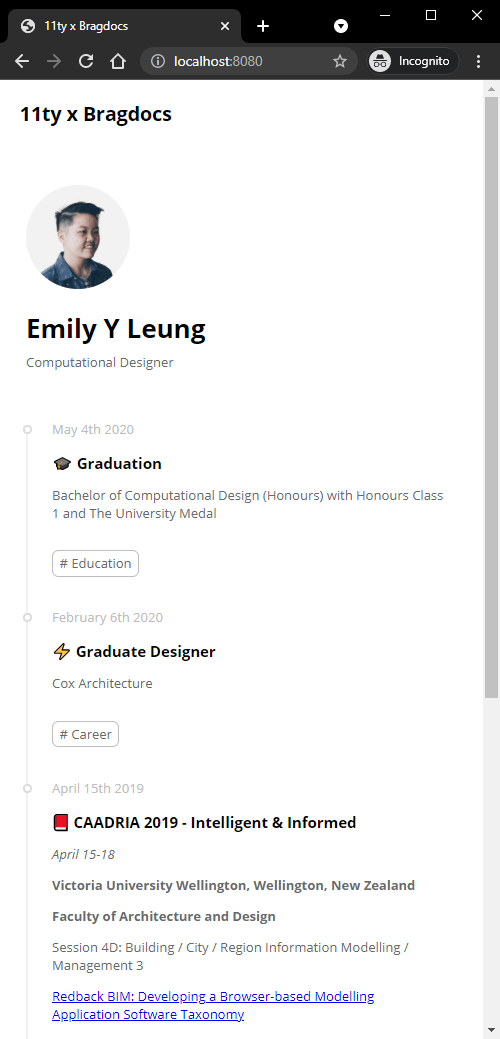
Using CSS media queries, I could also control the size of text as well as the positioning of HTML elements. This makes it work well when viewed on mobile.
/* Make it responsive */ @media only screen and (max-width: 1400px) { .bragdoc__container { /* Center the bragdoc*/ margin: 0 auto; } .bragdoc__entry-title { font-size: 1.25em; }
} @media only screen and (max-width: 870px) { .bragdoc__container { padding-left: 2em; padding-right: 2em; } .bragdoc__entry-title { font-size: 1.15em; }
}
The final touches to the design needed to account for the description (i.e. the Markdown body content) in each entry, which you can find in this Gist.
Given that the CSS has been structured with reference to root variables, we can continue to create more themes. Have a crack at exploring color palettes from Color Hunt or Cooolers.
Deploying the bragdoc to GitHub Pages
Building a project from scratch is fantastic, but sharing it with the world is even better!
While there are a myriad of ways to host a bragdoc, I decided to host it on GitHub Pages. This meant I could use the base URL of my GitHub account and add /eleventy-bragdoc/ to the end of it.
At this point, I had been working from the eleventy-bragdoc repository and had already created a gh-pages branch.
Follow this tutorial for information on how to set up GitHub Pages for your repository.
Configuring the URL path
To configure the URL path for deployment, I included a pathPrefix in .eleventy.js to define the route relative to the base URL.
Without specifying a pathPrefix, the value by default is /, which links to the base URL, i.e. https://emilyyleung.github.io/
Since I already had content on the base URL, I wanted to host it on a sub-page, i.e. https://emilyyleung.github.io/eleventy-bragdoc/
To set the pathPrefix for sub-pages, it must start and end with a slash:
module.exports = function (eleventyConfig) { // ... return { dir: { input: "src", output: "public" }, markdownTemplateEngine: "njk", pathPrefix: "/eleventy-bragdoc/" }
}
Adding the GitHub Pages dependency
After configuration, I installed GitHub Pages using the terminal:
npm install gh-pages --save-devThis automatically adds the dependency to package.json
{ // ... "devDependencies": { "gh-pages": "^3.2.3" }, // ...
}
Adding a custom terminal script
To deploy the public folder, I added a deploy script and referenced the public folder:
{ // ... "scripts": { "start": "eleventy --serve", "build": "eleventy", "deploy": "gh-pages -d public" } // ...
}
Running the build
Just like in development, I navigated my terminal to the eleventy-bragdoc folder. But this time, I ran the following command to rebuild the files into the public folder:
npm run-script buildThen, to deploy to GitHub Pages, I ran the following command:
npm run deployGranting access to deploy
At this point, the terminal may ask you to log in via the terminal or through the GitHub Desktop application. If the login fails, the terminal may ask you to generate a token of authentication to use instead of a password. Here is a guide on how to create one.
With a successful response from the terminal, I could see my bragdoc live!
Maintaining your bragdoc
Unlike reports and books, a bragdoc must be maintained continuously as a live record of your progress and achievements. Think of your bragdoc like a garden, where tending requires regular attention and care. While you may not see the benefits straight away, time invested in tending to your document will lead to far greater returns. Instant recall and the ability to share what you’ve done are some of the upsides in forming this habit.
While you may not be able to note down everything as it happens, Julia Evans suggests setting a block of time to review your progress and update the document. Perhaps even making it a bi-weekly group activity to celebrate all wins, big and small.
For many, the less time it takes to do something, the better. With this bragdoc setup, adding new entries and rebuilding the site doesn’t take long at all! Just to give you an idea of how simple this is, I’ll walk you through the process of adding another entry to round out the tutorial.
Add a new bragdoc entry
Continuing from my last deployment, I’ll first add a new Markdown file in my posts folder.
eleventy-bragdoc
├── src
│ ├── _data
│ │ └── data.json
│ ├── _filters
│ │ └── dates.js
│ ├── posts
│ │ ├── posts.json
│ │ ├── post-1.md
│ │ ├── post-2.md
│ │ ├── post-3.md
│ │ └── post-4.md // new entry goes here
│ ├── css
│ │ └── styles.css
│ ├── images
│ │ ├── profile_picture.jpg
│ │ └── test_image.jpg
│ ├── _includes
│ │ ├── partials
│ │ │ └── bragdoc-entry.njk
│ │ └── layouts
│ │ └── base.njk
│ └── index.njk
├── .eleventy.js
├── node_modules
├── package.json
├── package-lock.json
├── README.md
└── .gitignore
Inside post-4.md, I’ll add in my front matter and description content.
---
title: Working towards publishing my first article on CSS-Tricks
date: 2021-10-02
categories: - Writing - Eleventy
public: True
icon: ✍????
--- Since re-creating [bragdocs.com](https://www.bragdocs.com/) using Eleventy, I am now in the process of writing the steps on how I did it.
Run the build
With the entries added and saved, I’m ready to tell Eleventy to reference my Markdown files from src to generate static HTML files in the public folder. So I navigate the terminal to eleventy-bragdoc where I run the following command:
npm run-script buildRun deploy
Since I’ve already deployed once before, my GitHub credentials should grant me immediate access for deployment when running the following command:
npm run deployThose changes are then reflected on my website at the same configured URL.
What’s next?
Well first off, congratulations on putting together your very own bragdoc from scratch! It’s yours to keep, to tend and to share.
While this tutorial has only scratched the surface of what’s possible with Eleventy, a small step can lead you to all sorts of directions. To fuel your curiosity, check out what others are doing with Eleventy.
Feel free to reach out, I’d love to see what you come up with!

