![]()
In this article, you’ll learn how to build a GitHub tracker that notifies users when there’s a new Issue/PR on a tracked repository by sending push notifications.
GitHub already sends notifications through emails if you’ve opted in, but many studies have shown that push notifications reach users better than emails do. After you’ve built the GitHub tracker by following this tutorial, you’ll have learned how to:
- add a service worker and convert the tracker to a PWA
- subscribe to push notifications
- use the GitHub API
- send push events through Vercel cloud functions
- periodically fetch new issues using EasyCron
Prerequisites
Table of Contents
There are a few skills and services you’ll need to follow this article:
- Node.js and npm installed
- prior Svelte knowledge
- a free GitHub account, since we’re using the GitHub API
- a free MongoDB Atlas account to use MongoDB in the cloud
- a free Vercel account to deploy the application and for cloud functions
What are Push Notifications?
Let’s take a look at what these so called “push notifications” are.
You must be familiar with regular notifications. These are little bubbles of text that appear on your screen to notify you of something. Push notifications are similar, except that they aren’t generated on-demand, but they are generated upon receiving push events. Push notifications work when an app is closed, while regular notifications require you to have the app open.
Push notifications are supported in modern web browsers like Chrome by using something called service workers. Service workers are little pieces of JavaScript that run separately from the browser’s main thread, and as a result, can run offline if your app is installed as a PWA (progressive web application).
Push notifications are used in chat applications to notify users when they have unread messages, in games, to notify users of game events, in news sites, to notify users of breaking articles, and for many other purposes.
There are four steps to show push notifications in your app:
- request permission with
window.Notification.requestPermission() - convert your app to a PWA and install it
- subscribe to push events
- upon receiving a push event, send the notification
Step 1: Creating the Tracker
Let’s use Svelte with Vite.js instead of Rollup in this article. Vite is, as its name suggests, faster than Rollup, and also provides built-in support for environment variables. To create a new project with Svelte and Vite, run this command:
npm init vite Select the framework to be svelte. You can use TypeScript if you want. I’ll be using regular JavaScript.
Next, cd into the project folder and you can add TailwindCSS to your application and install all dependencies with these commands:
npx svelte-add tailwindcss # Install packages yarn install # or npm install Finally, open the project in your favorite code editor and run npm run dev or yarn dev to start the application on http://localhost:3000.
How the tracker will work
We’ll use the GitHub API to get a list of issues and pull requests for a repository that the user has tracked. A user’s tracked repositories and their username will be stored in the MongoDB database.
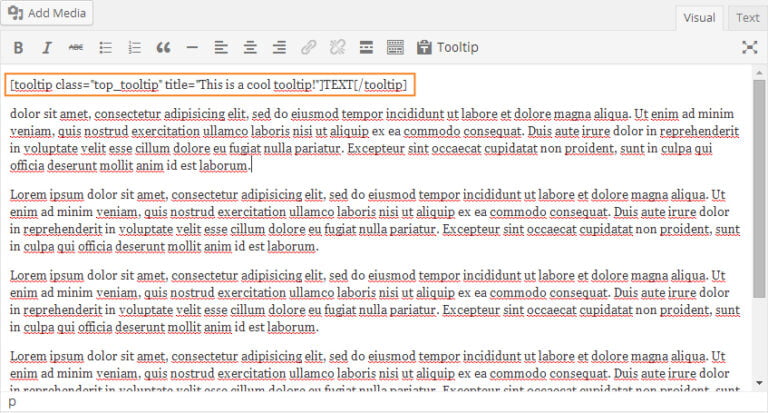
The first step would be to prompt the user for their username. Create src/lib/UsernamePrompt.svelte, which will be the component that will do so. Here’s my UI for the form, but you can design it however you want:
<script> let username = ""; async function submit() { // TODO } </script> <form on:submit|preventDefault="{submit}" class="mx-auto min-w-[350px] max-w-[1100px] w-[50%] border border-gray-500 rounded my-4 px-6 py-4" > <h1 class="text-center text-3xl m-4">Enter a username</h1> <p class="text-center text-xl m-4">Enter a username to use this tracker</p> <input type="text" class="rounded px-4 py-2 border border-gray-300 w-full outline-none" placeholder="Username" aria-label="Username" bind:value="{username}" /> <button class="mt-4 border border-transparent bg-blue-500 text-white rounded px-4 py-2 w-full" > Submit </button> </form> Add this component in App.svelte like so:
<script> import UsernamePrompt from "./lib/UsernamePrompt.svelte"; </script> <UsernamePrompt /> Next, let’s add the main tracker UI. Create file src/lib/Tracker.svelte and add the below code in it:
<script> let repo = ""; function track() { // TODO } function untrack(repo) { // TODO } </script> <form on:submit|preventDefault={track} class="mx-auto min-w-[350px] max-w-[1100px] w-[50%] border border-gray-500 rounded my-4 px-6 py-4" > <h1 class="text-center text-3xl m-4">GitHub tracker</h1> <input type="text" class="rounded px-4 py-2 border border-gray-300 w-full outline-none" placeholder="Enter the repository's URL" aria-label="Repository URL" bind:value={repo} /> <button class="mt-2 border border-transparent bg-blue-500 text-white rounded px-4 py-2 w-full" >Track repository</button > <h2 class="mt-4 text-2xl">Tracked repositories</h2> <ul class="m-2 list-decimal"> <!-- We'll use a loop to automatically add repositories here later on. --> <li class="py-1 flex items-center justify-between"> <a class="text-gray-500 hover:underline" href="https://github.com/test/test" >https://github.com/test/test</a > <button class="text-red-500 cursor-pointer" on:click={() => untrack("")} >Untrack</button > </li> </ul> </form> To test out your component, temporarily swap out the UsernamePrompt component for the new Tracker component in App.svelte:
<script> // import UsernamePrompt from "./lib/UsernamePrompt.svelte"; import Tracker from "./lib/Tracker.svelte"; </script> <!-- <UsernamePrompt /> --> <Tracker /> Your screen should now look like this:
![]()
Note: remember to restore App.svelte to its previous code!
Step 2: Setting up Cloud Functions
We need to have a back-end server to send push events to our application. This means that you need to create a new (maybe) ExpressJS project, and then deploy that separately. This will all be a headache for someone just experimenting with push notifications.
Vercel Cloud Functions to the rescue! Cloud functions are like Express routes. They can run code and give you a response when you fetch its URL. Vercel has support for cloud functions; you just have to create files in the api folder. You’ll be using cloud functions to interact with MongoDB, since exposing secrets client-side is never a good thing.
First, make sure you have a Cluster in MongoDB Atlas. MongoDB has a free plan (M0), so be sure to create one if you haven’t already. Now, go to the Database Access tab in the sidebar of your Atlas dashboard. Add a new Database User by clicking the green button on the right side. Enter in the user’s details (don’t forget the password), and create the user.
![]()
To connect to the database, you’ll need the connection string. Save the new user and password somewhere and head to your Cluster’s Overview. Click the Connect button on the right side and select Connect your Application as the method of connection. You should see a connection string similar to the one below.
![]()
Now that you have the connection string, you can connect to your database, but first, you need to deploy the current application to Vercel. The easiest way to do this is using GitHub.
Create a new GitHub repository and push your code to it. Next, head to your Vercel Dashboard and click the New Project button. Import your GitHub Repository, make sure the framework is Vite, and add an environment variable called MONGODB_URL. Set its value to the connection string of the MongoDB database.
Once your website has been deployed, you need to change your local development command from yarn dev to vercel dev. Upon running the command, if you’re asked to link to an existing project, click yes.
Note: make sure to install the Vercel CLI with npm i -g vercel if you haven’t already.
Like me, if you run into a problem with using vite with vercel dev, be sure to change the Development Command of your project to vite --port $PORT from vite in the Vercel Dashboard.
This will allow us to use cloud functions with the correct environment variables locally.
Let’s add a helper file that will allow us to access MongoDB without opening up too many connections. Create file api/_mongo.js and put the following code in it. A file in the api directory that is prefixed with a _ will not be treated as a cloud function. This allows us to add helpers and other logic in separate files:
const { MongoClient } = require("mongodb"); const mongo = new MongoClient(process.env.MONGODB_URL); // Export the connection promise export default mongo.connect(); Exporting the connection promise instead of the main client itself will prevent us from having redundant connections, since we’re working in a serverless platform.
Using CommonJS instead of ESModules
Notice how I am using require instead of import? This is because, as of the time of writing, Vercel Cloud Functions doesn’t support ESModule import statements in JavaScript files. Instead, you need to use CommonJS require statements.
There’s one problem here. If you see the package.json of our app, you’ll notice that it has a line "type": "module". This means that each JavaScript file in the project is an EsModule. This is not what we want, so to mark all files in the api directory as CommonJS files, so we can use the require statement, create api/package.json and add this line in it:
{ "type": "commonjs" } This will now allow us to use require statements in the api directory. Install the MongoDB connection driver with this command:
# Don't forget to CD! cd api npm i mongodb # or use yarn Step 3: Adding functionality
The tracker, as of now, doesn’t really work, so let’s fix that.
Authentication
For authentication, we need to store the username that the user has input in the MongoDB database.
Create a file /api/storeusername.js. This will be a cloud function and will be mapped to http://localhost:3000/api/storeusername. Put the below code in it:
const mongoPromise = require("../src/lib/mongo"); // All cloud functions must export a function that takes a req and res object. // These objects are similar to their express counterparts. module.exports = async (req, res) => { // TODO }; Next, get the MongoDB client like so:
module.exports = async (req, res) => // Wait for the client to connect const mongo = await mongoPromise; } Extract the username from the request’s body:
// ... const { username } = req.body; // Check if the username is valid if (typeof username !== "string" || !username.trim()) { res.status(400).json({ message: "Please send the username" }); return; } Next, you need to store this username in the database:
// Get the collection const usersCol = mongo.db().collection("users"); // Check if the username already exists in the database if (await usersCol.findOne({ _id: username })) { res.status(400).json({ message: "User already exists!" }); return; } // We want the username to be the identifier of the user await usersCol.insertOne({ _id: username }); // Everything went well :) res.status(200).json({ message: "Username recorded" }); Finally, this is how the api/storeusername.js file should look:
const mongoPromise = require("./_mongo"); module.exports = async (req, res) => { const mongo = await mongoPromise; const { username } = req.body; if (typeof username !== "string" || !username.trim()) { res.status(400).json({ message: "Please send the username" }); return; } // Get the collection const usersCol = mongo.db().collection("users"); // Check if the username already exists in the database if (await usersCol.findOne({ _id: username })) { res.status(400).json({ message: "User already exists!" }); return; } // We want the username to be the identifier of the user await usersCol.insertOne({ _id: username }); // Everything went well :) res.status(200).json({ message: "Username recorded" }); }; Deploy your application to Vercel with vercel ., or by pushing to GitHub, and your serverless function should be live! You can test it using cURL with this command:
curl -X POST -H "Content-Type: application/json" -d '{"username": "test"}' https://your-app.vercel.app/api/storeusername This should create a new document in the users collection with the _id field being the username we just gave.
![]()
Now all that’s left is to fetch this function on the front end. In src/lib/UsernamePrompt.svelte, in the submit function, first you need to send a request to the cloud function, and then put the username in localStorage, so we know that the user is authenticated. You can send requests with the fetch function:
async function submit() { const res = await fetch("/api/storeusername", { body: JSON.stringify({ username }), headers: { "Content-Type": "application/json", }, method: "POST", }); const data = await res.json(); if (!res.ok) alert(data.message); else { // Store the username in localStorage localStorage.setItem("username", username); // Reload the page window.location.reload(); } } We’re reloading the page, because in App.svelte, when the page is loaded, we need to check if there is a username in localStorage. If there is, we can skip the UsernamePrompt screen. To do so, add this code in the script tag of App.svelte:
<script> import { onMount } from "svelte"; import UsernamePrompt from "./lib/UsernamePrompt.svelte"; import Tracker from "./lib/Tracker.svelte"; let isLoggedIn = false; onMount(() => { // If there is a username in the localStorage, set isLoggedIn to true isLoggedIn = !!localStorage.getItem("username"); }); </script> The above code will check the localStorage for a username and set isLoggedIn to true if it exists. Next, all we have to do is update the DOM. Right under the script tag of App.svelte, add this:
{#if !isLoggedIn} <UsernamePrompt /> {:else} <Tracker /> {/if} Tracking and untracking repositories
Now let’s add the functionality for the actual tracking features of the tracker. If you open Tracker.svelte, you’ll notice there are two functions — track() and untrack(). These functions should track and untrack repositories respectively, by adding them to the database.
But before that, you need to add a few more cloud functions. One to track a repository, another to untrack, and one last to get a user’s tracked repositories.
Let’s work on them one by one.
Continue reading Create a GitHub Tracker with Push Notifications in Svelte on SitePoint.