In this tutorial, we’ll learn the difference between a Django project and a Django app, and how to start a new Django project.
Django is the Python web framework of choice for building web applications. It’s a mature, full-featured, flexible and open-source framework that lets you build anything from a simple CRUD application to a more complex, multi-app project like a photo-sharing app.
Requirements
You don’t need previous knowledge to set up a Django project. But Django is a Python framework, so to use it you should have strong foundations using Python.
Before starting, make sure you have a terminal or command prompt with Python 3.6 or later installed.
Most macOS and Linux systems have Python 3 installed by default, but if you’re using Windows, you’ll need to download and install Python. You can follow this guide from the official Python website.
You can open a terminal by opening the applications finder of your operating system and searching for Terminal, or on Windows, cmd.
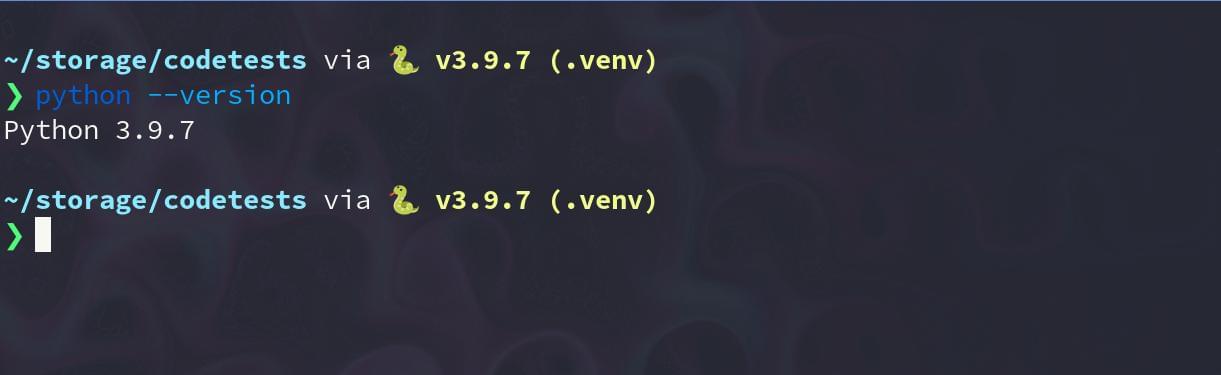
Once you’ve set up a terminal, it’s time to confirm your Python version. To do this, type the following command:
python --version Python 3.9.7 # My result If you didn’t get a result of the form Python 3.x, don’t panic. There are two options:
-
if
python --versionreturned a Python 2.x version, you’ll need to usepython3along with this tutorial. This usually happens with some macOS systems, as well as with some Linux distros like Ubuntu. Try running the following command:python3 --version Python 3.9.7 # Again, my result -
if you got an
Unknown commanderror, tried to runpython3, and still got another error, you’ll need to download and install Python from the official website.
Now that you know what Python command to run in your terminal, let’s dive into Django projects.
What’s a Django Project?
A Django project is a Python package needed to make a web application work. It contains everything you need to build the backend (server-side development, what the users don’t see) of your site. The normal functionality of a Django project determines how you interact with the database, authentication, how data is retrieved, and so on.
You can also think of it as a collection of settings, and small Python modules named apps. We’ll talk about them later, but as a pre-concept, an app is another set of Python files that solve a specific task of your app.
Through this article, you’ll learn about the sophisticated structure of a Django project. But from the start I want you to know that a Django project can be narrowed down to a single file, something similar to a Flask project.
A quick demonstration of this is the Minimal Django project. This is a file with 23 lines of code that allows us to bring a Django “Hello, World!” project to life:
import sys from django.conf import settings from django.urls import path from django.core.management import execute_from_command_line from django.http import HttpResponse settings.configure( DEBUG=True, ROOT_URLCONF=sys.modules[__name__], ) def index(request): return HttpResponse('<h1>A minimal Django response!</h1>') urlpatterns = [ path(r'', index), ] if __name__ == '__main__': execute_from_command_line(sys.argv) Now, a Django project can go much further. A great example is Instagram, which has thousands of Django endpoints and still uses this framework for crucial functionality.
How to Set up a Django Project
Don’t worry too much if some of the following commands seem complex. After you’ve created a couple of projects, you’ll know them like the back of your hand.
First of all, you need to know that Django is an external package. In other words, it doesn’t come built-in with Python, so you’ll need to install it with PIP.
PIP is a package manager for Python, a tool that allows you to install Python packages from the Python Package Index (PyPI).
Now, before installing the actual Python package, you’ll need to create a virtual environment. It’s a good practice to create a virtual environment for each Django project you build, so you can keep track of dependencies.
Maybe the code you have in a Django 2.6 project may not work with Django 3.0. A virtual environment lets you have specific requirements for each project you have.
You can create a virtual environment named .venv (or whatever name you want) with the following command:
python -m venv .venv Now, if you list the files in the current directory, you’ll see a new folder called .venv, which at the same time contains isolated Python binaries:
$ ls -lah .venv/ Permissions Size User Date Modified Name drwxr-xr-x - daniel 10 nov 23:13 . drwxr-xr-x - daniel 10 nov 23:13 .. drwxr-xr-x - daniel 10 nov 23:13 bin drwxr-xr-x - daniel 10 nov 23:13 include drwxr-xr-x - daniel 10 nov 23:13 lib lrwxrwxrwx 3 daniel 10 nov 23:13 lib64 -> lib .rw-r--r-- 69 daniel 10 nov 23:13 pyvenv.cfg To active your virtual environment, you need to activate it with the following command:
source .venv/bin/activate This will only work on bash shells (available on macOS and Linux). If you’re using a different shell, you can take a look at the following activation venv table:
| Platform | Shell | Command to activate virtual environment |
|---|---|---|
| POSIX | bash/zsh | $ source .venv>/bin/activate |
| fish | $ source .venv>/bin/activate.fish | |
| csh/tcsh | $ source .venv>/bin/activate.csh | |
| PowerShell Core | $ .venv/bin/Activate.ps1 | |
| Windows | cmd.exe | C:> .venvScriptsactivate.bat |
| PowerShell | PS C:> .venvScriptsActivate.ps1 |
A way to check that your shell is activated is by looking for changes in your prompt. In my case, what I saw is pictured below.
Now, install the Django package. You can either install the latest or a specific version of Django:
pip install django # Latest version pip install django==2.2 # Specific version Continue reading How to Quickly Start a Django Project and a Django App on SitePoint.