In this article, you’ll learn how to create an email alias and how to utilize it in the best way possible to secure your mailbox, protect your privacy and declutter your real email inbox.
What Is an Email Alias?
Table of Contents
- 1 What Is an Email Alias?
- 2 Why You Should Use an Email Alias
- 3 How to Create an Email Alias in Gmail
- 4 How to Create a Platform-agnostic Alias
- 5 How to Connect a Custom Domain to an Alias
- 6 How to Send an Email from an Alias Address
- 7 Use Email Aliases to Declutter Your Inbox
- 8 Stop Spam and Secure Your Privacy Online
- 9 Conclusion
An email alias is a unique email address you’ve created that functions like a nickname, or an on-the-fly email address that you can use for specific tasks. The underlying technology is quite simple, but grants you way more power than you may be thinking right now.
Email aliases can be platform-specific or platform-agnostic.
Platform-specific aliases are connected to a specific email client, such as Gmail, Outlook, Yahoo or your business email address (for example, on Rackspace or Godaddy). These aliases are deeply integrated in the ecosystem of the provider, and can’t be used outside of it.
Platform-agnostic aliases allow you to connect multiple mailboxes, even from different email providers, and create aliases for all of them. It’s a better, more streamlined approach for your aliases.
Why You Should Use an Email Alias
There are four main use cases for email aliases, so let’s explore them now.
Securing your primary inbox
An Email Alias secures your primary inbox. No one will ever know your real email address. Email aliases mask your email address, protecting your digital identity.
Aliases have little to no connection in terms of meaning, wording or redirections to your real mailbox. For example, your real email address could be <me@gmail.com> and one of the aliases for it could be <imarockstar@youbet.com> — which has zero connection to the source address.
Controlling your identity
Email aliases give you control of your identity online. They can be created, enabled and disabled in a single click.
If you’re like me, you probably created your primary email address when you were around 11, perhaps in middle school. There’s no way that address is still relevant to your use case and interests as an adult.
However, you can’t go back. You can’t delete it, since all your friends and work colleagues use it for serious reasons, and you can’t replace it everywhere online. You’re stuck.
Email aliases can be created, renamed, redirected, deactivated and deleted in a single click of your mouse. No complex setup, no hurdles.
Sending emails
An alias can be used to send emails, making it perfect for businesses that want to save a bit of money on their business addresses.
Yes, you could pay for a Google Workplace account for each of your teammates … or you could use free Gmail accounts and set up your professional online identity with aliases!
Yep, you read it right. You can connect a domain to a platform-agnostic email alias generator and create aliases with your professional domain that redirect messages to free mailboxes on Gmail, Outlook, Zoho and ProtonMail.
For example, if your domain is youbet.com, and you connect it to an alias generator service, you could create the aliases <info@youbet.com>, <support@youbet.com>, and <talent@youbet.com> — all on the same domain — and redirect messages to your real Gmail inbox <me@gmail.com>.
Your clients will never know the source and you’ll appear as professional as you can be using aliases!
It’s free or very affordable!
Come on, we wouldn’t be talking about it if it wasn’t. That’s what’s innovative about it. ????
You can have your aliases for free or a very, very affordable fee — certainly much (I mean a loooooot) lower than professional email hosting for sure!
How to Create an Email Alias in Gmail
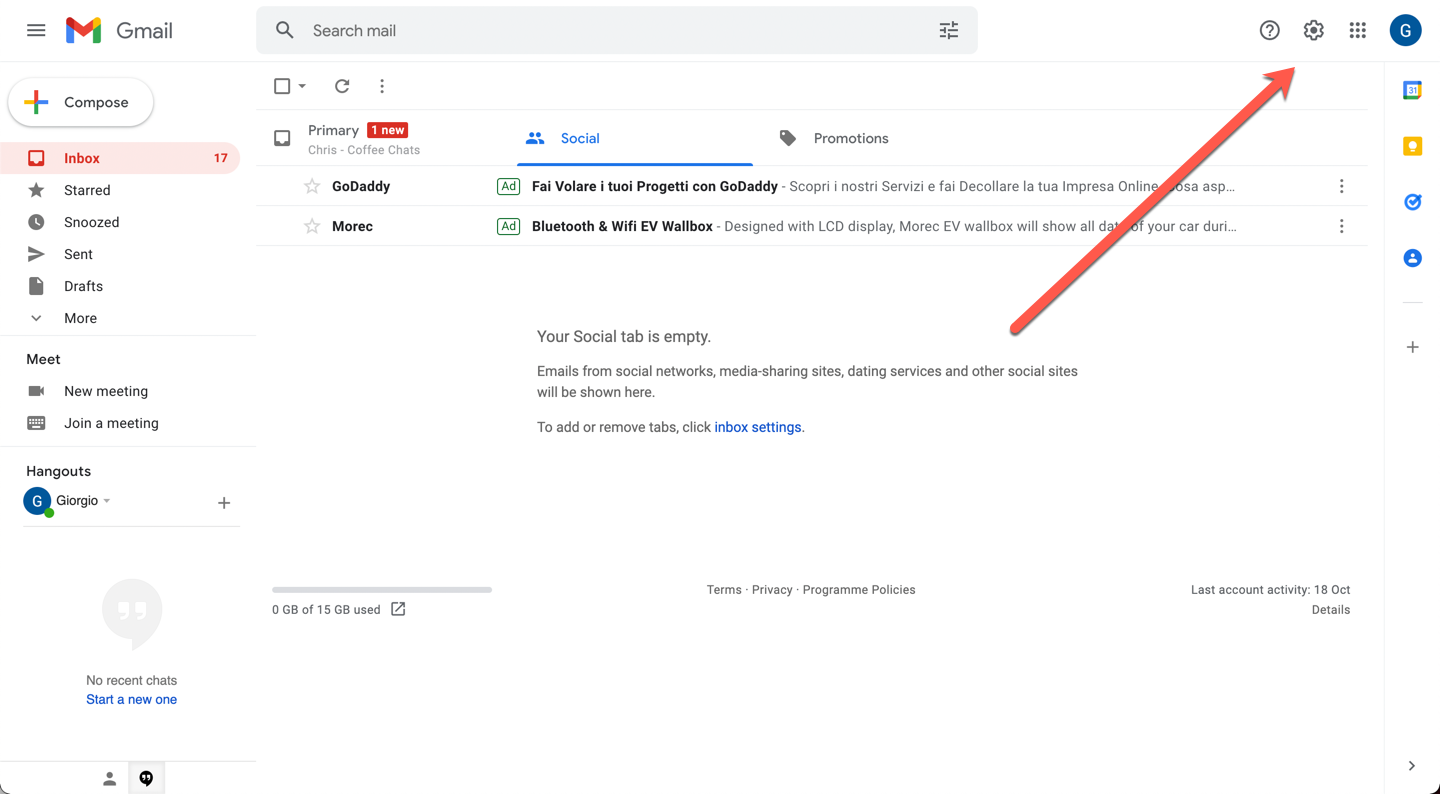
Chances are you have a Gmail account. If you simply need an alias and you’re not interested in using it for business needs, you can create a free one from your Gmail Client.
Here’s how to do it:
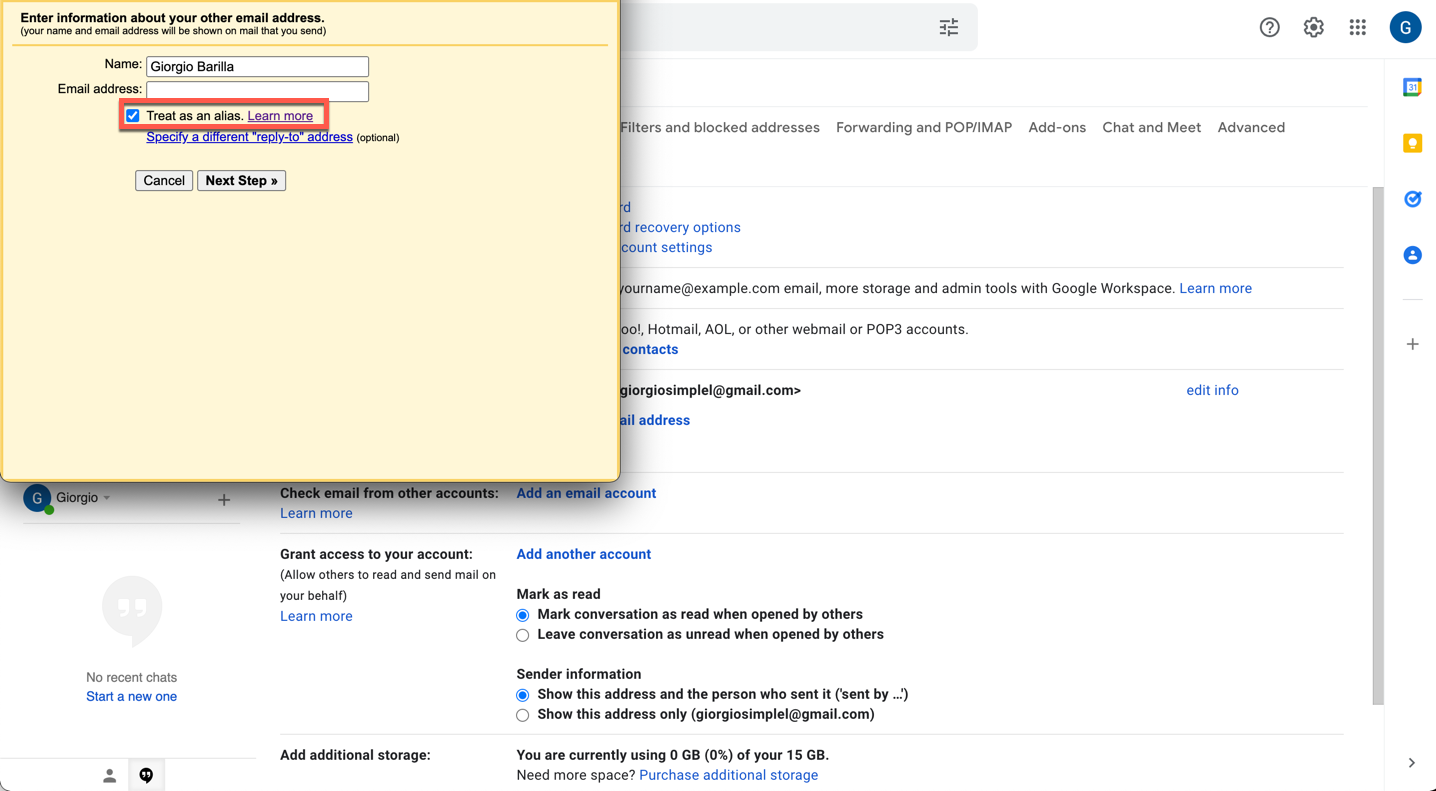
-
Log into Gmail and select the settings icon in the right corner.
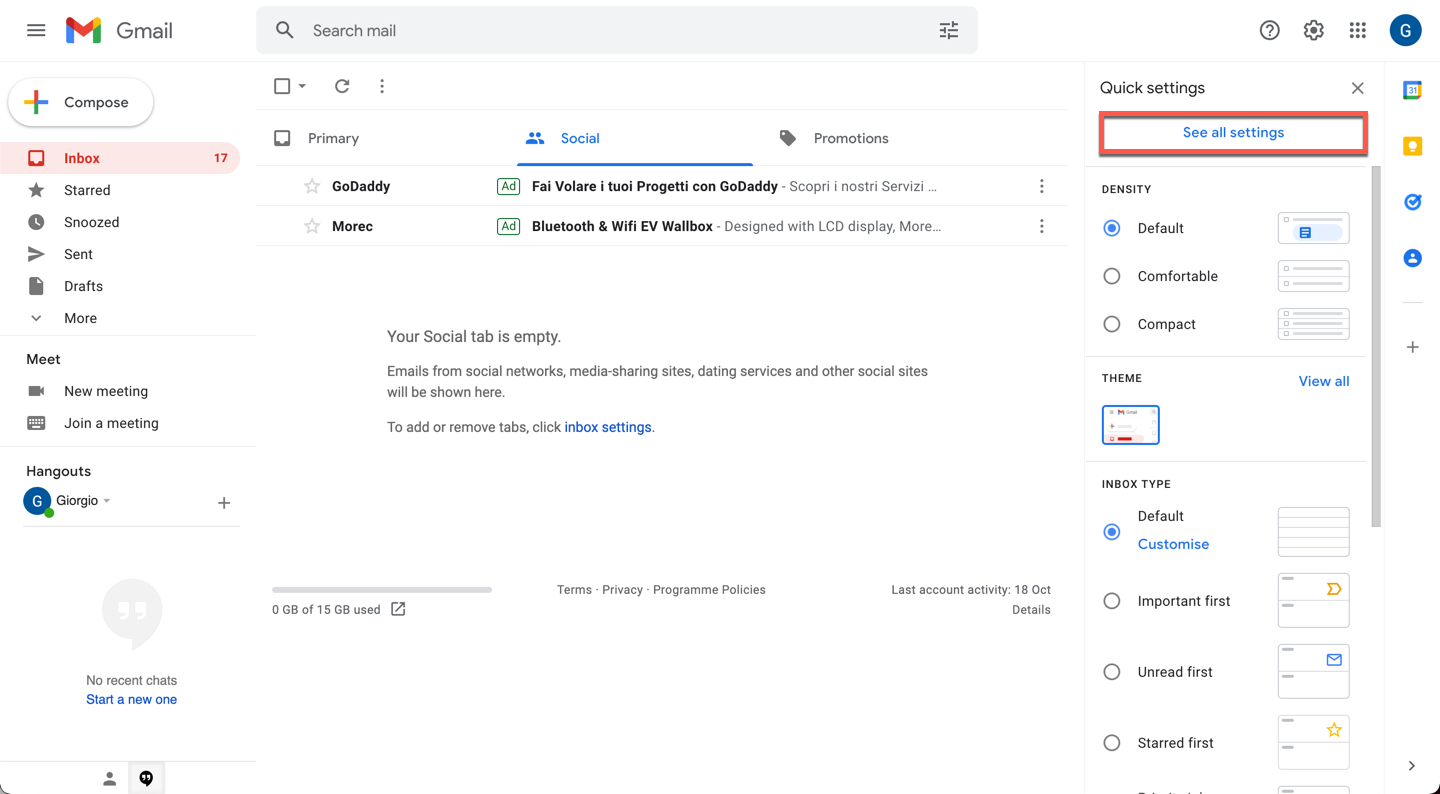
-
Click See All Settings.
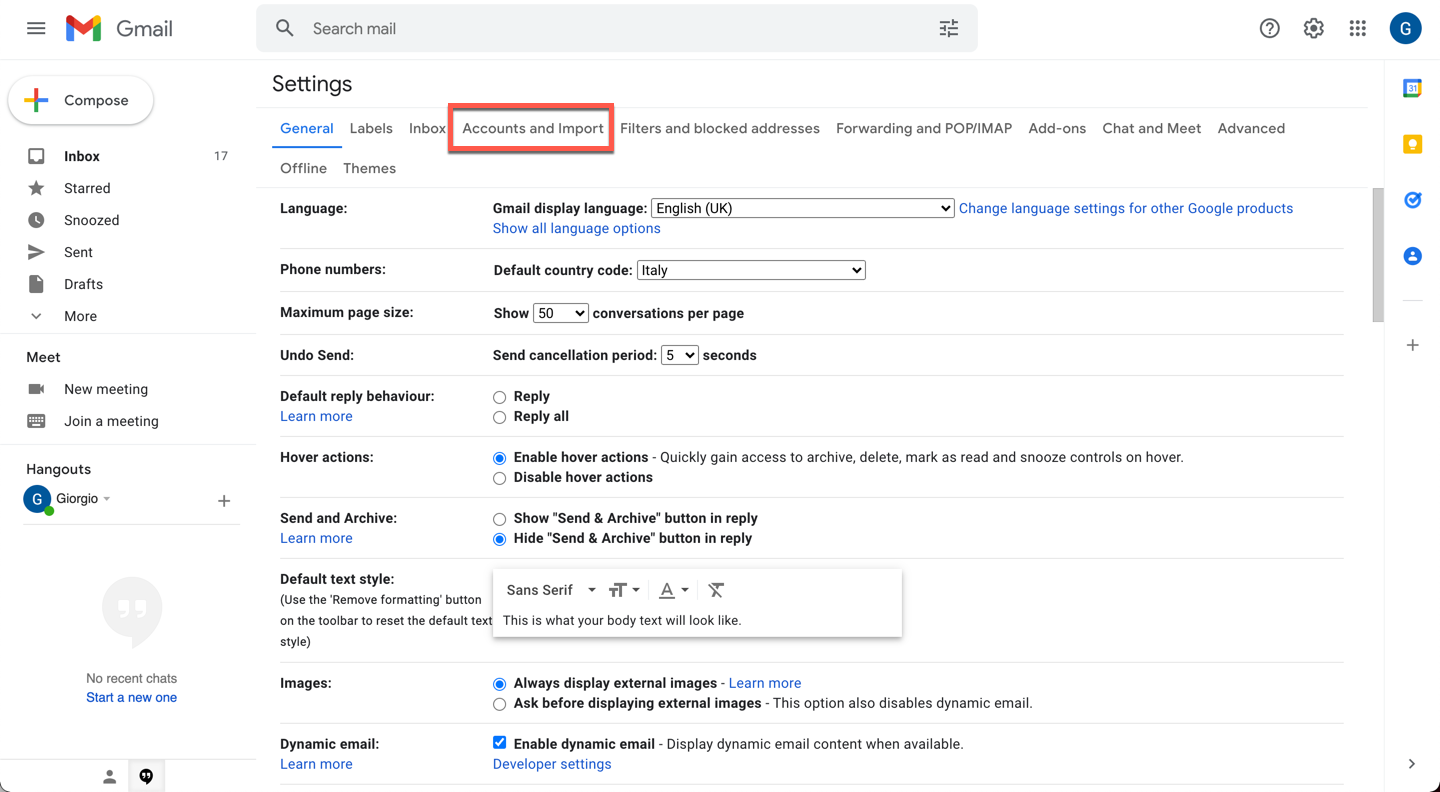
-
In the top menu bar, select Accounts and Import.
-
Under Send Email As select Add Another Email Address.
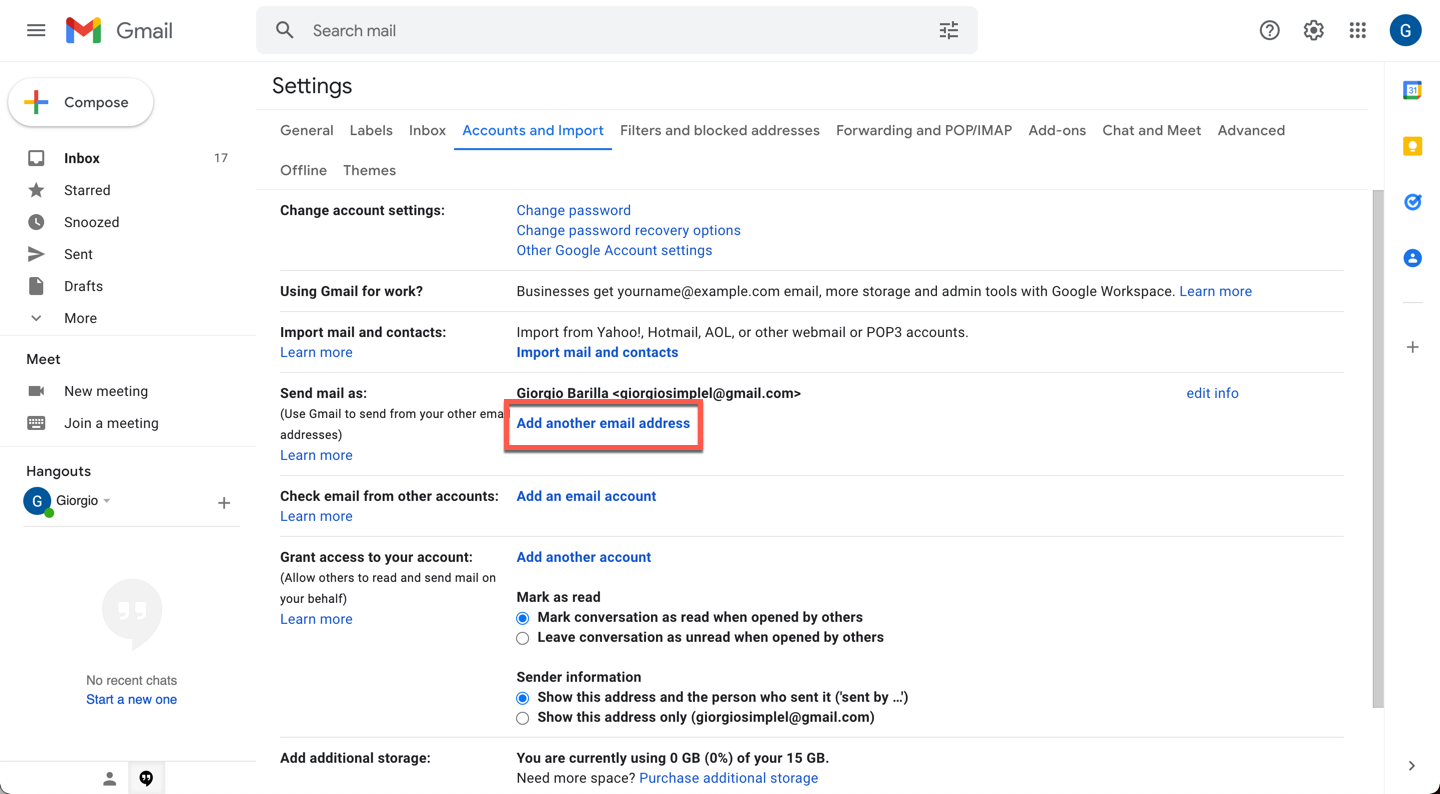
-
Add a new email address and make sure Treat as Alias is selected.
-
Once that’s done, when you send a message, choose which address to send from. Recipients see that the message came from whichever address you chose.
That’s it!
As you can see, this is not a very useful alias. You still need two email addresses, and all you’re doing is connecting them to the same email inbox and potentially hiding your real email address from the receiver.
However, you’re not optimizing your time or money, as you still need two accounts in two separate providers.
How to Create a Platform-agnostic Alias
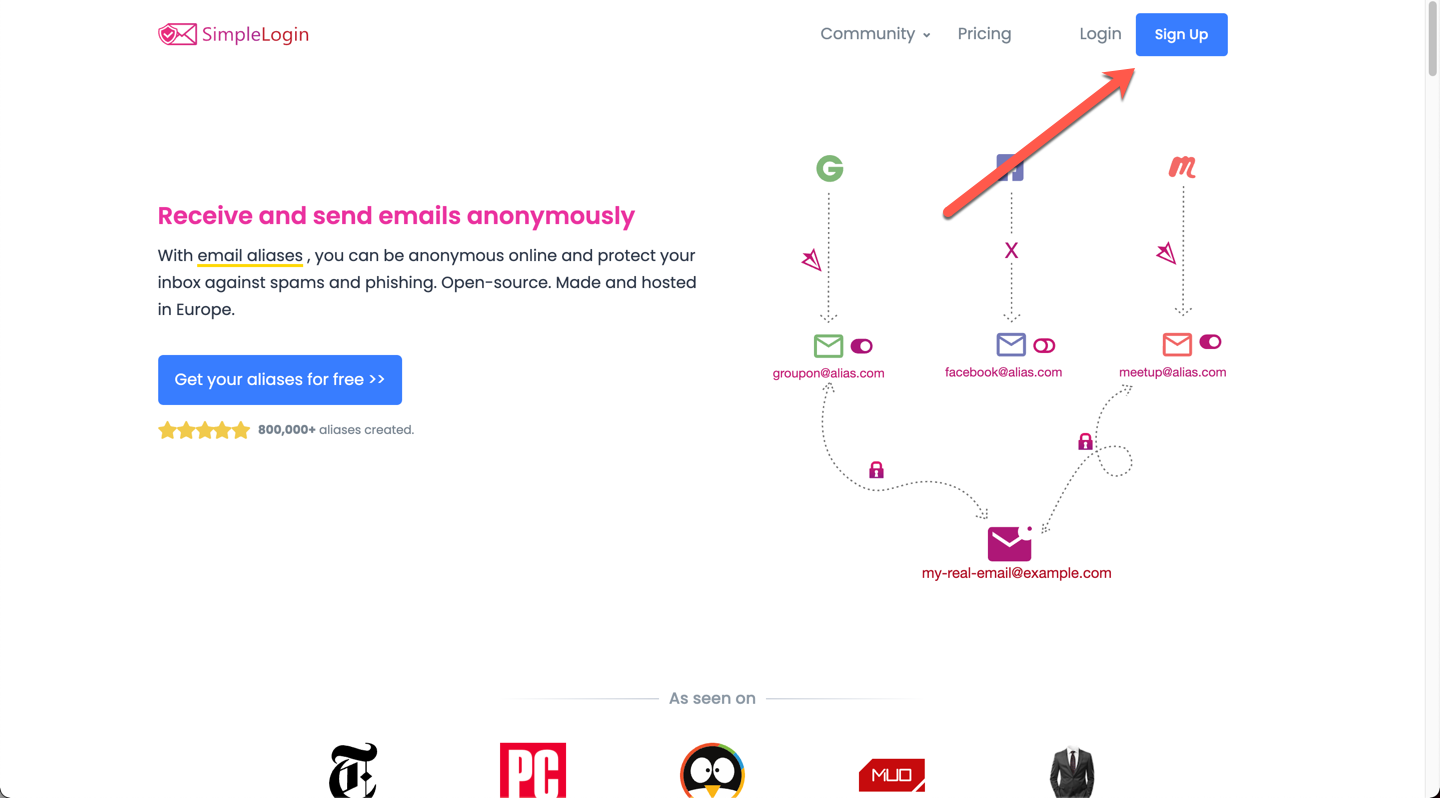
If you want a fully platform-agnostic alias, one of the solutions available is SimpleLogin. (Disclaimer: I’m personally associated with SimpleLogin.)
To create a SimpleLogin account, head over to https://simplelogin.io and register for free.
-
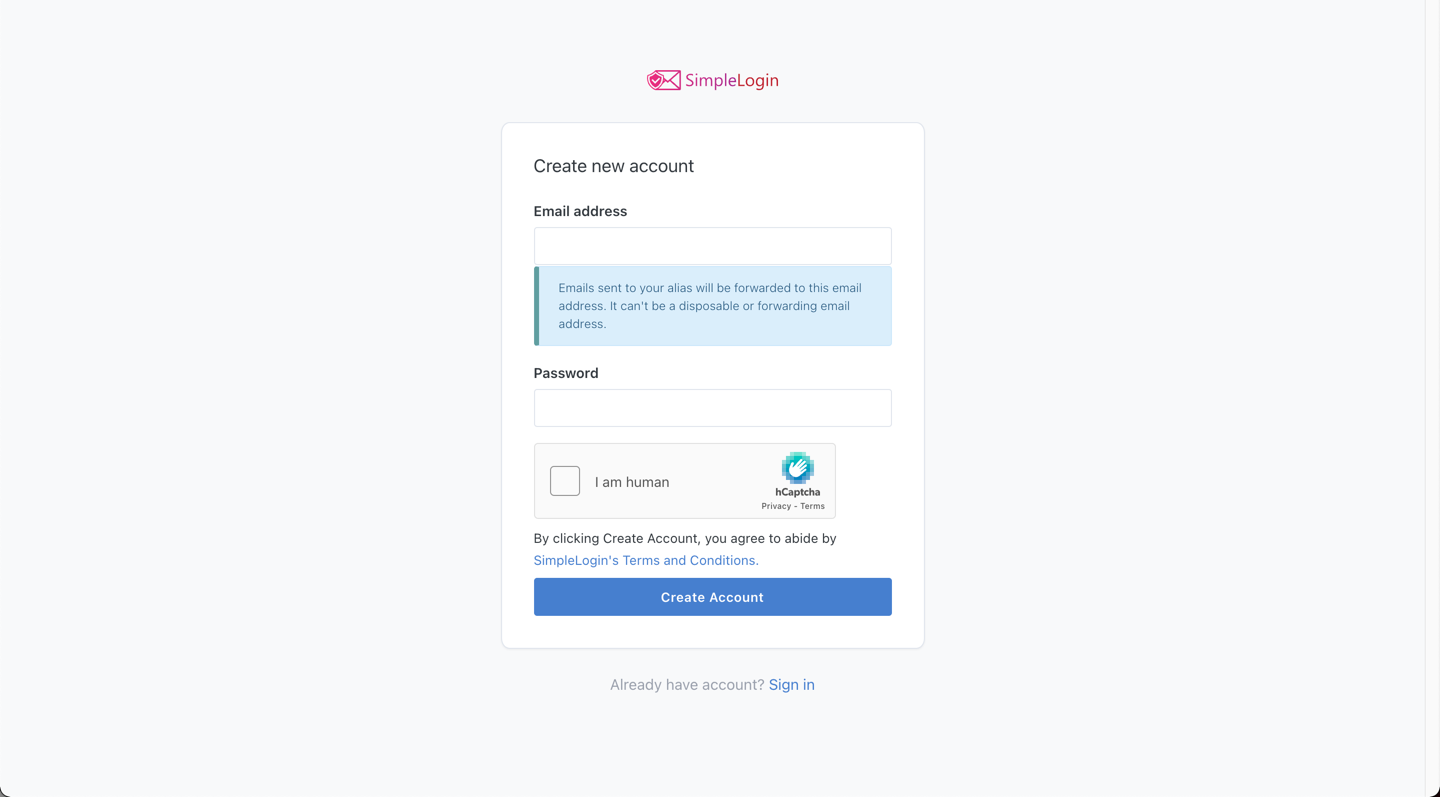
Head over to https://simplelogin.io and register for free. Click on Sign Up at the top-right corner.
-
Input your email address and a password for your SimpleLogin account.
-
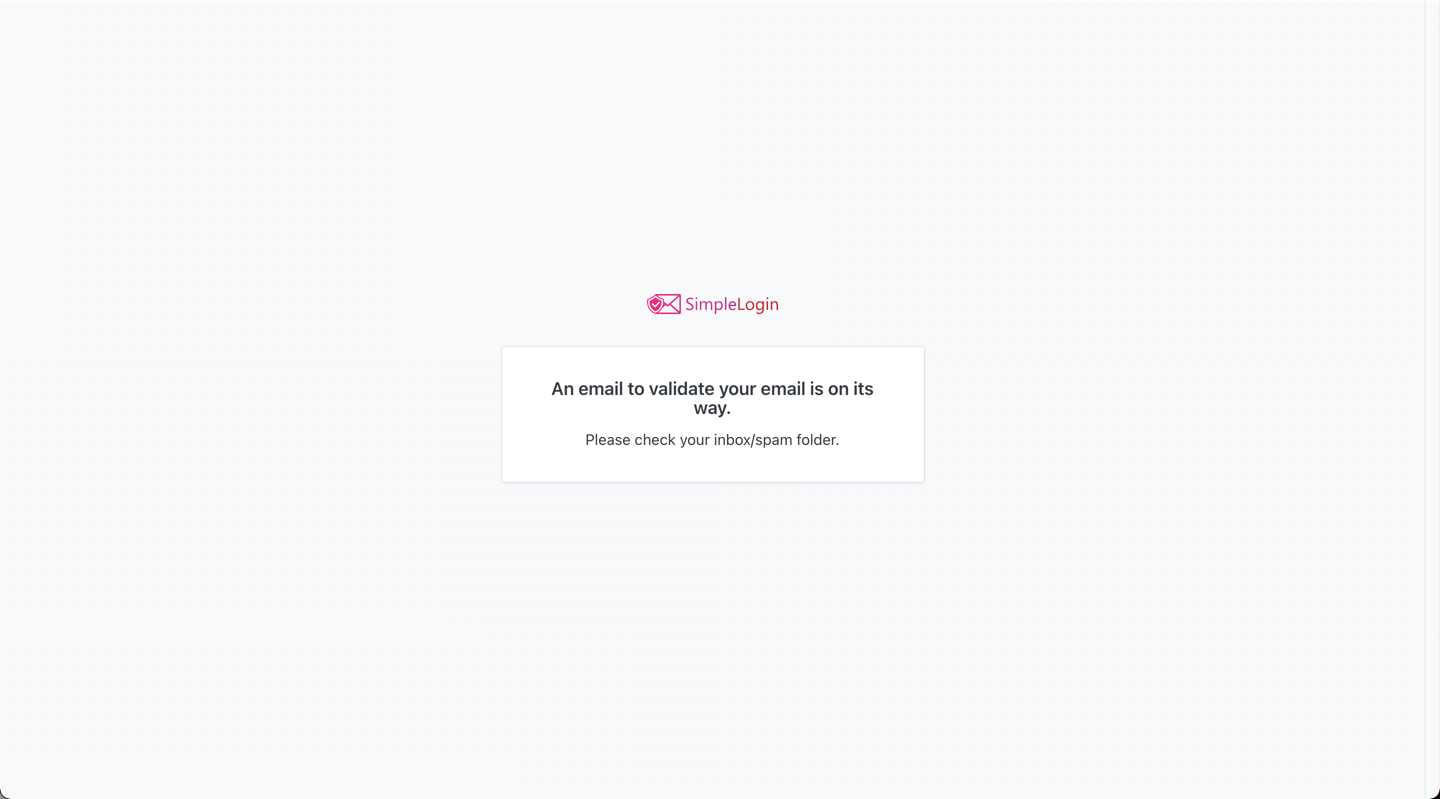
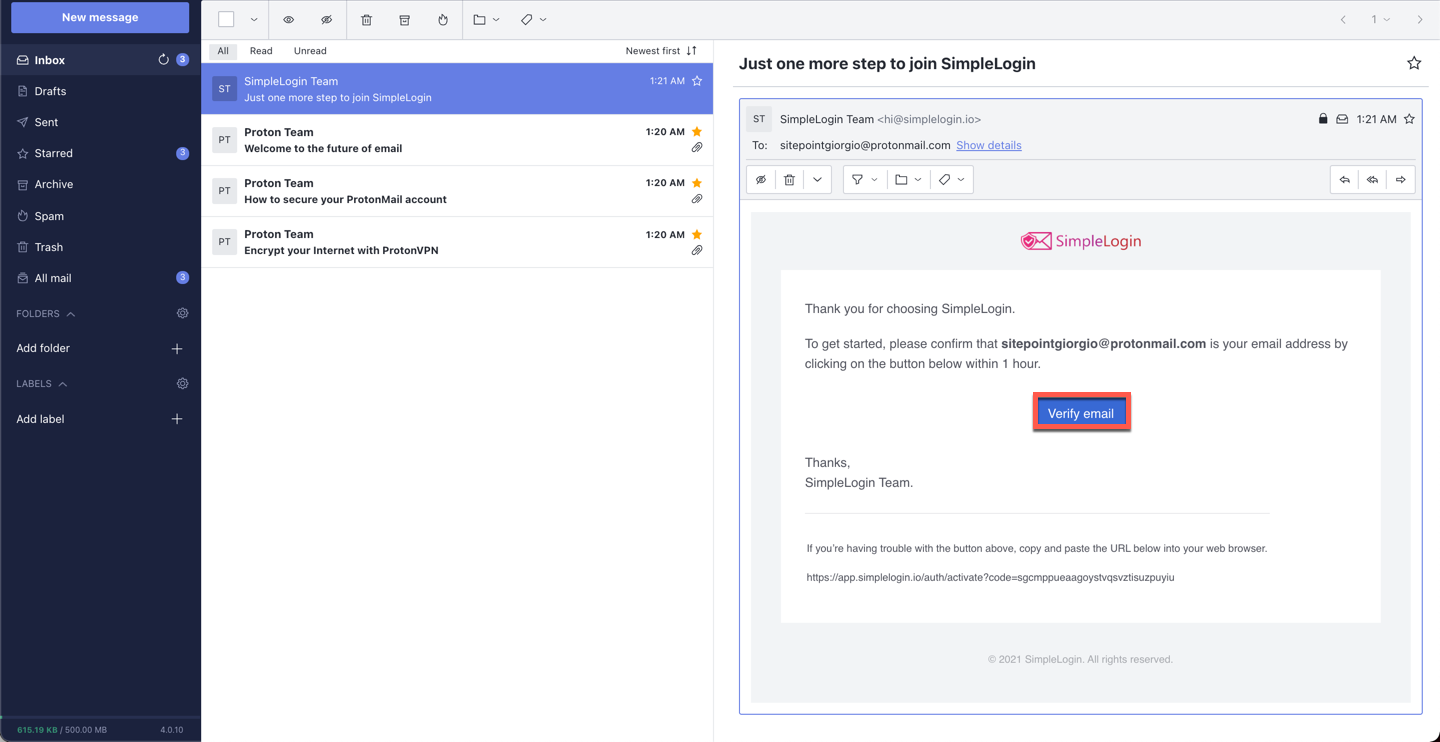
SimpleLogin will send a validation email to the address inserted.
-
Click on Verify Email in the email you just received.
-
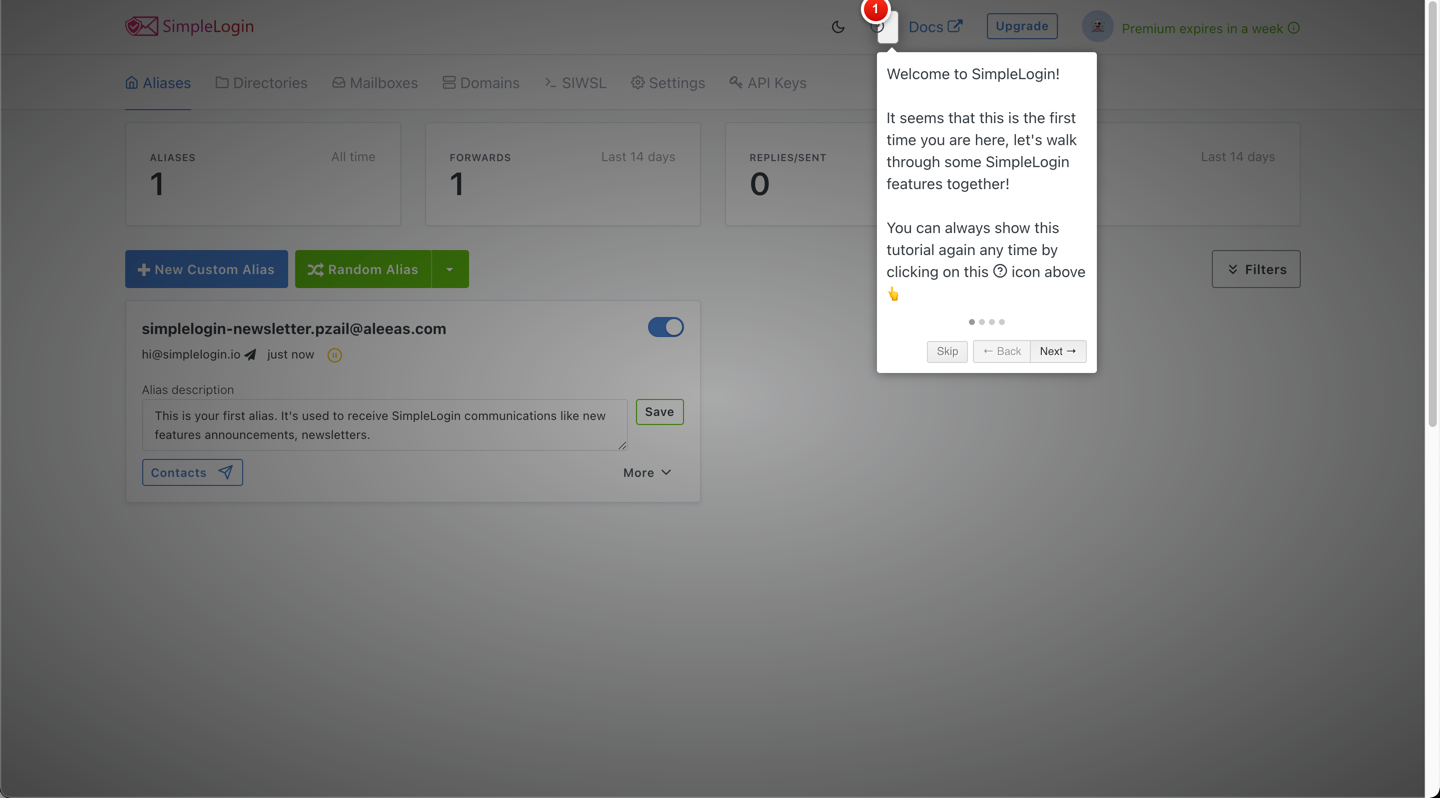
You’ll be redirected inside your SimpleLogin’s Dashboard! Make sure to follow the guided tutorial, as it provides important information and only takes a couple of minutes. ????
-
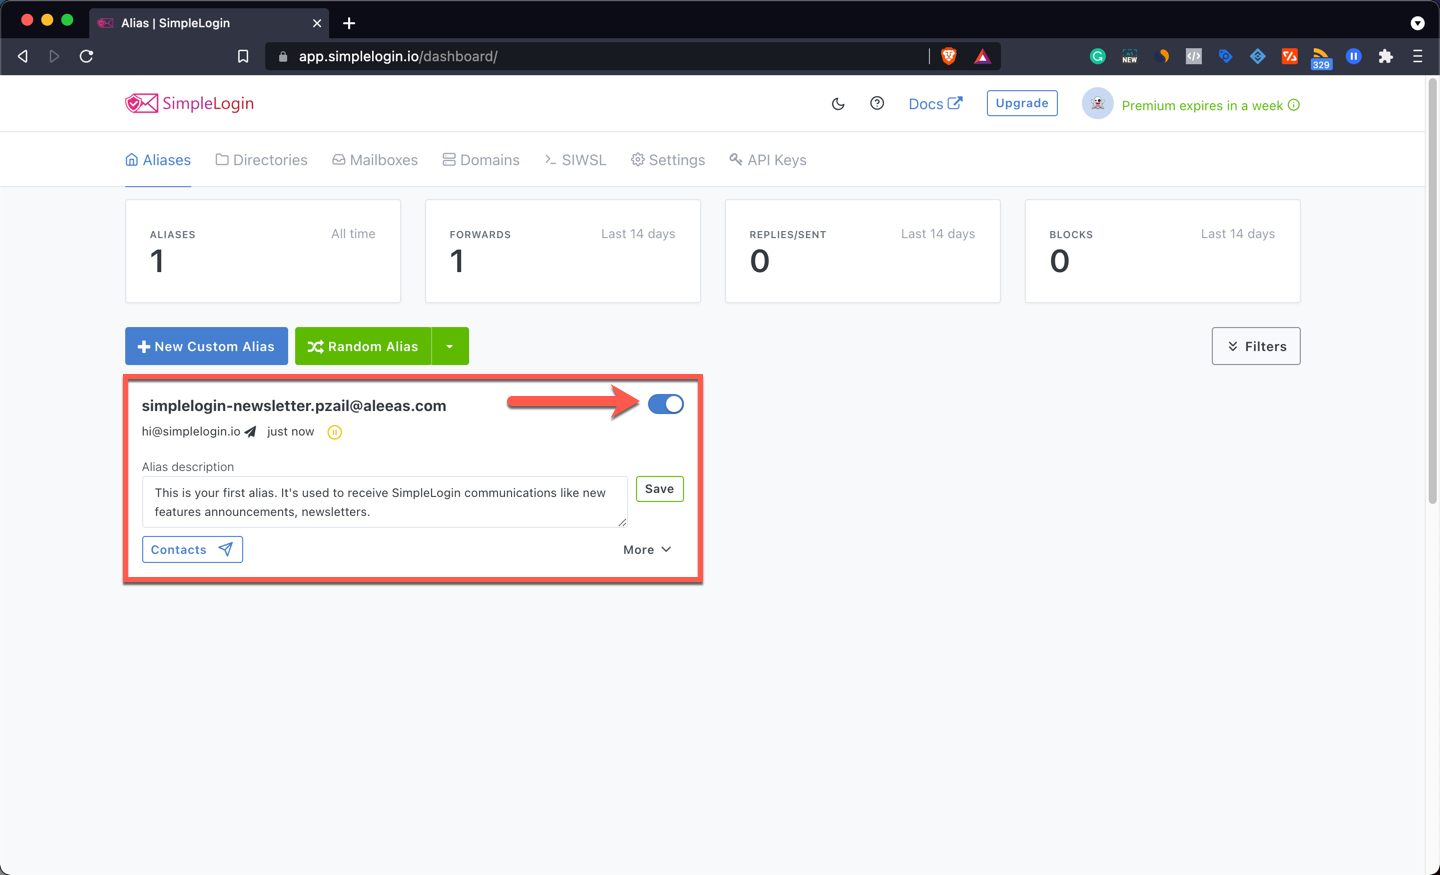
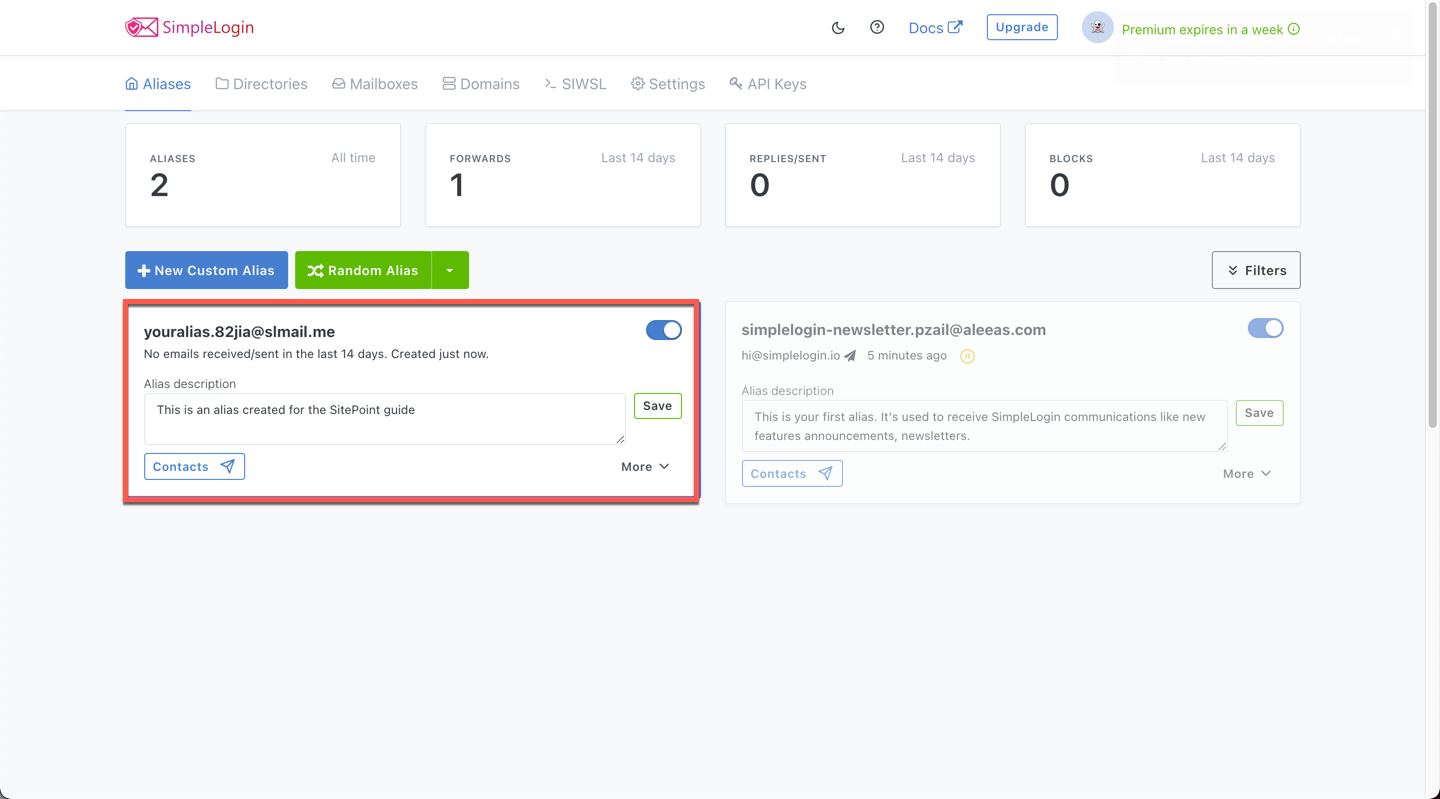
Your first alias will already be in the dashboard. That’s to receive email newsletters from SimpleLogin. If you wish to stop receiving it — you guessed it — just click on the toggle and the alias will be deactivated.
-
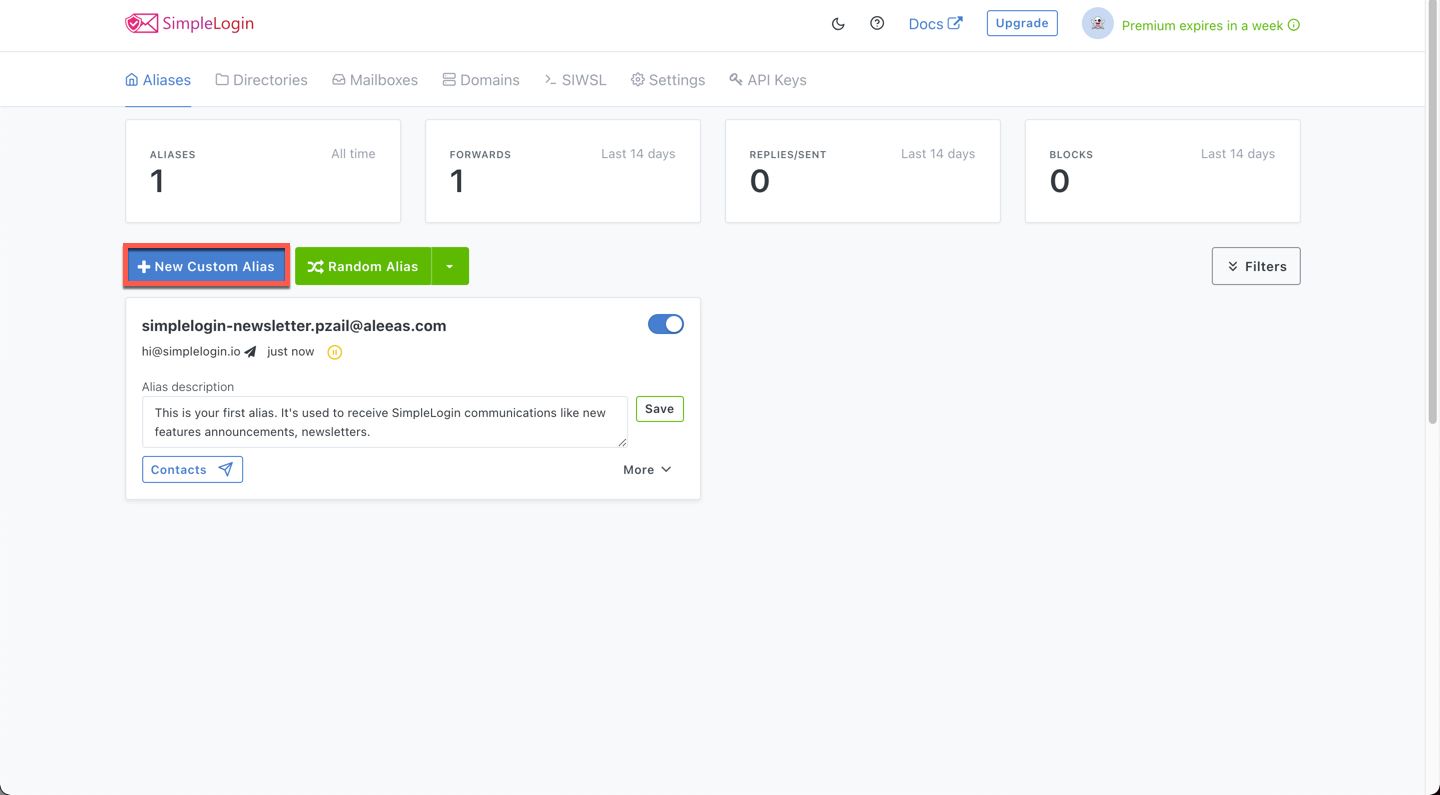
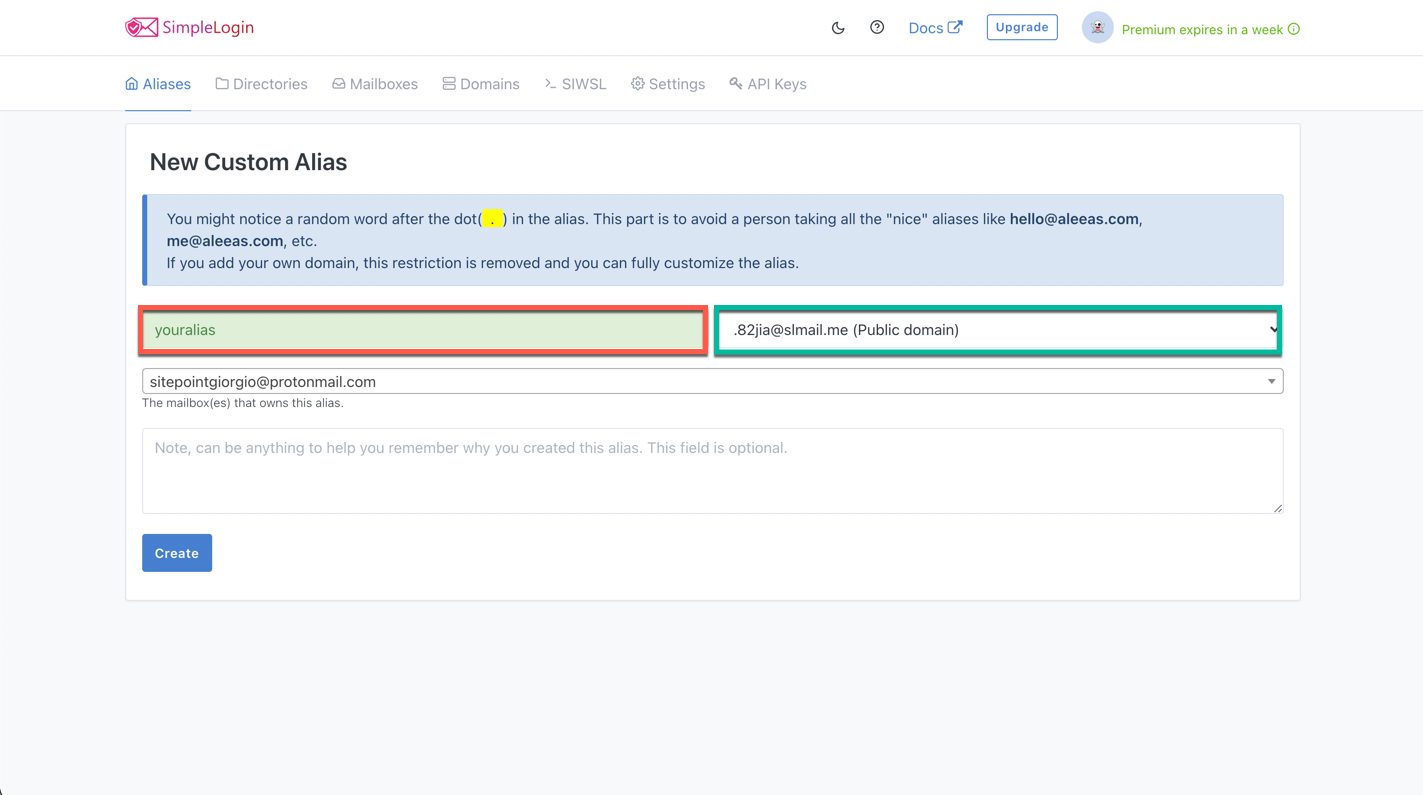
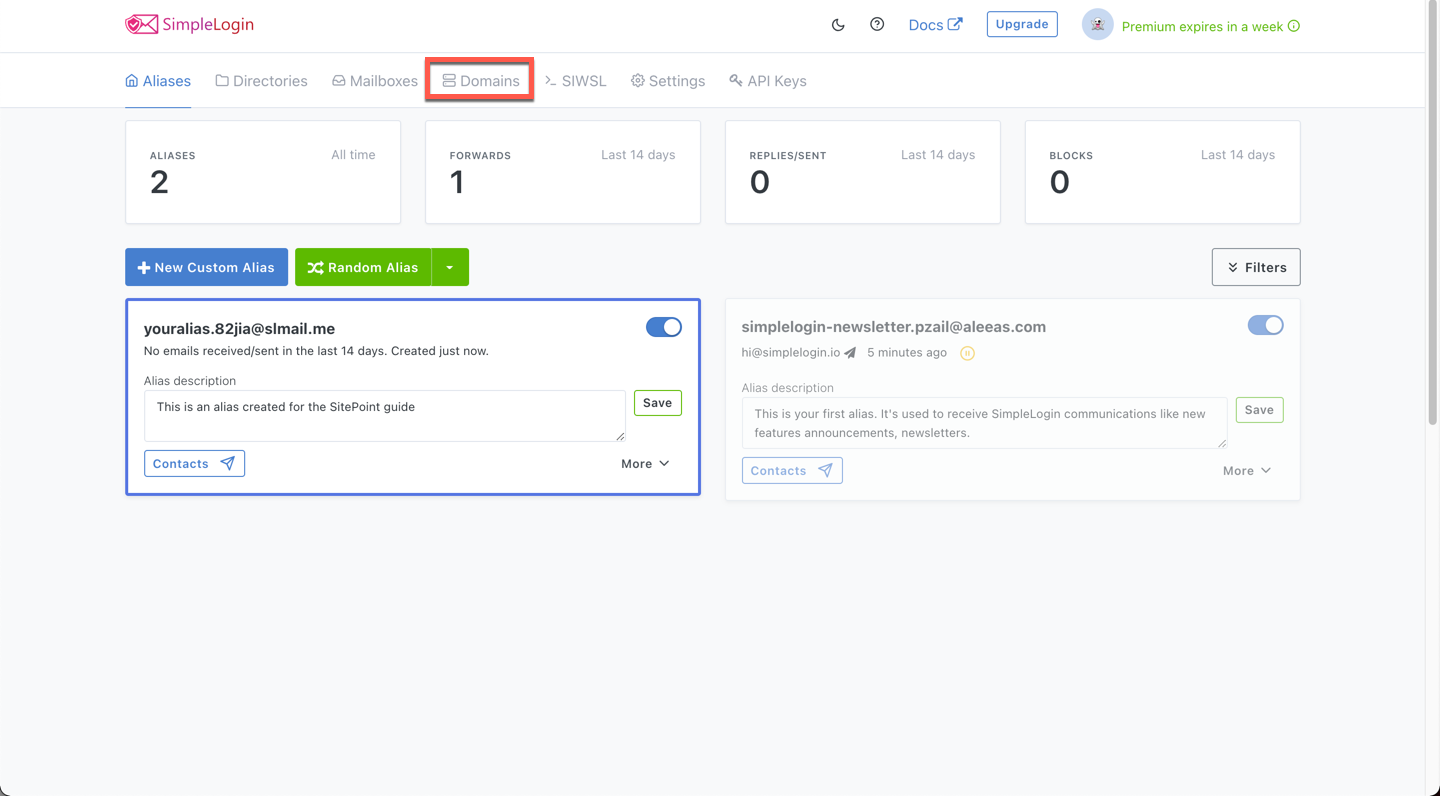
Now things get fun! Click on New Custom Alias.
-
Choose your preferred alias name and a domain name from the list of publicly available, free domains SimpleLogin provides for all accounts.
-
Choose the real mailbox(es) that will receive emails sent to this alias. (You can choose more than one if you connect multiple email addresses!)
-
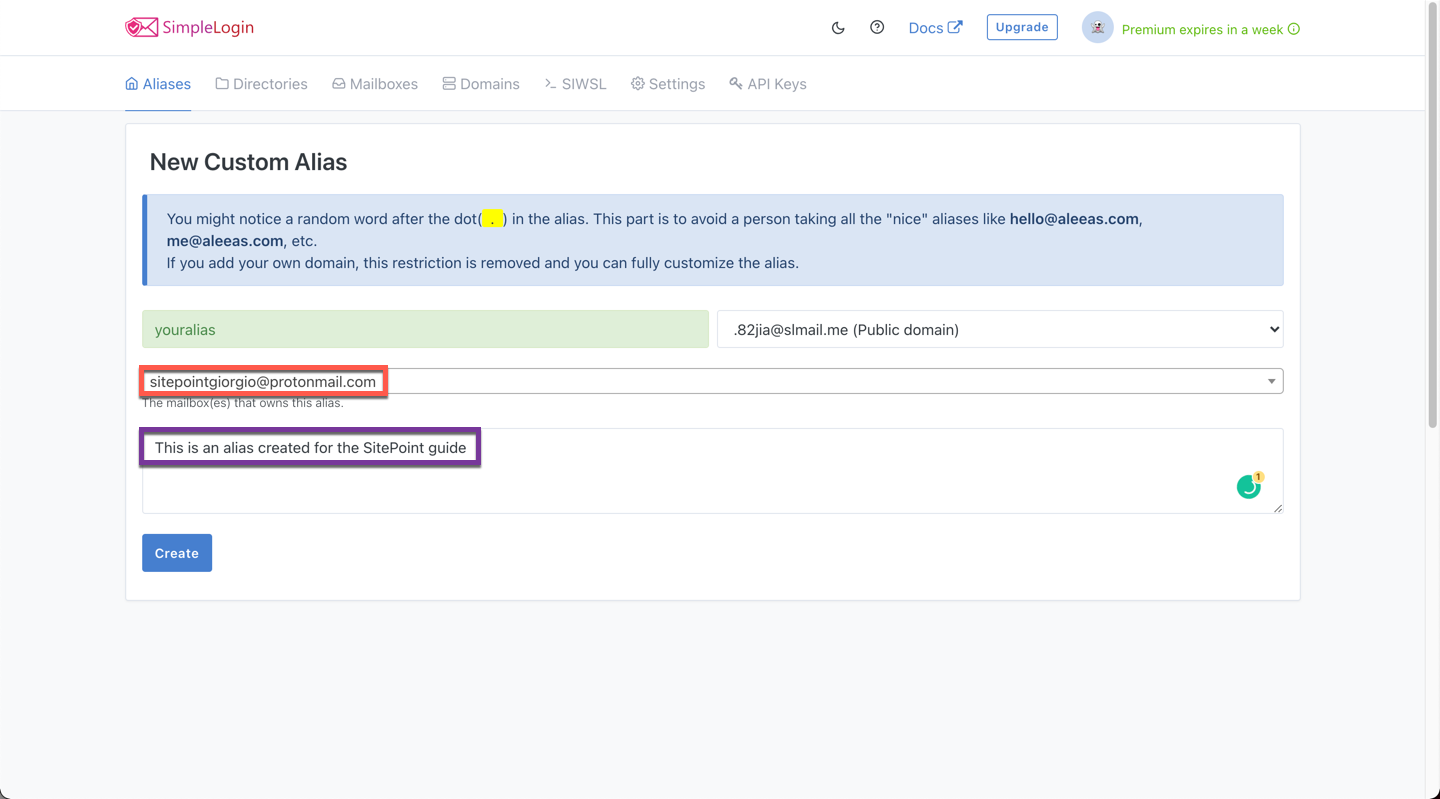
That’s it; your platform-agnostic alias is ready. It was painless, wasn’t it? ????
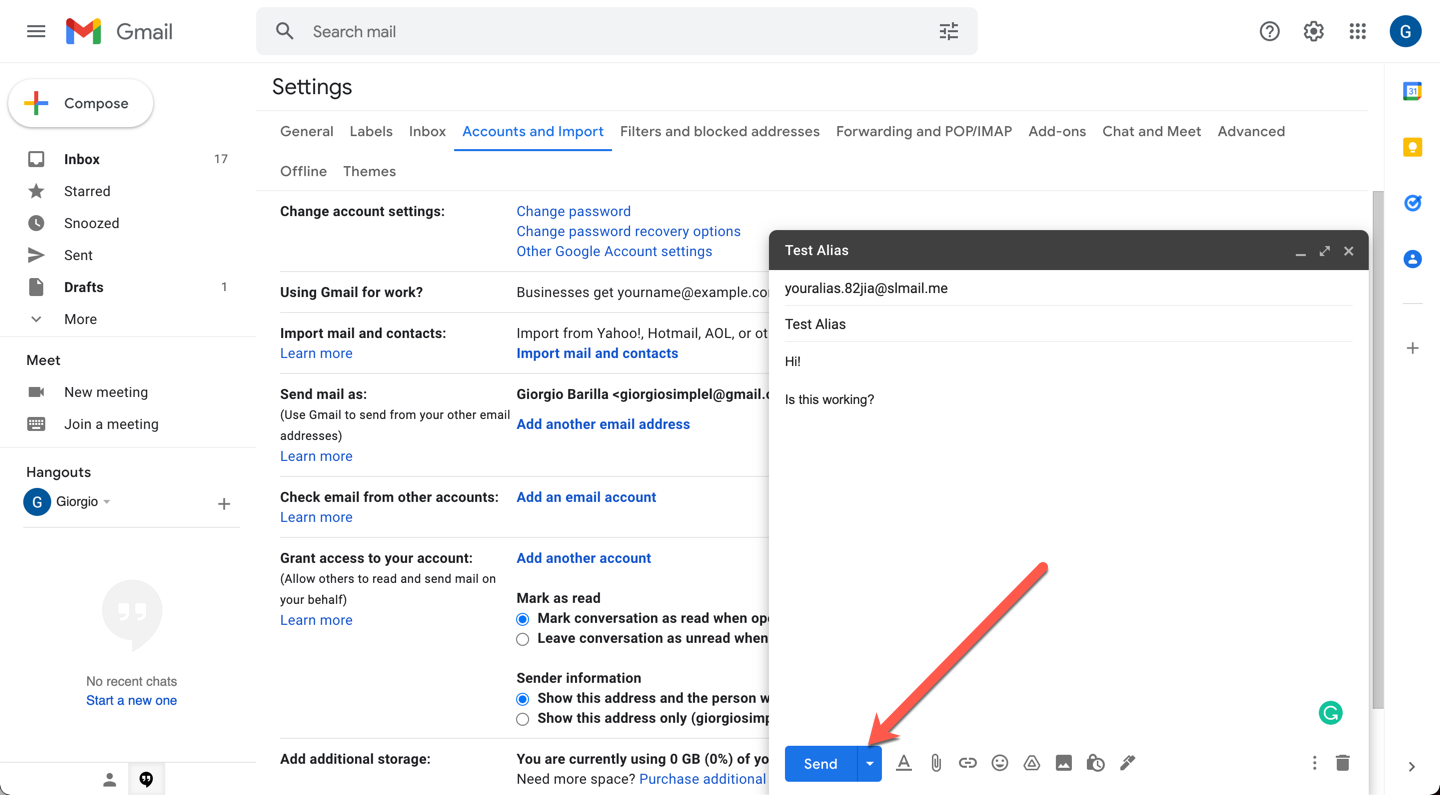
Before we move on, it’s a good idea to test if the alias is working as intended. We just need to send an email to the alias we just generated. Let’s do that from Gmail.
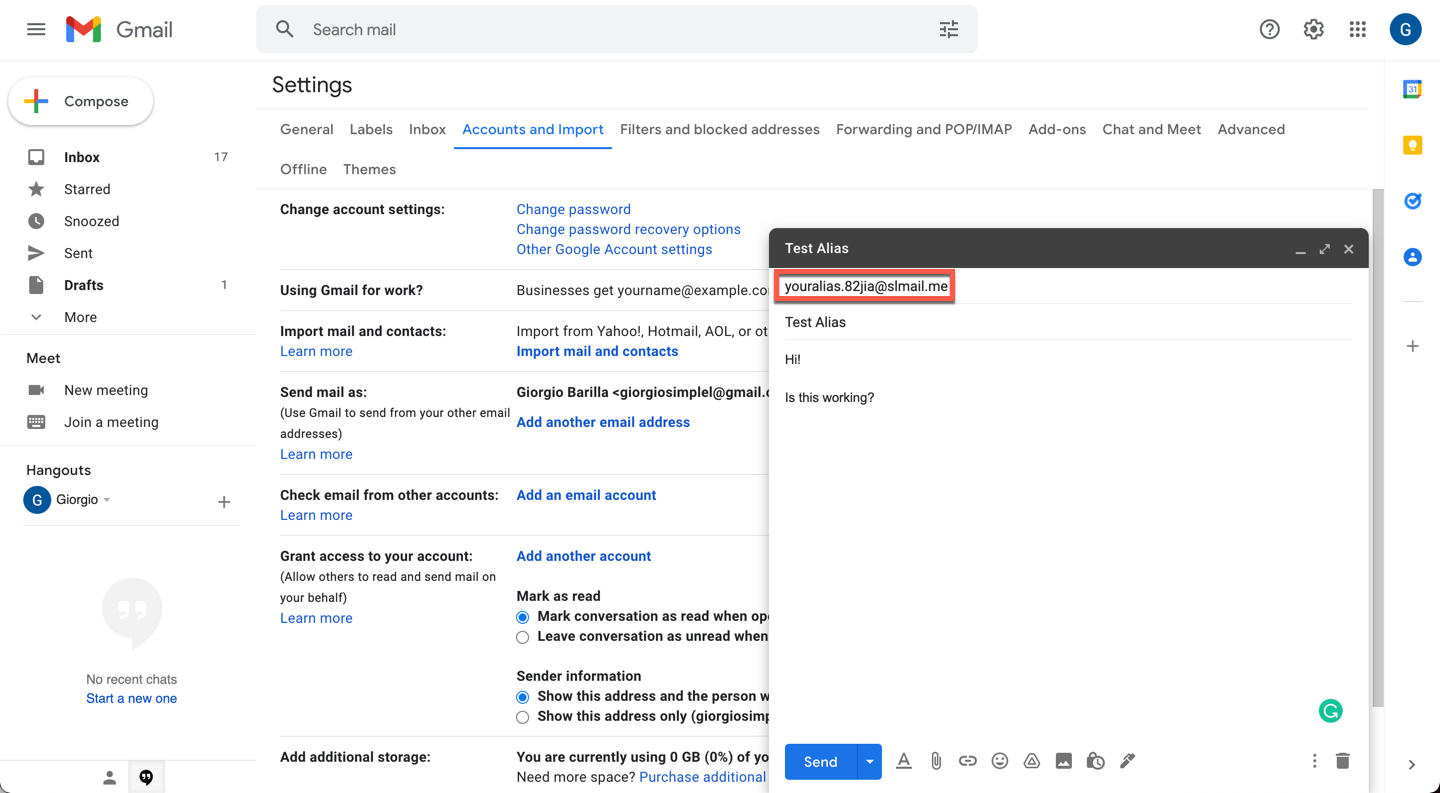
That’s our freshly created alias! Let’s send the email.
If everything worked as intended, we should now receive the email to the email alias associated with your alias.82jia@slmail.me, hence giorgiositepoint@protonmail.com. Let’s check!
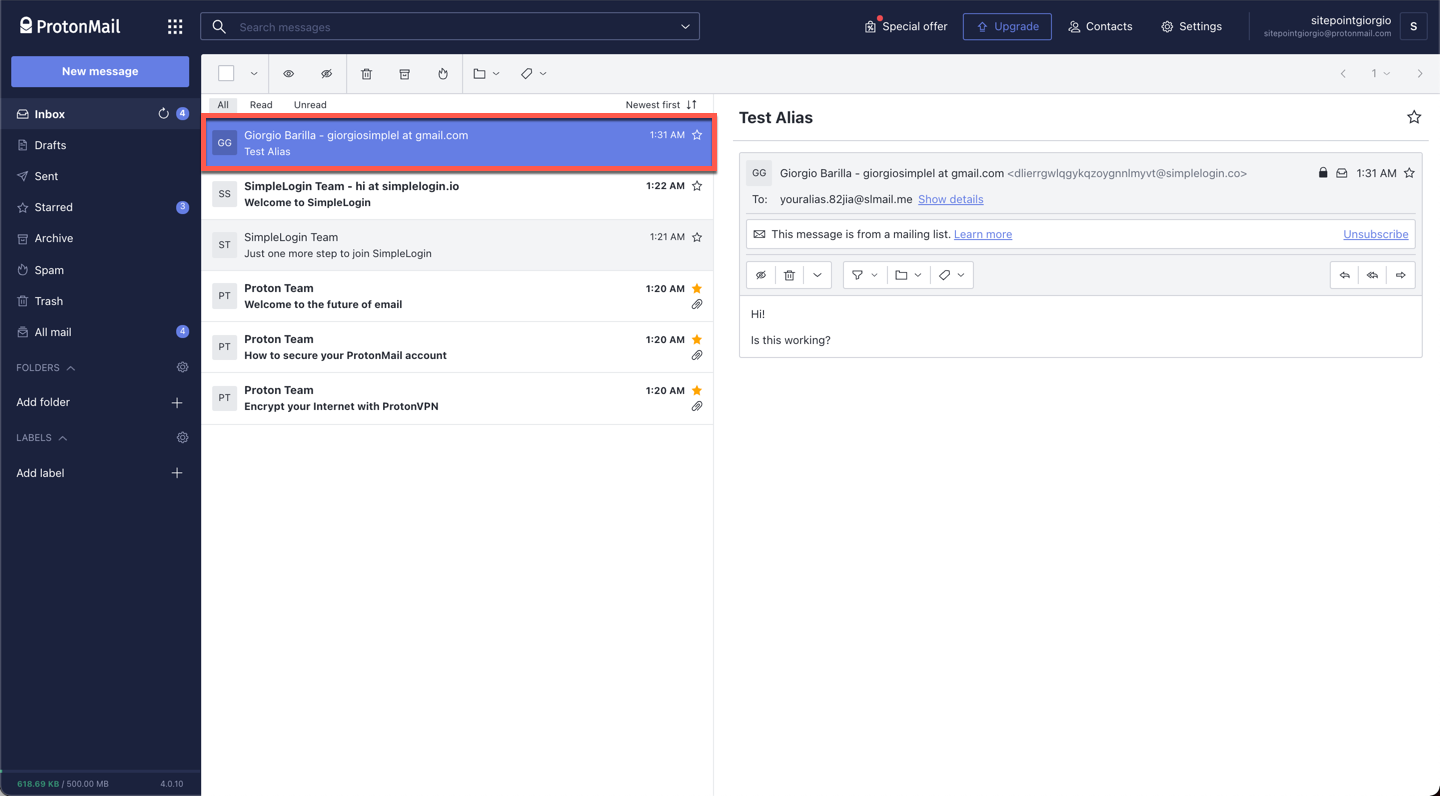
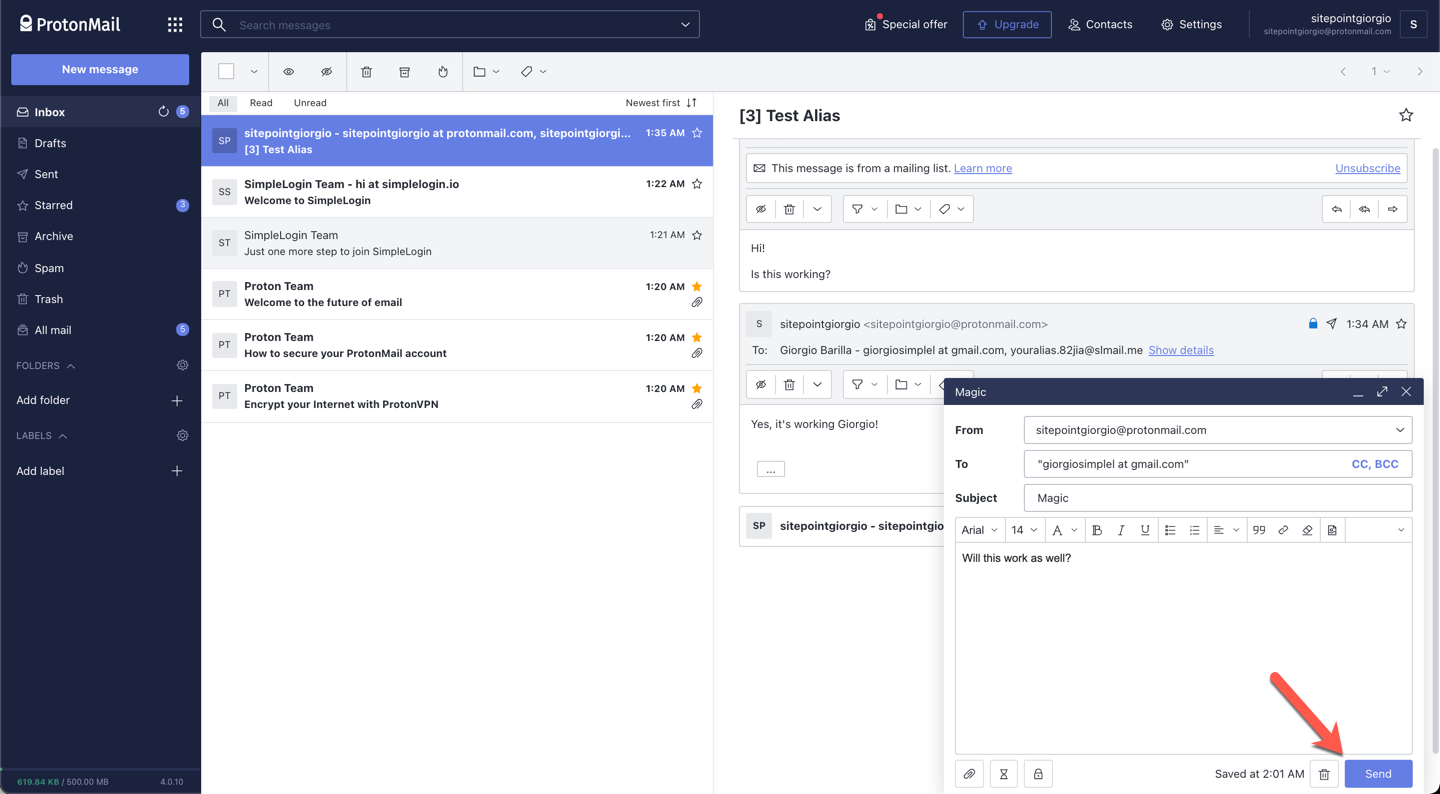
Here we go: there’s the email sent to the alias. Beautiful, isn’t it? Almost feels like magic.
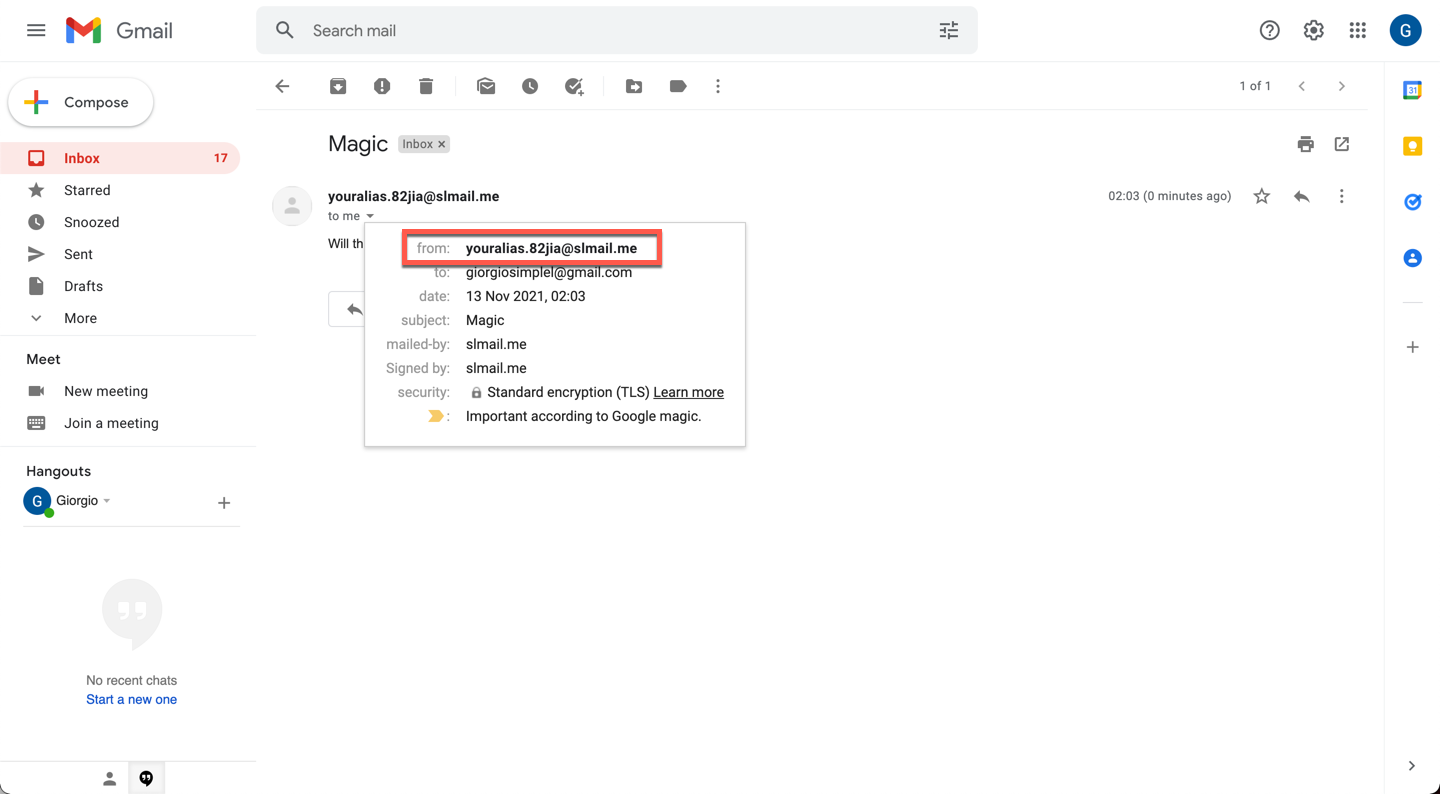
Just to confirm our identity is indeed protected, let’s respond to the email from our inbox.
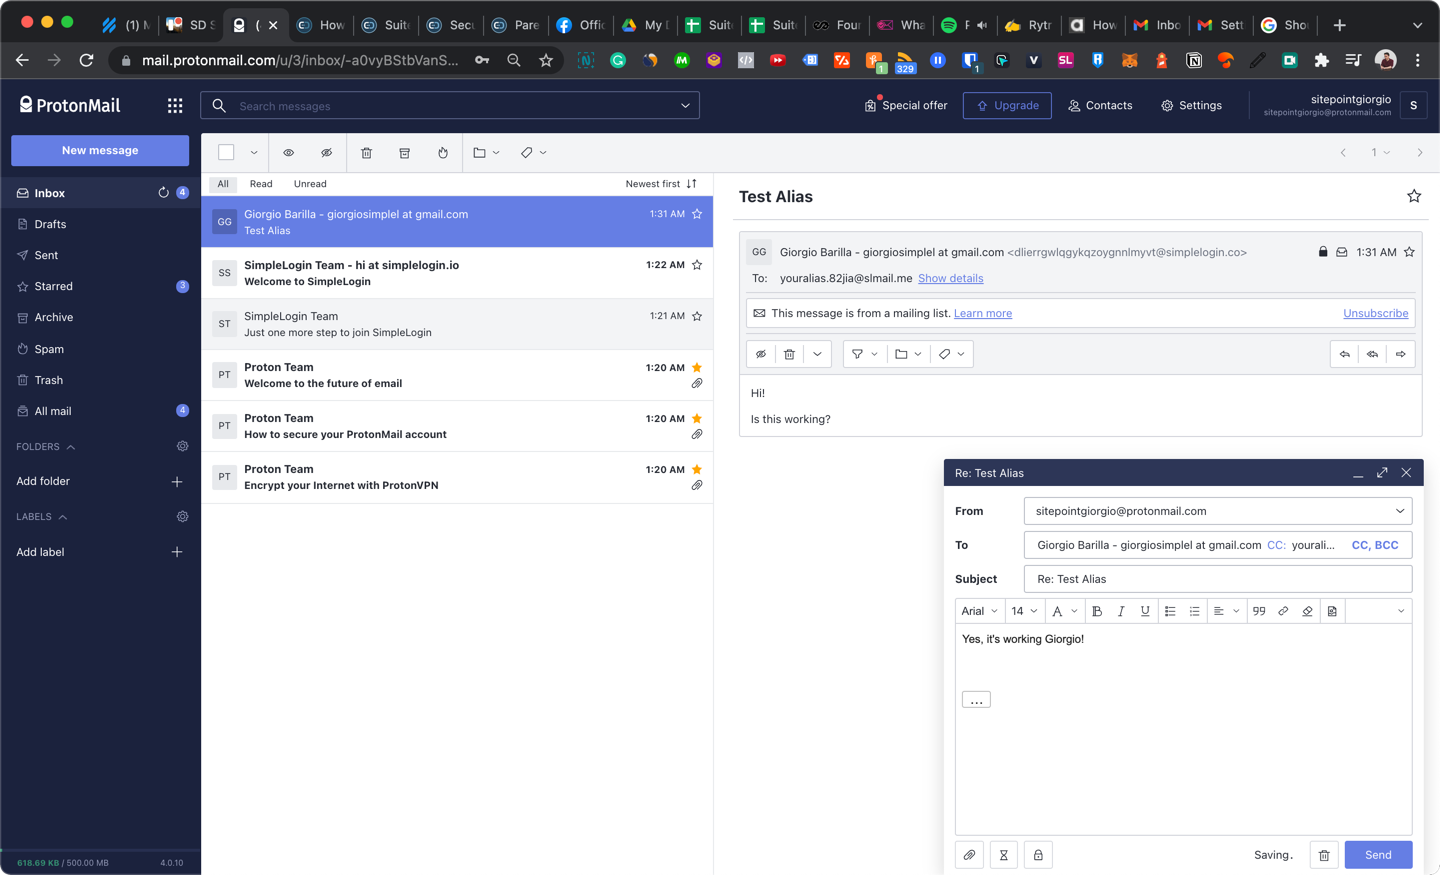
If everything worked as intended, we should now receive the response in our Gmail inbox with the “From Address” showing our alias, not our real Proton inbox.
Time for the truth…
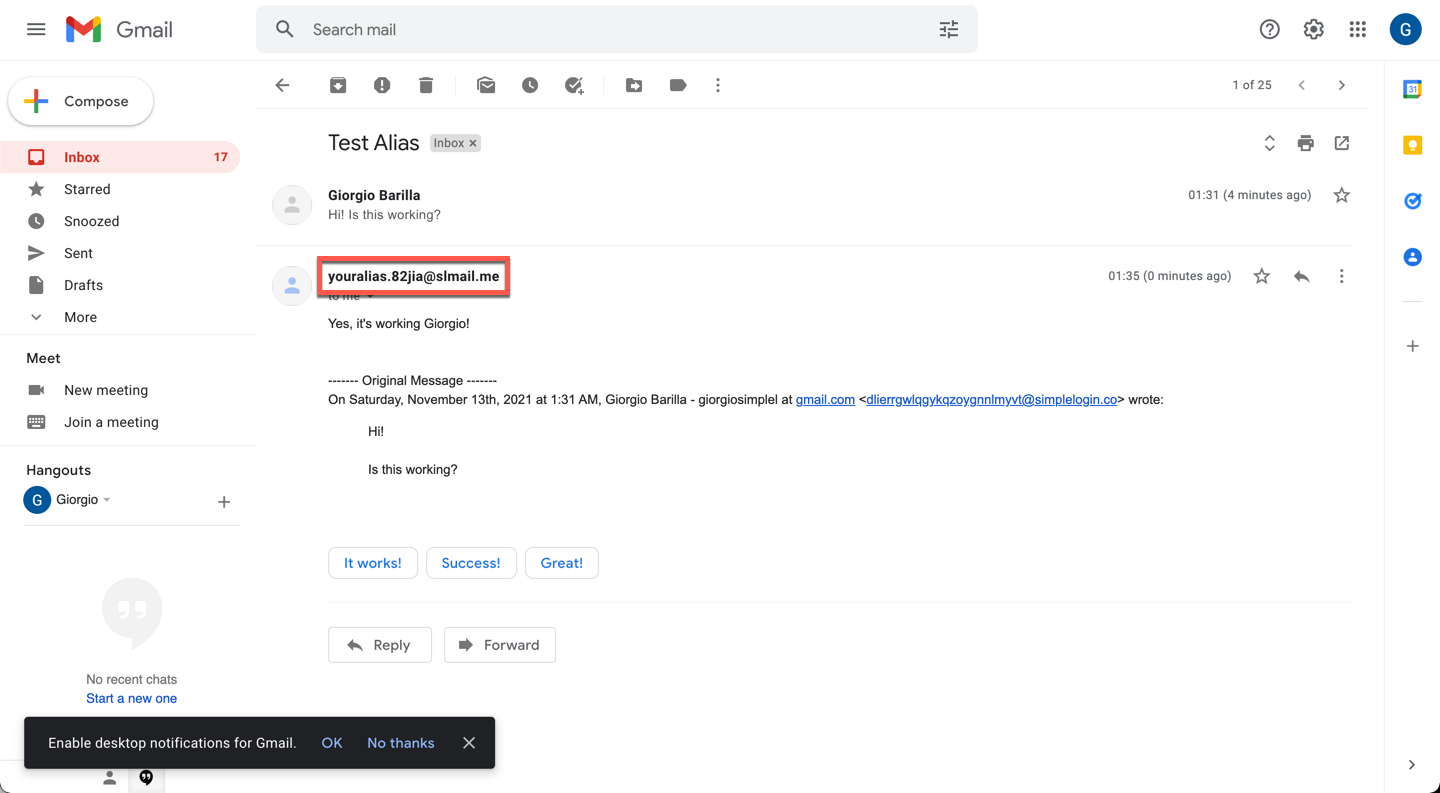
Wonderful!
Just to recap, we:
- created a platform-agnostic alias that we can connect to multiple mailboxes
- sent an email to the alias we just created
- received the message in the connected mailbox
- replied to that message
- received the reply from our alias, not the real mailbox
All of this for free.
If you’re more of a visual learner, here’s a video tutorial explaining the basics of the tool.
SimpleLogin isn’t the only tool for creating email aliases. There are several others that allow you to create platform-agnostic, beautiful and simple to use aliases.
Here are a few:
How to Connect a Custom Domain to an Alias
At the beginning of this article, I mentioned you can substitute professional email hosting with tools like SimpleLogin.
To do this, you’ll need to connect your domain to the tool through DNS records.
Don’t worry, it’s way less daunting than you might think.
For a quick example, let’s take a look at the procedure. Stick with it; it’s worth it, I promise!
-
Click on Domains from your SimpleLogin Dashboard
-
Type the name of your new domain inside the box.
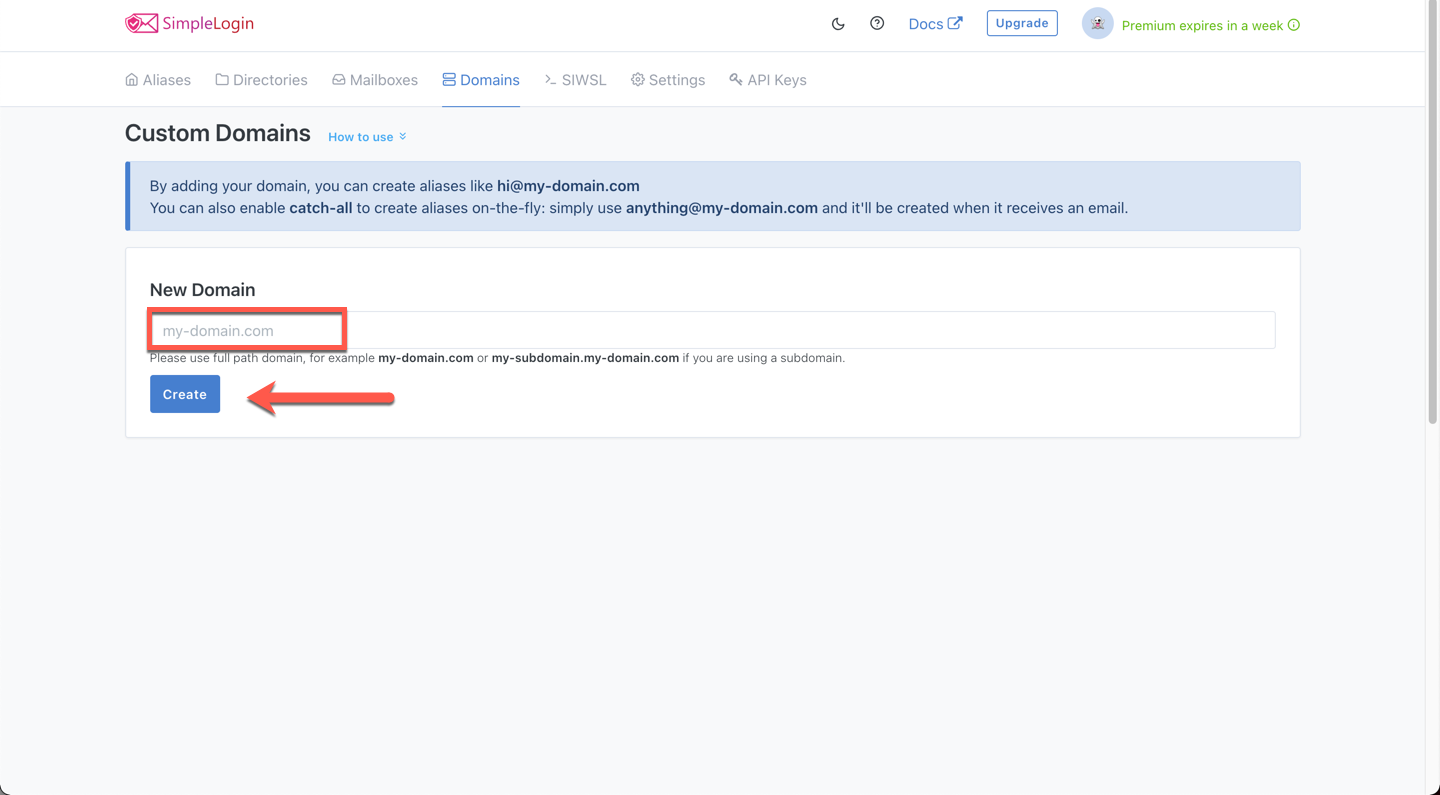
-
Add the TXT record and two MX records as detailed in the next step.
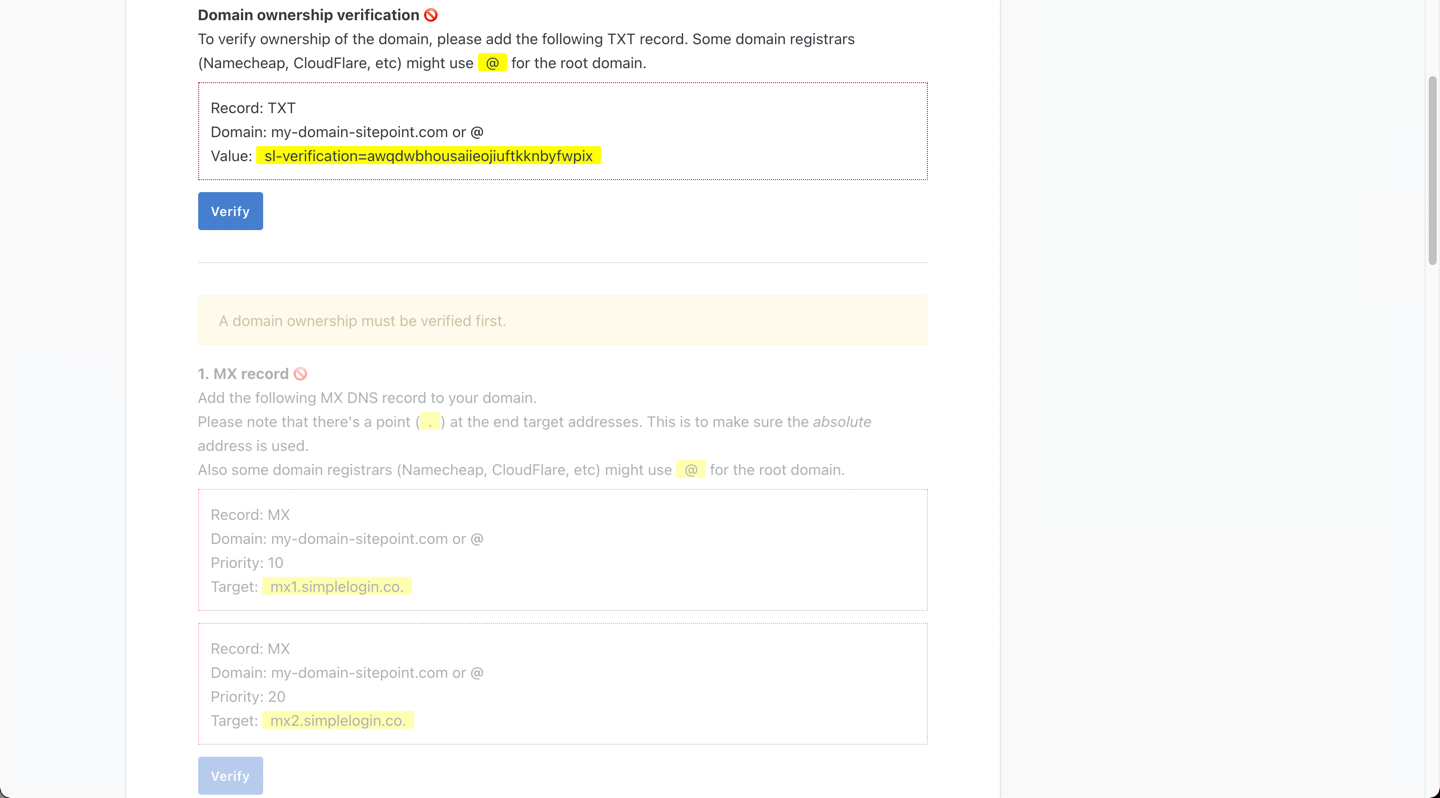
Once that’s done, your domain will start appearing in the dropdown when creating a new alias.
Your domain provider can help you change the DNS and point the TXT and MX records. Here’s a quick index of links for doing it on the most common domain providers:
To check whether your records propagated correctly, head over to DNS Checker and insert your domain.
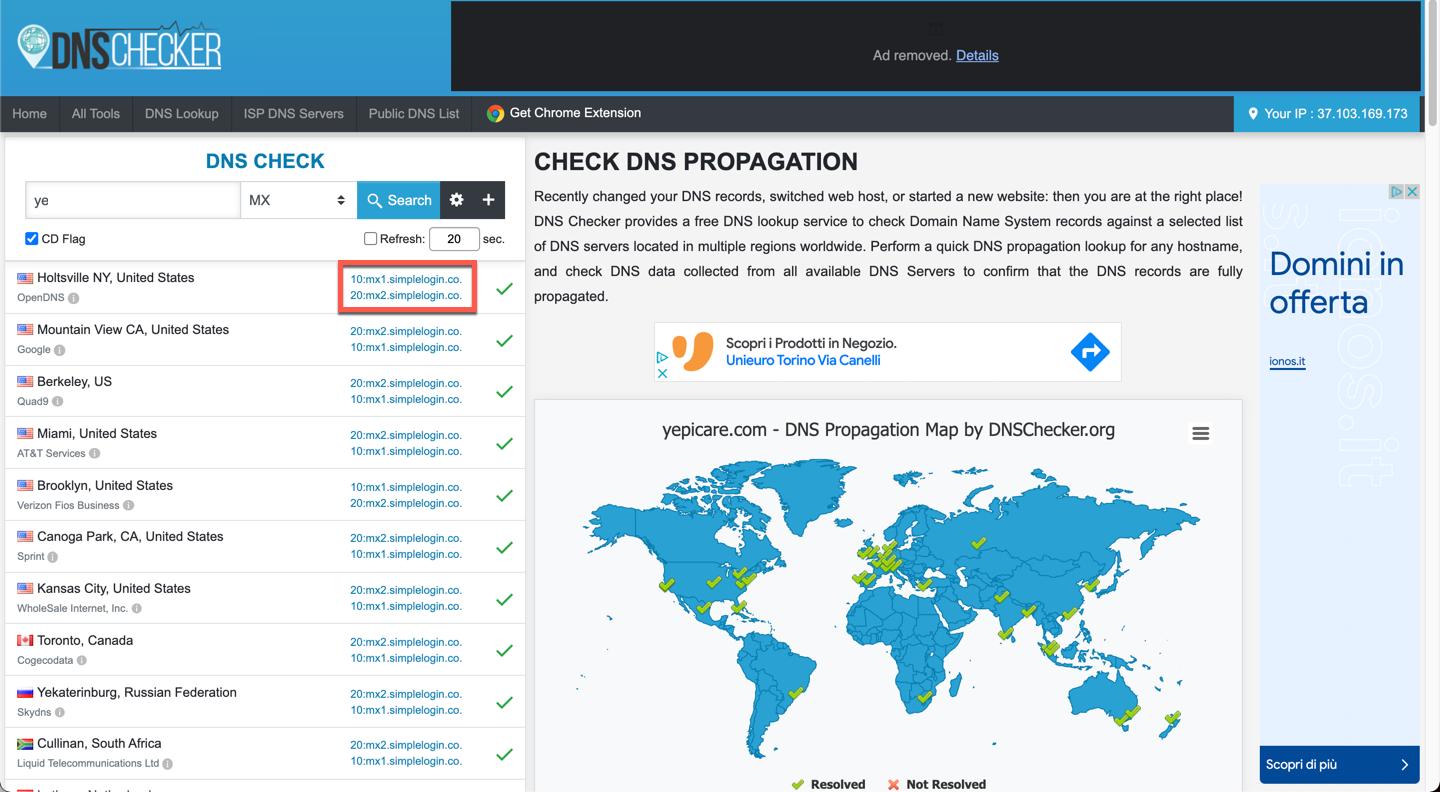
You can check both the MX record and A records. Once everything is done, your SimpleLogin domain will show up as verified.
How to Send an Email from an Alias Address
Now we’ll look at how to send an email using your alias. After all, you can’t use an alias for business purposes if your alias can only receive messages, right?
Happily, sending an email from your alias is quite easy. The first time, it will feel a bit convoluted, but keep working on it, and it’ll become second nature for you. The team at SimpleLogin and other teams around the world use aliases every day to manage internal operations, transfer email aliases from one person to another, and mask their emails.
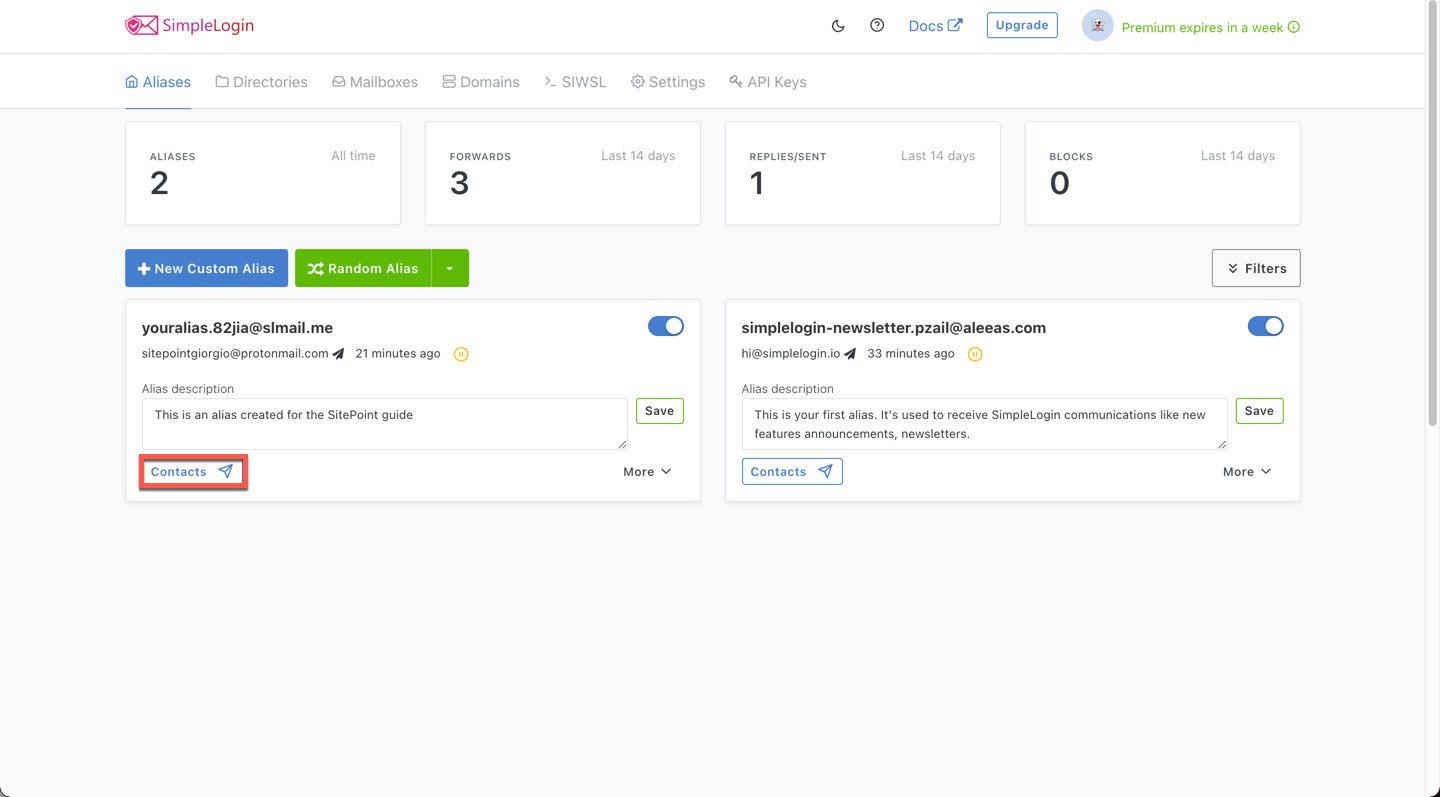
-
Click on Contacts at the bottom of the alias you want to use to send the email. You’ll only be able to send an email with this alias using the mailboxes associated with it. Since we associated our ProtonMail account to this alias, we’ll only be able to send emails from this alias using the mentioned ProtonMail inbox.
-
Type in the email address you want to send an email to. In our example, let’s use the Gmail account.
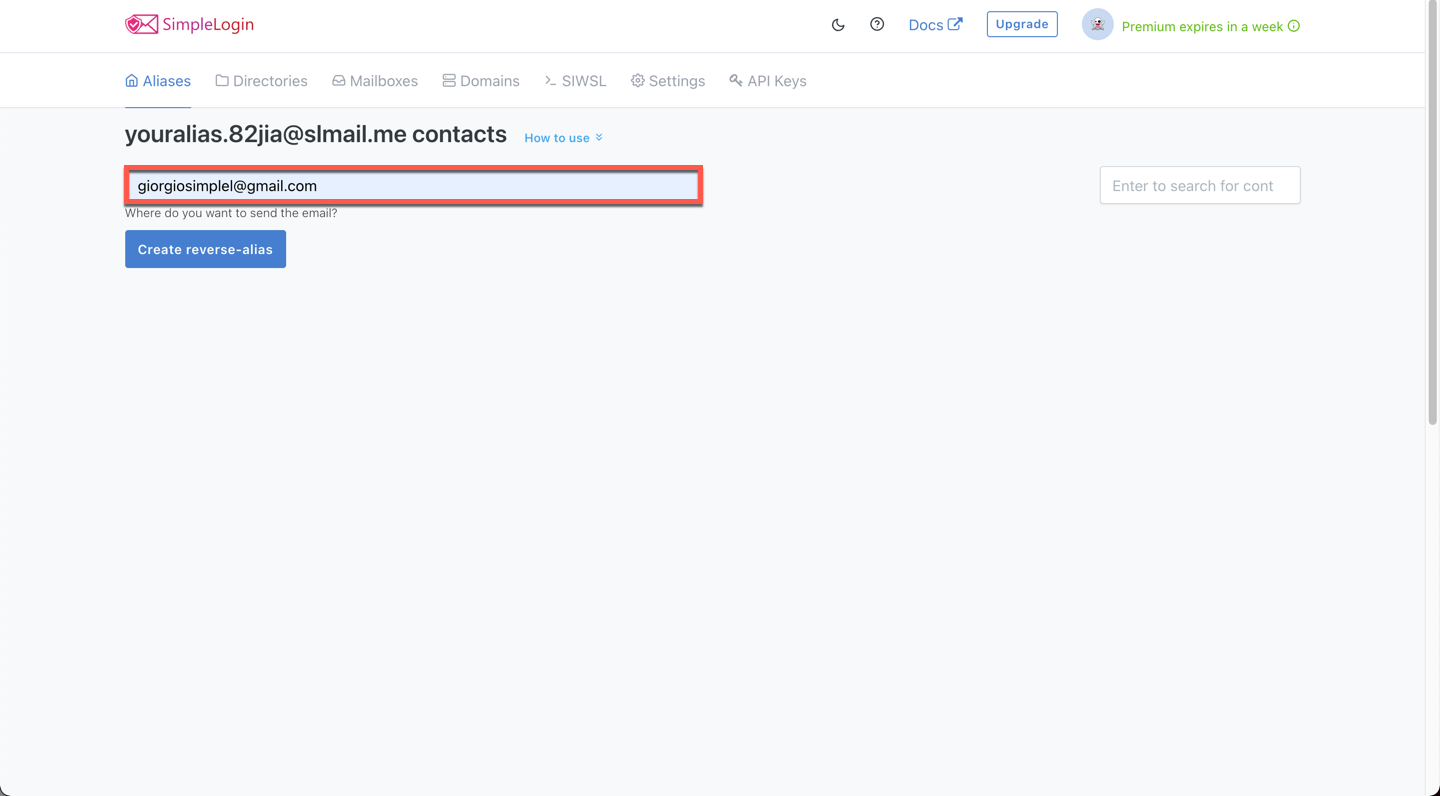
-
SimpleLogin will now generate a reverse-alias connected to this alias. A reverse-alias is an email address that allows us to send an email to a recipient masking our real email address.
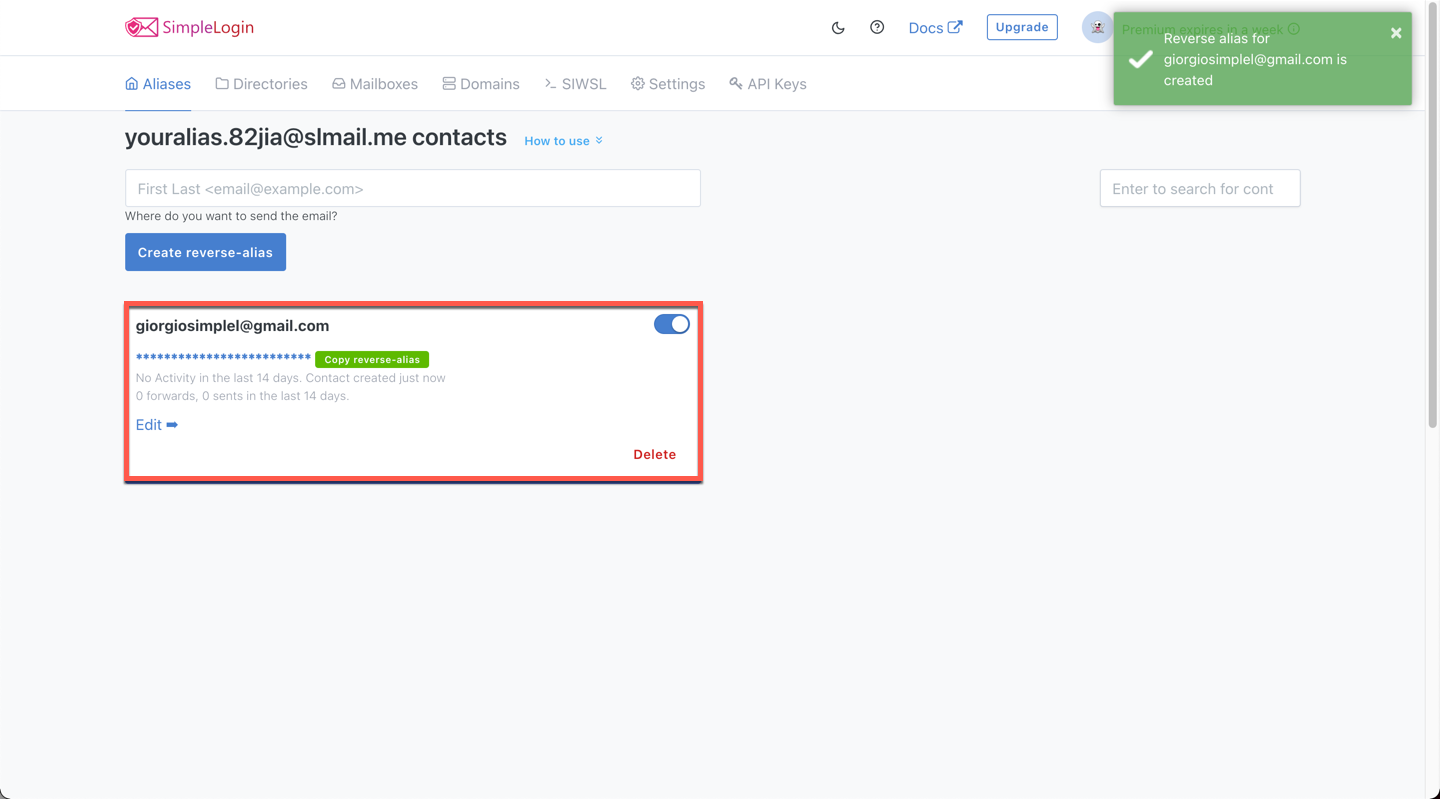
-
The reverse-alias is hidden by default. Click on Copy reverse alias to copy it to your clipboard.
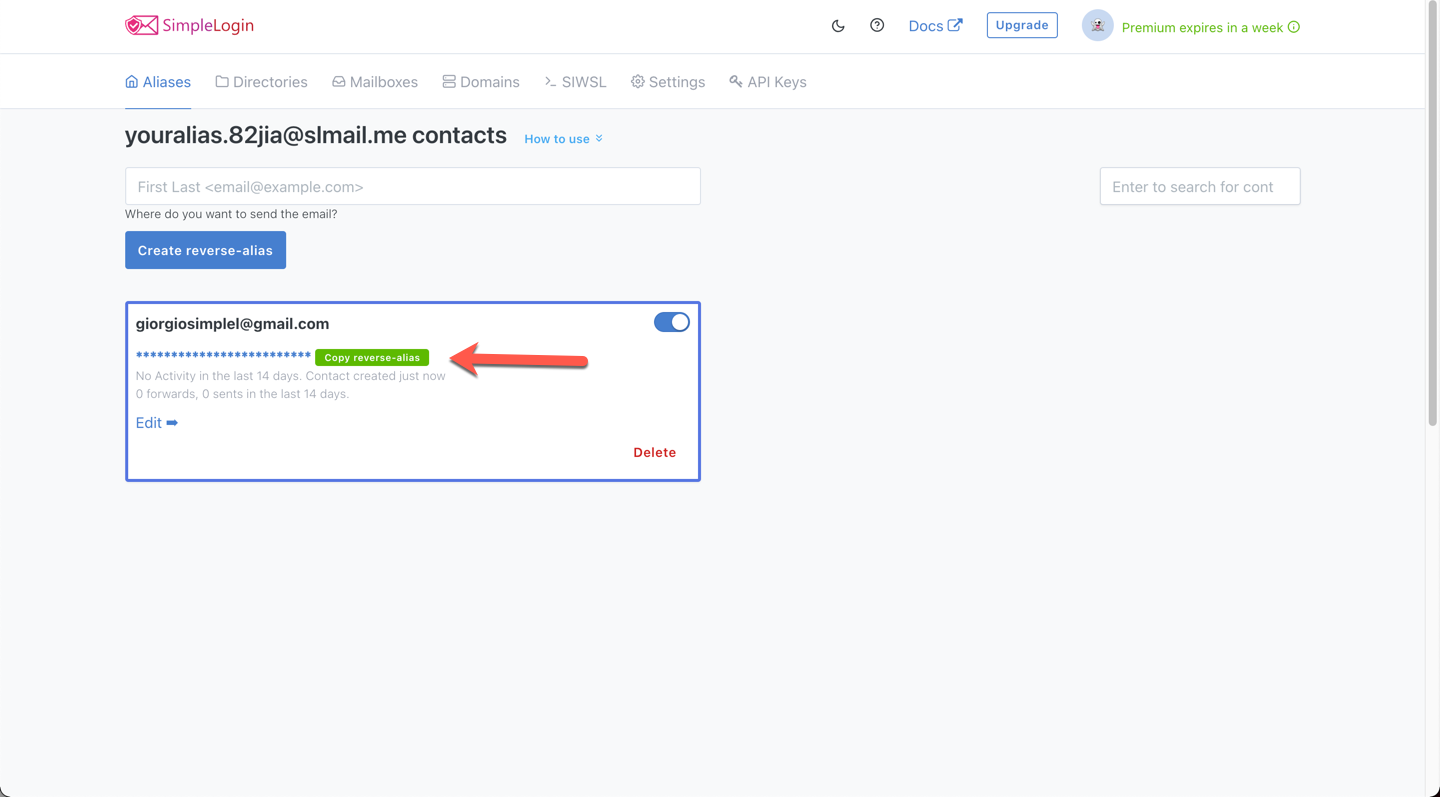
-
Head over to the ProtonMail account connected to that alias and use the reverse-alias as the
Toemail address.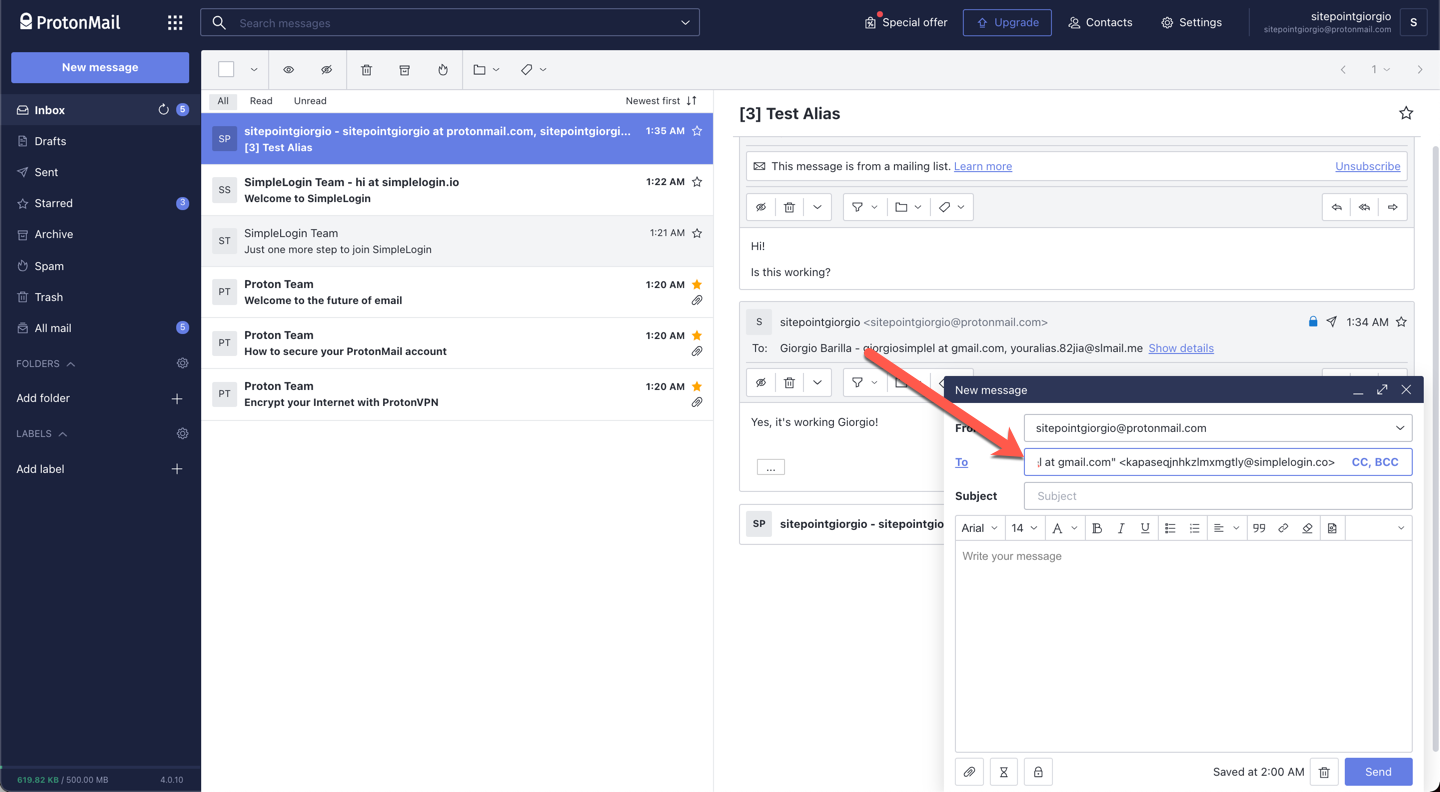
-
Write your message and click Send.
-
Now let’s go ahead and check if we received the message in our Gmail account — the one we created the reverse-alias from. As expected, it shows as sent from the alias!
Awesome: we just created a workflow to use our aliases to send emails to real inboxes. The process is the same when sending the message from one alias to another.
As long as the reverse-alias is in the To field and you send the mail from the connected mailbox, everything will work as intended.
If you’re more of a visual learner, you can watch SimpleLogin’s tutorial on reverse-aliases and hear a deeper explanation on YouTube.
Use Email Aliases to Declutter Your Inbox
Around 3.1 million emails are sent every second, and 85% of them are spam. According to Dataport, this translates into an average daily volume of 122.33 billion spam messages globally.
Our main mailbox nowadays looks like a nightmare turned reality. Currently, I have more than 50,000 unread emails in my personal mailbox and over 300,000 unread emails in all my accounts combined.
It’s simply impossible for me to check all the newsletters I subscribed to when I was in middle school.Just like me, you may have given up on decluttering your inbox, and fair enough! But it doesn’t have to be like this for your future email inboxes.
Thanks to aliases, you have two superpowers:
- a kill switch*
- the ability to stop spam*
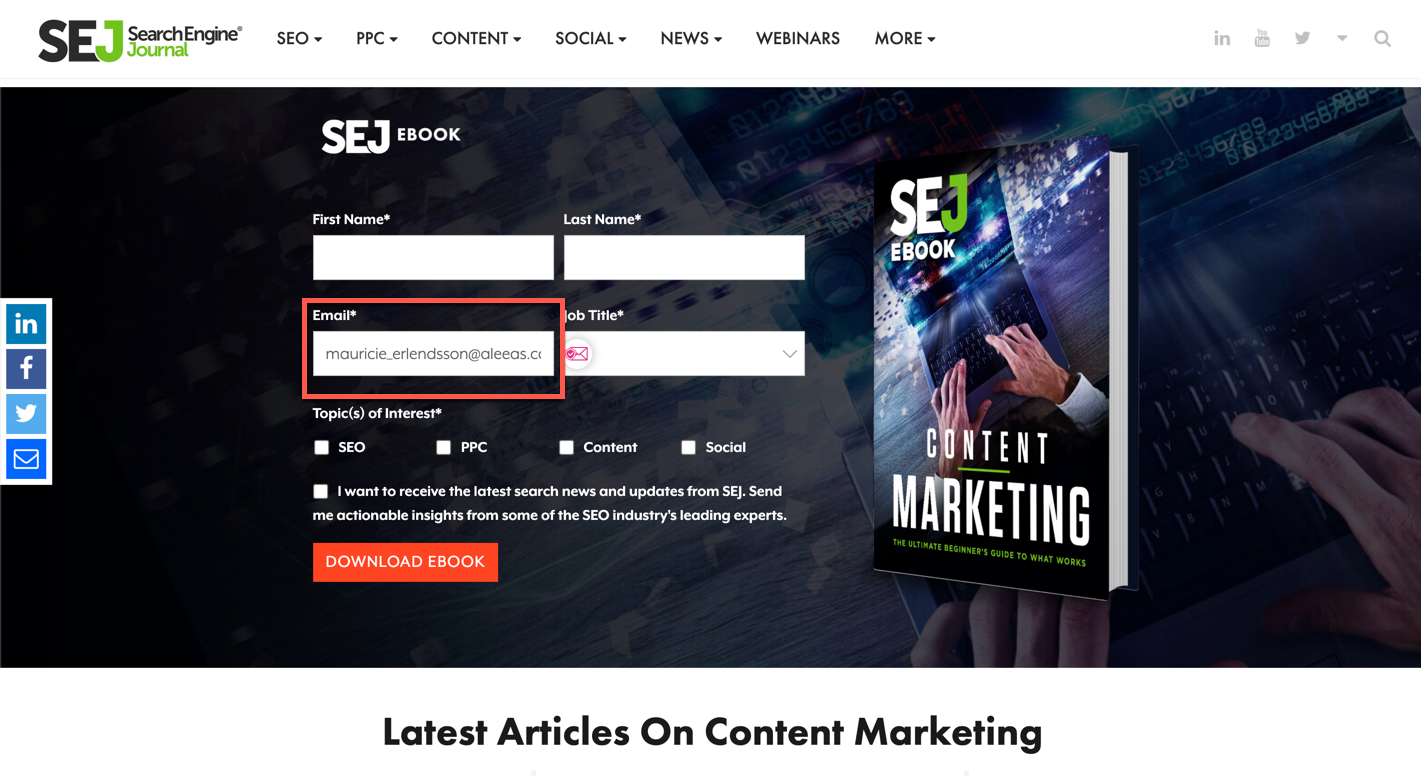
Let’s explore the kill switch first with a practical example. It’s Monday morning, you’re drinking coffee and you’re reading an article from the Search Engine Journal. While reading, you notice the article offers an associated an ebook. But you need to provide your email address to receive the ebook. And of course, you need to agree to receive a gazillion other emails from them.
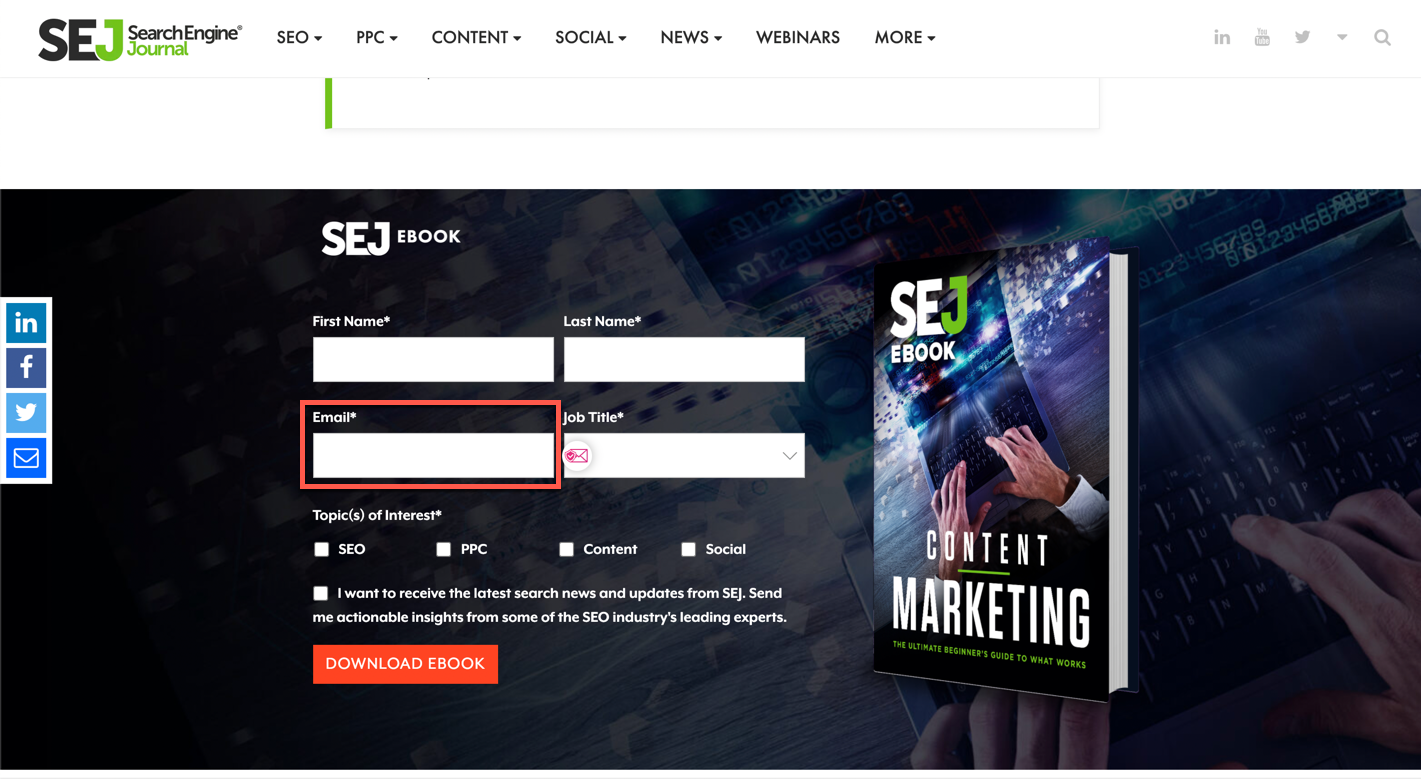
Well, whatever. You’re interested, you want in. Let’s use our alias to register.
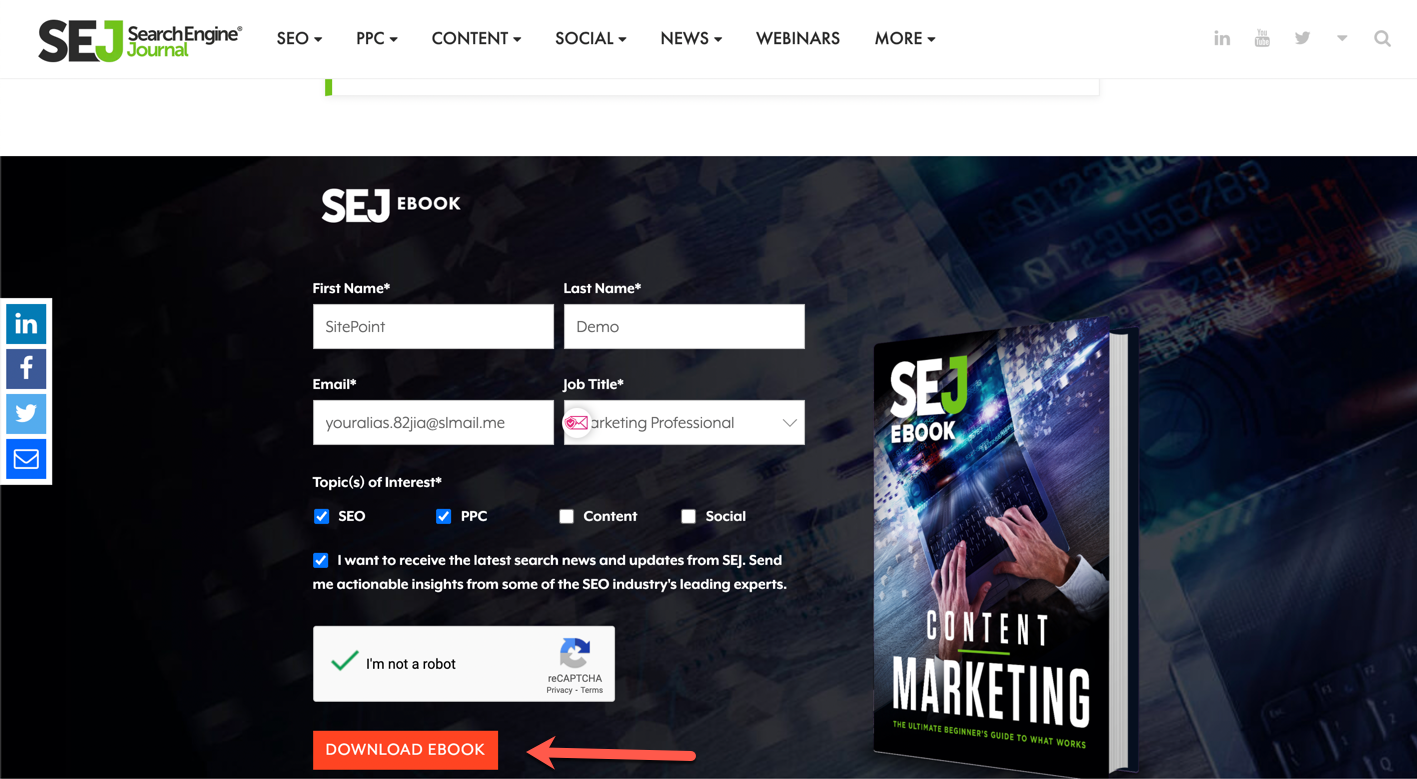
(By the way, no, the “I want to receive the latest search news” box is NOT optional. Grrr.)
After two minutes, you receive the ebook.
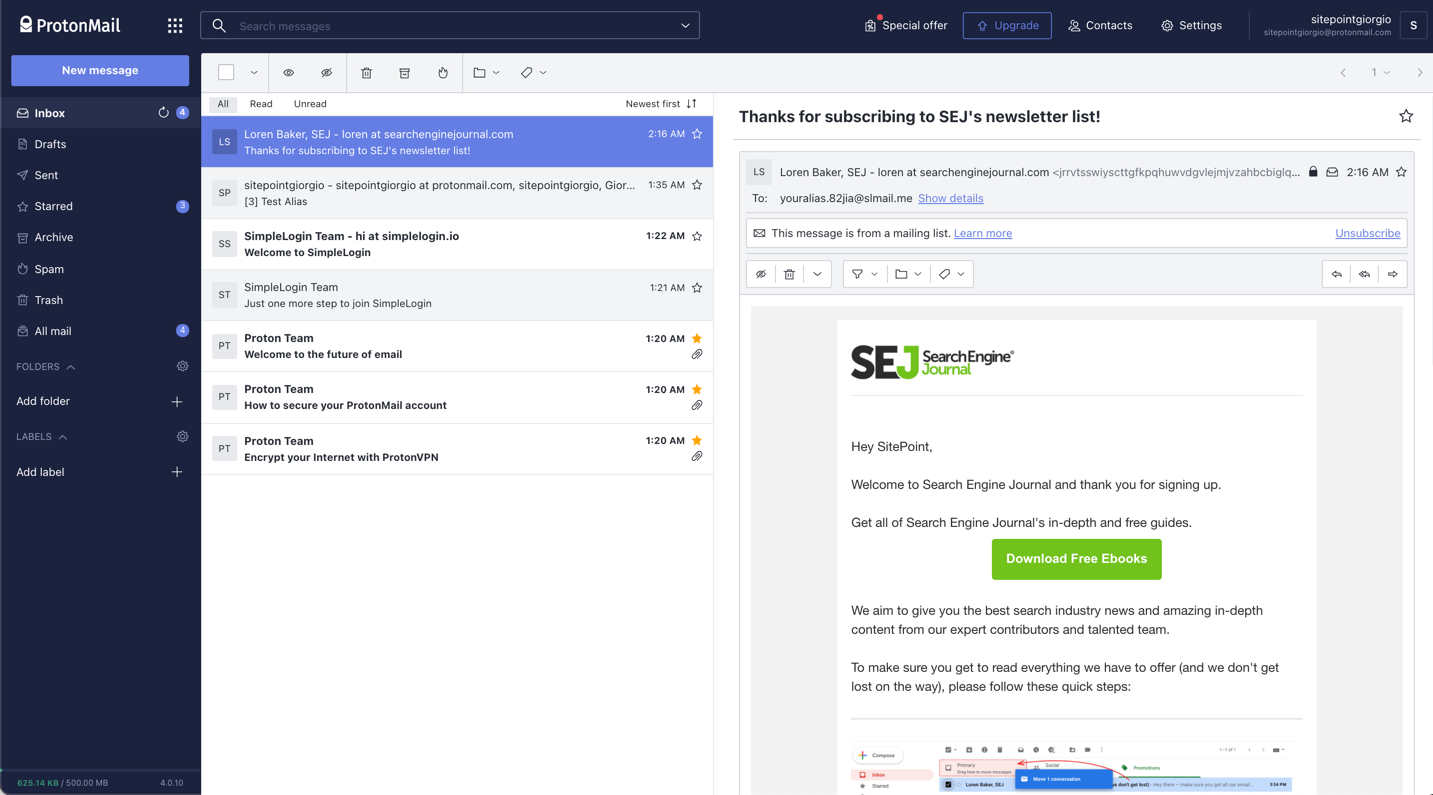
Amazing, now you can read it and benefit from the content.
The day goes on, and you find other interesting ebooks, locked-by-email video tutorials and sales pages. In 24 hours, you might end up on ten different email lists.
Search Engine Journal will obviously try to benefit from your email, and send you new content every day or so. But let’s say you get bored after two months; you want to quit.
Cool, let’s scroll down in one of the emails and click Unsubscribe.
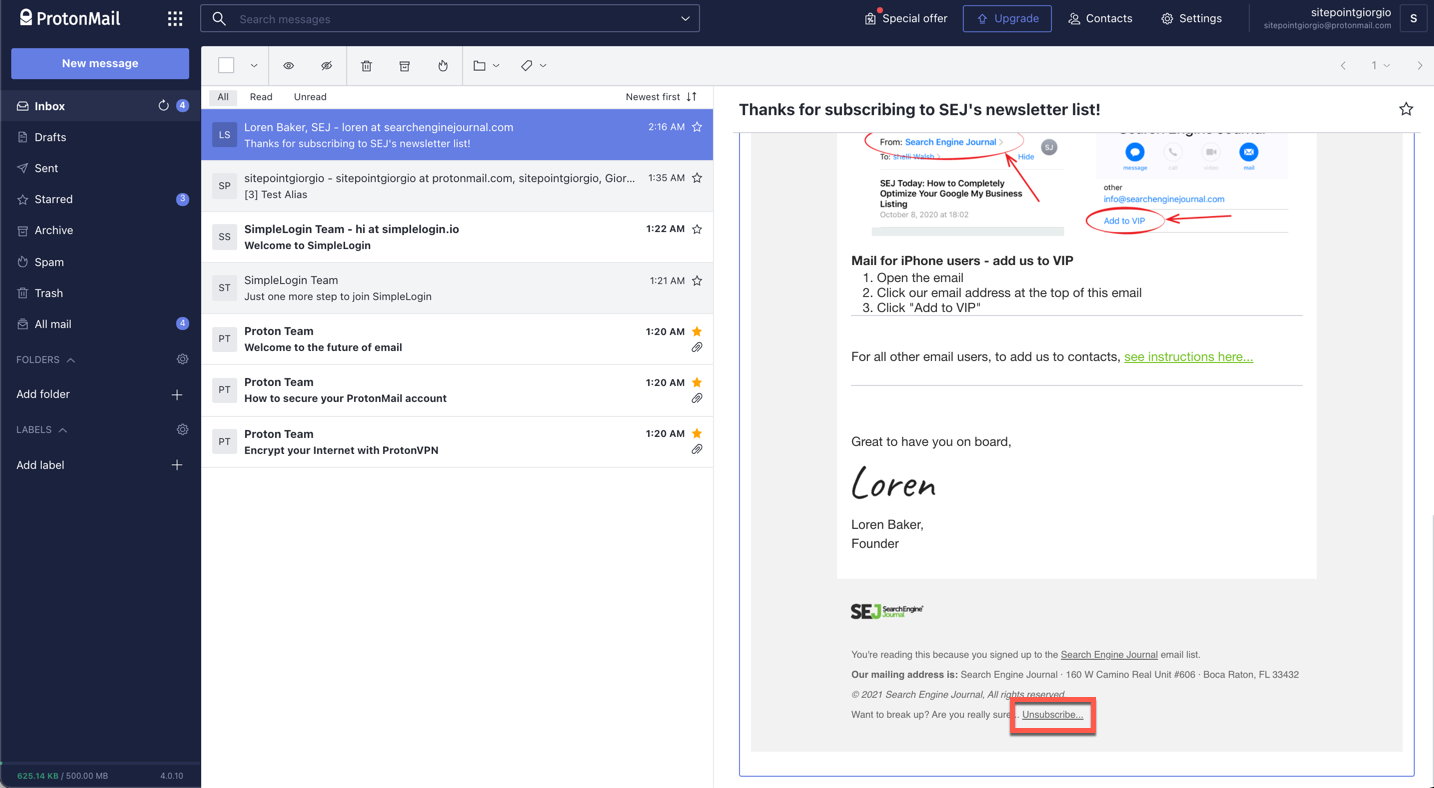
We’ll be redirected to a page to confirm we’re no longer part of their email list and to provide feedback on what went wrong.
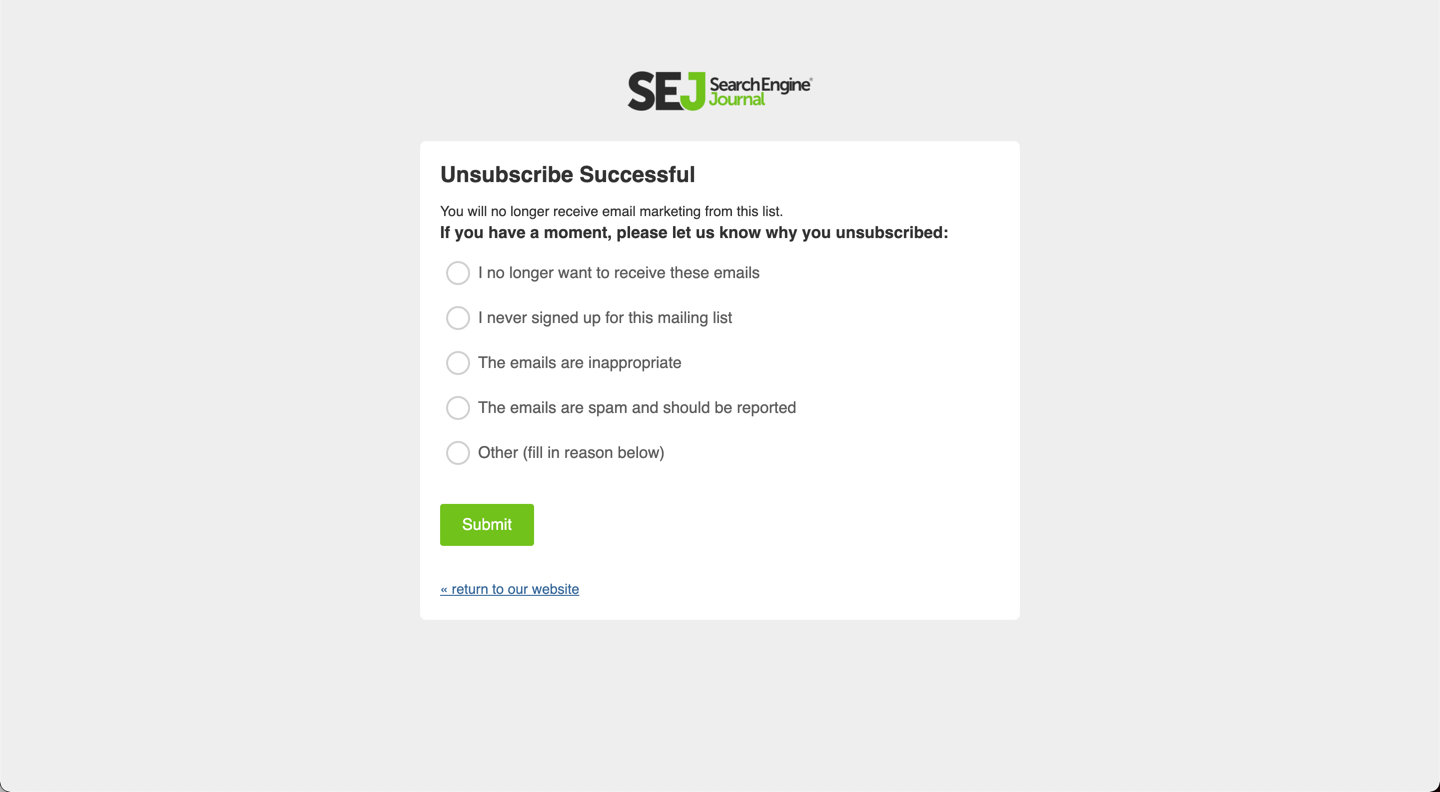
Nice, simple … right?
I’m sure that if you’ve been on the Internet for a while you spotted at least three problems in this workflow:
- You’re trusting the provider to actually delete the email from their list. You’ll never know if they actually did, and you have no way to check.
- The process is not necessarily this straightforward. Sometimes companies ask you to provide a reason before you can cancel, and sometimes the Unsubscribe page leads to a 404, which means you have to spend extra time during your day to Unsubscribe.
- This is one email newsletter. One. Assuming you sign up for one per day, it’s 365 in a calendar year. Do you really think you can click on 365 Unsubscribe links and follow 365 workflows like a trained monkey? I don’t think so. You have better things to do in your day.
And that’s why our inboxes are full of content we’re completely uninterested in and why open rates for emails are so low.
Do you know what’s different with aliases?
Once you get bored of something, or you no longer want to receive content from a source, you can block the alias.
That’s it. Block it with a single click, from your unified SimpleLogin dashboard.
You don’t have to check with them if it’s done. It’s done. They only have your alias; they never had access to your real email address in the first place.
Consent is not fun if it’s not easy to take back and control. At least that’s how I see it.
Stop Spam and Secure Your Privacy Online
Let’s talk about the second super power, shall we?
As of now, we only created one alias. However, SimpleLogin and other competitors like AnonAddy, Firefox Relay and 33Mail also provide a Chrome Extension you can download for free.
The Chrome extension adds a little icon next to the email input field in every registration form around the Internet.
It looks something like this:

Can you guess what it does? It creates a new alias connected to your primary account ON THE SPOT.
Yup, in one click.
Let’s click it and watch the algorithm do its thing.
Here you go — a new alias in a fraction of a second.
I didn’t have to do anything other than clicking a button. This is even easier and faster than typing your actual email address in the field.
Now, imagine doing that for each service you sign up for. Every. Single. One.
It’s one click instead of typing, and gives you your freedom back.
You don’t trust me, do you? OK, let’s take the same example as before. 365 signups per year. Heck, let’s even say you’re a researcher and signed up for 800 newsletters in a year. Cool.
Now you have 800 aliases with a kill switch.
Brew a coffee, sit on the chair, and click the toggle next to the aliases. Done.
No unsubscribe button, no workflow to cancel, no trusting the provider. Spam will be a thing of yesterday, and your inbox will look clean as a hotel room with a click of a button.
Aliases will improve your online privacy and security too. If your alias ever gets in a breach, SimpleLogin will immediately notify you, and you’ll be able to remove yourself from the breach in a snap.
This truly is a revolution in terms of organizing your email inbox to only serve you relevant, interesting information and never keep you anchored to decisions you made years ago.
It also keeps annoyances away.
Email aliases are to emails what password managers are to passwords — a natural evolution to better manage our online identity.
Conclusion
In this guide, we explored a great deal of use cases related to email aliases, both in-client (such as Gmail aliases) and platform independent (such as SimpleLogin aliases).
Tens of thousands of users from across the globe started using aliases to guard their privacy and finally start using email as it was in the past.
As a quick recap, we’ve seen that:
- email aliases can be used to save money against a professional email hosting solution (thanks to reverse-alias)
- aliases can control your subscription to newsletters
- with email aliases, spam is a worry of the past
- every alias can be connected to a custom domain, making emails more effective
- depending on the provider, aliases have extra perks such as transfers
- open-source email aliasing exists and poses less risk than trusting a third party without open-source code
- email aliases are a great tool for guarding your main email inbox.