Nanny State is a tiny library that I wrote to help make it easy to build state-based web apps using Vanilla JS. It’s similar to React, but with far less overhead and new syntax to learn. It also uses a single app-wide state object instead of each individual component having its own state. It was inspired by HyperApp and has many similarities to to Elm.
In this post I’m going to explain how Nanny State works and then demonstrate what it can do with a couple of examples.
Nanny State uses a one-way data flow model, made up of 3 parts:
- State – an object that stores all the app data
- View – a function that returns a string of HTML based on the current state
- Update – a function that is the only way to change the state and re-render the view
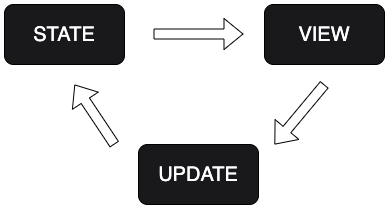
In Nanny State, the state is everything. The state object is the single source of truth for your app – every bit of app data is a property of this object. Even event handlers used in the View are methods of the state object.
The View is a representation of the state as HTML. It changes whenever the state changes and allows users to interact with the app.
The Update function is the only way the state can be changed. It is a single entry-point for updating the state and ensures that changes are deterministic, consistent and predictable.
These 3 things are all you need to build an app in Nanny State. In fact, it can be summarised by asking yourself the following 3 questions:
- What data do I need to store in my app? This will make up the properties of the
Stateobject - How do I want the app data to be presented on the page? This will help you create the
Viewfunction - How will the app data change when the user interacts with it? The
Updatefunction will be needed for this
Hello Nanny State!
The easiest way to see how Nanny State works is to write some code! We’ll start with a basic example and then have a go at making something a bit more complex.
The easiest way to run the following example is to use an online code editor such as CodePen, or you can run it locally by installing the nanny-state package using NodeJS.
Copy the following code into the JS section of CodePen:
import { Nanny,html } from 'https://cdn.skypack.dev/nanny-state'; const View = state => html`<h1>Hello ${state.name}</h1>` const State = { name: "Nanny State", View
} const Update = Nanny(State)
This shows how the 3 parts of Nanny-State work together. Let’s take a close look at each part individually:
const View = state => html`<h1>Hello ${state.name}</h1>`
Nanny state uses µhtml to render HTML. The View function always accepts the state objects as its only parameter. It then uses the html function provided by µhtml to create HTML based on the template literal it is provided as an argument.
Using a template literal means that we can use the ${variable} notation to insert properties of the state into the view. In this example we are using it to insert the value of the name property inside the <h1> element.
const State = { name: "Nanny State", View
}
The State object is where all the app data is stored. It includes any properties and values that will be displayed in the View and might change over the life-cycle of the app, such as the name property in this example.
Notice that View is as also a property of the State using object shorthand notation. Remember the state is everything – every part of the app is a property of the state.
const Update = Nanny(State)
The final line defines the Update function as the return value of the Nanny function. This can now be used to update the value of any properties of the State. In fact it is the only way that any properties of the State can be updated. It also performs the initial render of the View based on the values provided in the State. This means that a heading will be displayed that says “Hello Nanny State” as can be seen in the CodePen below:
Hello Nanny State
This example is basically just a static page though. Let’s make it dynamic by adding an input box that allows the user to enter a name that they want to say hello to. Update the code so it looks like the following:
import { Nanny,html } from 'https://cdn.skypack.dev/nanny-state'; const View = state => html`<h1>Hello ${state.name}</h1><input oninput=${state.changeName}>` const changeName = event => Update({name: event.target.value}) const State = { name: "Nanny State", changeName, View
} const Update = Nanny(State)
In this example we’ve added an <input> element to the View. Event listeners are defined inline in the view, so in this example we have an oninput event listener attached to the <input> element. This will call the changeName event handler, which is a method of the state object, whenever any input is detected. This event listener needs defining, so let’s take a closer look at it:
const changeName = event => Update({name: event.target.value})
This is a standard event handler written in Vanilla JS. It accepts an event object as a parameter as usual and when it is called, we want to update the State object, so we use the Update function, as this is the only way we can update the State.
The argument we provide to the Update function is an object that contains any properties that we want to update in the state and the respective new values. In this case we want to update the name property to the value that was entered by the user into the input field, which is part of the event object and accessed using event.target.value. This will update the state with the new value from the input field and instantly re-render the page. Using µhtml for rendering means that only the parts of the View that have actually changed get updated. This means that re-rendering after aState update is both efficient and blazingly fast.
And that’s it – your first Nanny State app! Have a go at typing and you’ll see how fast it reacts to user input … and all with just a few lines of code. You can see the code in the CodePen below:
Dynamic Input
Nanny State makes it super easy to write reactive state-based apps. As you can see, there’s not much code required to build a dynamic state-based application that reacts to user interaction. This is the beauty of Nanny State.
True or False Quiz
Now we’ve seen a basic example, let’s try making something a bit more complex. We’ll use Nanny State to build a True or False quiz game. Open up a new pen on CodePen and follow along.
We’ll start in the same way, by importing the Nanny State library:
import { Nanny,html } from 'https://cdn.skypack.dev/nanny-state'
Next, we’ll create the State object and fill it with the initial property values that the game will use:
const State = { score: 0, index: 0, questions: [ {question: "A Nanny State is a country where nannies are employed by the state", answer: false}, {question: "Nanny State is also the name of a beer", answer: true}, {question: "Mila Kunis and Ashton Kutcher employ 16 nannies to help raise their children", answer: false}, {question: "The Nanny McPhee films are based on the Nurse Matilda books", answer: true}, {question: "Nanny State uses the µhtml library for rendering", answer: true},
]
}
This object contains 3 properties:
score– this keeps track of how many questions the player has answered correctly and starts at 0index– this keeps track of which question the player is up to and corresponds to the last property which is thequestionsarray.questions– This is an array of objects withquestionandanswerproperties. Thequestionproperty is a string and theanswerproperty is a Boolean
Now we’ve created the data, let’s create the View to visualise that data:
const View = state => html`
<h1>True or False?</h1>
<h2>Score: ${state.score}</h2>
${state.index < state.questions.length ?
html`<p>${index + 1}) ${state.questions[state.questionNumber].question}</p> <button onclick=${state.checkAnswer(true)}>TRUE</button> <button onclick=${state.checkAnswer(false)}>FALSE</button>`
:
html`<h2>Game Over, you scored ${state.score}</h2>`
}`
This is a slightly more complicated View than we saw in the earlier example, but most of it should be fairly self-explanatory. After the title heading, we display the score using the score property of the State object. Then we use a ternary operator to fork the view. Because the view is written using template literals, you can’t use if-else statements to fork code, so need to use ternary statements.
This ternary statement checks if questionNumber is less than the length of the questions array, which is basically checking to see if there are still any questions left to answer. If there are then the question is displayed with two buttons, on for TRUE and one for FALSE. If there are no questions left then we show a GAME OVER message along with the player’s score.
One thing to note when forking the view code using ternary operators is that you need to use the html function for each new fork.
The buttons both have an inline onclick event listener attached to them that calls the same event handler, checkAnswer and accepts an argument of either true or false depending on which button was pressed. Let’s write this event handler now:
const checkAnswer = answer => event => Update(state => ({ score: answer === state.questions[state.index].answer ? state.score + 1 : state.score, index: state.index + 1
}))
This event handler accepts an extra argument of answer as well as the event object that all event handlers accept, so it needs to be curried using the double arrow notation seen above. It calls the Update function which uses a ternary operator to check if the answer provided as an argument matches the answer to the current question, if it does then the score property is increased by 1, if not then the score stays the same. It also increases the value of the index property, so the next question will be displayed.
This event handler now needs adding to the State, along with the View. We can do this using the object shorthand notation, as long as checkAnswer and View are defined before State:
const State = { score: 0, index: 0, questions: [ {question: "A Nanny State is a country where nannies are employed by the state", answer: false}, {question: "Nanny State is also the name of a beer", answer: true}, {question: "Mila Kunis and Ashton Kutcher employ 16 nannies to help raise their children", answer: false}, {question: "The Nanny McPhee films are based on the Nurse Matilda books", answer: true}, {question: "Nanny State uses the µhtml library for rendering", answer: true},
], checkAnswer, View
}
Now that everything is part of the State, all that is left to do is define the Update function by calling the Nanny function and providing State as an argument:
const Update = Nanny(State)
And that’s it! The quiz should start running straight away and you should be able to answer each question and the score will change based on if the answer is right or not. Another example of an interactive app that is quick to build with minimal amount of code. Have a go at answering the questions and see how you get on. You can see the finished code in the CodePen below:
True or False Quiz
Once you’ve had some fun playing it and got used to how Nanny State works, here are a few ideas for extending the game:
- Add more questions
- Add a ‘Start’ and ‘Play Again’ buttons to allow players to play again
- Select questions at random
- Keep track of the highest score
- Add questions with other answers, except true or false
- Create a multiple-choice quiz
Nanny State includes a lot more other goodies such as built-in support for using local storage and routing. See the docs for more info or get in touch if you have any questions.
I’d love to hear what you think of Nanny State. Would you consider using it for a project? Is there anything more you’d like to know about it? Leave a comment in our community!