React Native is a mobile app development framework that allows developers to build apps that render natively in Android and iOS. The principle of “code once, run everywhere” is an inherent trait of the framework. React Native also shares many similarities with React, so developers who work in React can quickly pick up React Native.
In addition to all these great features, it’s all JavaScript under the hood. JavaScript can be used to write backend code in Node.js. Therefore, JavaScript developers are in a unique position of being able to build apps, web apps, and server-side code.
In this guide, we’ll build a full-stack app for uploading videos on React Native to Firebase using Multer, a Node.js middleware that handles file uploads.
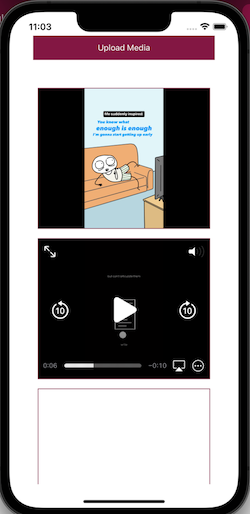
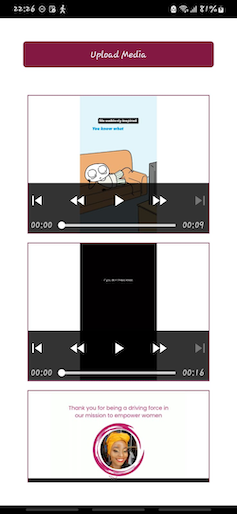
Our end product will look like this:
To jump ahead:
Prerequisites
Table of Contents
Setting up Firebase
Firebase is a Google backed app development platform. It provides several services for building and scaling apps, including a real-time database, authentication, and hosting.
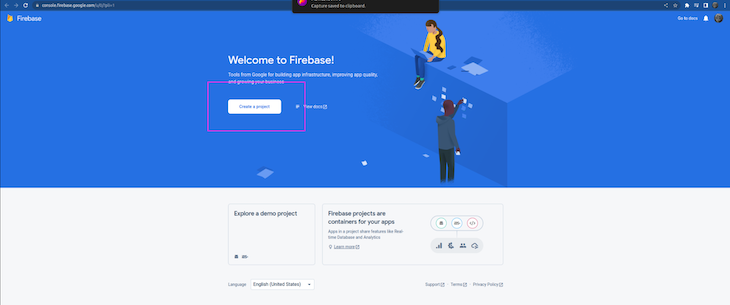
The first step of our tutorial is creating a Firebase account, if you don’t already have one. Once you’ve done that, click on the Create a Project button:
Give the project a name, which will be used later to identify the storage bucket in use.
Once you’ve created your project, you need to choose the test environment. Please note that when deploying to production, you will need to choose a production environment and restrict access to your files.
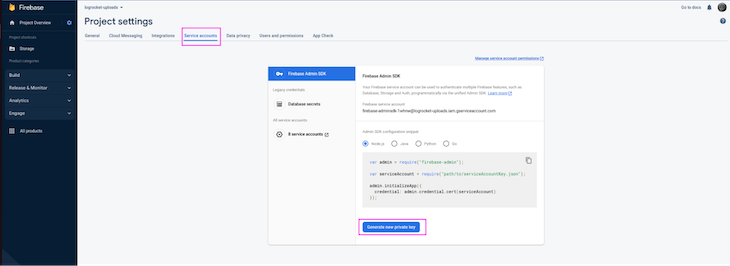
On the Project settings dashboard, click on the Service accounts tab and generate private keys. Save the keys to your backend folder as serviceAccount.json:
Setting up the backend Node.js server
The backend will hold the API logic that will interface with React Native. The API will have two endpoints; one for retrieving all video files from Firebase and one for uploading images to Firebase.
The backend folder structure is as follows:
project_folder
|__backend |__controllers | controllers.uploadController.js |__routes | routes.uploadRoute.js | package.json | server.js | serviceAccountKey.json
The controllers folder holds the business logic for handling uploads and retrieval of videos. The routes folder specifies the structure of the Express route that will direct traffic to the right controller. package.json will contain the version used for all our dependencies, and server.js will be the entry point that spins up an Express server and handles route requests. Finally, serviceAccountKey.json holds the Firebase config we downloaded earlier.
The packages needed for the backend are:
- Cors: middleware for implementing Cross-Origin Resource Sharing
- Express: A web framework for building server-side applications
- Multer: Middleware for handling multipart/form data used for file uploads
- Firebase-admin: Interacts with Firebase services from the server-side environment
- Nodemon: A utility that restarts Node applications
- Fluent-ffmpeg: A library for processing multimedia files using ffmpeg
In the backend folder, install the packages using npm with the following command:
npm install cors express multer firebase-admin nodemon fluent-ffmpeg
In package.json, add the “type” :”module” field. This enables us to use import statements instead of the required syntax.
Next, change the start script command to use nodemon to run server.js. Nodemon listens for the changes made and restarts the Node server. The final package.json is as follows:
{ "name": "backend", "version": "1.0.0", "description": "Backend for the react native app for uploading videos", "main": "server.js", "type": "module", "scripts": { "test": "echo "Error: no test specified" && exit 1", "start": "nodemon server.js" }, "author": "Wamaitha Nyamu", "license": "ISC", "dependencies": { "cors": "^2.8.5", "express": "^4.18.2", "firebase-admin": "^11.4.1", "fluent-ffmpeg": "^2.1.2", "multer": "^1.4.5-lts.1", "nodemon": "^2.0.20" }
}
Creating API endpoints for uploads
Server.js
Server.js will be the entry point to the backend. The server.js file has the following code:
import express from 'express';
import cors from 'cors';
import uploadRoute from './routes/routes.uploadRoute.js'; const app = express();
app.use(cors())
app.use(express.json());
app.use('/api/uploads', uploadRoute)
app.listen(3000, () => { console.log('Server listening on port 3000...'); });
In the code above, we import relevant libraries, initialize an Express app instance, and pass the cors and express.json middlewares. We then mount uploadRoute to the /api/uploads route and start the server on port 3000.
Routes
The uploadRoute function in Server.js imports an Express router from ‘./routes/routes.uploadRoute.js and it has the following code:
import express from 'express'
import { uploadAttachment, getAllAttachments
} from "../controllers/controllers.uploadController.js"
const router = express.Router()
router.route('/').post(uploadAttachment)
router.route('/').get(getAllAttachments)
export default router.
The code above imports Express and two functions from controllers/controllers.uploadAttachment.js. We then define two endpoint routes, POST and GET that use the uploadAttachment and getAllAttachments functions respectively. Both are then exported as a router.
Controllers
In ‘controllers/controllers.uploadAttachment.js’, we first import the relevant modules:
import multer from 'multer';
import firebase from 'firebase-admin';
import ffmpeg from 'fluent-ffmpeg';
import path from 'path';
import fs from 'fs';
Then, we define the videoFilter function that will be used as a file filter function by Multer. The function ensures Multer only uploads files of the file extensions .mp4, .avi, and .mkv. Any other file extension will throw an error:
const videoFilter = (req, file, cb) => { // Accept video files only if (!file.originalname.match(/.(mp4|avi|mkv)$/)) { return cb(new Error('Only video files are allowed!'), false); } cb(null, true);
};
Next, we define a helper function, checkFileSize, which takes in a video filePath as an argument and returns the size of the video in bytes.
The fs.statSync method of the fs module is used to retrieve file information for the file specified by the filePath. The file size is stored in a variable called fileSizeInBytes, and then logged to the console using the console.log method. Finally, the function returns the file size in bytes:
const checkFileSize = async (filePath) => { const stats = fs.statSync(filePath); const fileSizeInBytes = stats.size; console.log(`Video file size: ${fileSizeInBytes} bytes`); return fileSizeInBytes;
}
Then, we instantiate the upload, which creates an instance of multer. The upload has two parameters: fileFilter and storage. fileFilter uses the videoFilter function defined in the step above.
multer.memoryStorage() creates a new instance of Multer’s built-in memoryStorage, which stores uploaded files in memory as Buffer objects. The instance also specifies that Multer should handle a single file being uploaded whose field name in the multiform data is ’files’:
const upload = multer({ fileFilter: videoFilter, storage: multer.memoryStorage(),
}).single('files');
Now, we want to initialize the Firebase SDK with two configuration options. credential specifies the Firebase authentication credentials stored in the serviceAccountKey.json file we saved earlier.
storageBucket specifies the name of the Firebase storage bucket used to store the uploaded files. This is the bucket we named logrocket-uploads.appspot.com:
firebase.initializeApp({ credential: firebase.credential.cert("./serviceAccountKey.json"), storageBucket: "logrocket-uploads.appspot.com"
});
The controller logic will be contained in two functions: uploadAttachment and getAllAttachments. The uploadAttachment function takes two arguments: req and res, which are objects representing the HTTP request and response, respectively:
export const uploadAttachment = async (req, res) => { try { upload(req, res, async function (err) { if (err) { console.error(err) res.status(403).send({ message: "Error uploading document. Make sure it is a video file." }) } else { const inputBuffer = req.file.buffer; //save buffer to file const inputFileExtension = path.extname(req.file.originalname); const today = new Date(); const dateTime = today.toLocaleString(); const inputFile = `${dateTime}-input${inputFileExtension}`; console.log("Saving file to disk...", inputFile); fs.writeFileSync(inputFile, inputBuffer); console.log("File saved to disk."); console.log(`Checking input filesize in bytes`); await checkFileSize(inputFile); ffmpeg(inputFile) .output(req.file.originalname) .videoCodec("libx264") .audioCodec('aac') .videoBitrate(`1k`) .autopad() .on("end", async function () { console.log("Video compression complete!"); const bucket = firebase.storage().bucket(); const newFile = bucket.file(req.file.originalname); await newFile.save(`./${req.file.originalname}`); console.log(`Checking output filesize in bytes`); await checkFileSize(`./${req.file.originalname}`); fs.unlinkSync(inputFile); fs.unlinkSync(req.file.originalname) res.json("Files uploaded successfully."); }) .run(); } }) } catch (error) { console.log(error) res.status(500).send({ message: "Something went wrong while uploading..." }) }
}
The above function utilizes the Multer upload middleware to process the incoming file and store it as a buffer in memory. Errors on uploading are logged to the console. On successful upload, the buffer is saved to a file on the file system with a temporary name.
Next, the function checks the file size in bytes by calling checkFileSize, which takes the temporary file path as a parameter, reads the file, and returns the file size. The function then uses the ffmpeg library to compress the video file by reducing the bitrate to 1K. The ffmpeg library has an end event that is emitted once compression is done.
The compressed video is then uploaded to Firebase and the temporary file is deleted from the system using the unlinkSync method. Before and after compression, we call the checkFileSize method to log the video bitrate to the console.
The second controller function is getAllAttachments. This function will retrieve all the saved files on Firebase storage:
export const getAllAttachments = async (req, res) => { try { const bucket = firebase.storage().bucket(); const options = { action: 'read', expires: '01-01-2024' }; const fileList = []; const [files] = await bucket.getFiles(); for (const file of files) { const [url] = await file.getSignedUrl(options); fileList.push(url); } res.json(fileList); } catch (error) { console.log(error) res.status(500).send({ message: "Something went wrong." }) }
}
The getAllAttachments function first initializes the Firebase storage bucket and all files are retrieved. The files are retrieved in the form of signed URLs with read-only access and an expiration date of January 1st 2024. All the retrieved URLs are stored in the fileList array.
The full code in controller.uploadController.js is:
import multer from 'multer';
import firebase from 'firebase-admin';
import ffmpeg from 'fluent-ffmpeg';
import path from 'path';
import fs from 'fs'; const videoFilter = (req, file, cb) => { // Accept video files only if (!file.originalname.match(/.(mp4|avi|mkv)$/)) { return cb(new Error('Only video files are allowed!'), false); } cb(null, true);
}; const checkFileSize = async (filePath) => { const stats = fs.statSync(filePath); const fileSizeInBytes = stats.size; console.log(`Video file size: ${fileSizeInBytes} bytes`); return fileSizeInBytes;
} const upload = multer({ fileFilter: videoFilter, storage: multer.memoryStorage(),
}).single('files'); firebase.initializeApp({ credential: firebase.credential.cert("./serviceAccountKey.json"), storageBucket: "logrocket-uploads.appspot.com"
}); export const uploadAttachment = async (req, res) => { try { upload(req, res, async function (err) { if (err) { console.error(err) res.status(403).send({ message: "Error uploading document. Make sure it is a video file." }) } else { const inputBuffer = req.file.buffer; //save buffer to file const inputFileExtension = path.extname(req.file.originalname); const today = new Date(); const dateTime = today.toLocaleString(); const inputFile = `${dateTime}-input${inputFileExtension}`; console.log("Saving file to disk...", inputFile); fs.writeFileSync(inputFile, inputBuffer); console.log("File saved to disk."); console.log(`Checking input filesize in bytes`); await checkFileSize(inputFile); ffmpeg(inputFile) .output(req.file.originalname) .videoCodec("libx264") .audioCodec('aac') .videoBitrate(`1k`) .autopad() .on("end", async function () { console.log("Video compression complete!"); const bucket = firebase.storage().bucket(); const newFile = bucket.file(req.file.originalname); await newFile.save(`./${req.file.originalname}`); console.log(`Checking output filesize in bytes`); await checkFileSize(`./${req.file.originalname}`); fs.unlinkSync(inputFile); fs.unlinkSync(req.file.originalname) res.json("Files uploaded successfully."); }) .run(); } }) } catch (error) { console.log(error) res.status(500).send({ message: "Something went wrong while uploading..." }) }
} export const getAllAttachments = async (req, res) => { try { const bucket = firebase.storage().bucket(); const options = { action: 'read', expires: '01-01-2024' }; const fileList = []; const [files] = await bucket.getFiles(); for (const file of files) { const [url] = await file.getSignedUrl(options); fileList.push(url); } res.json(fileList); } catch (error) { console.log(error) res.status(500).send({ message: "Something went wrong." }) }
}
Testing using postman
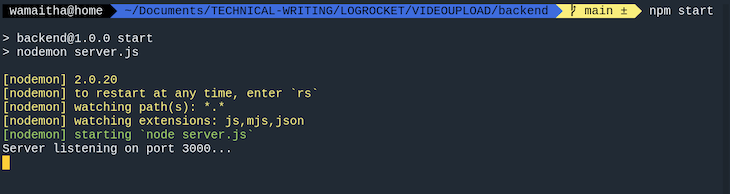
Start the server using npm start while in the backend directory. This should launch nodemon as shown below:
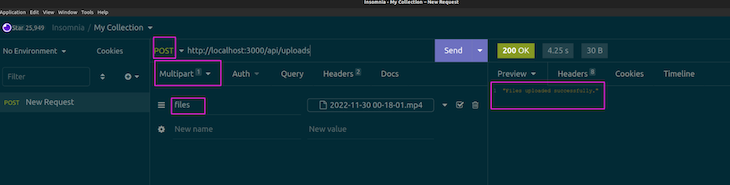
Using postman or another API testing tool of your choice (I used Insomnia here), upload videos with the multi-part form data option, as shown below. Remember to give the value of the form data as files:
On the terminal, you should see the video compression log:
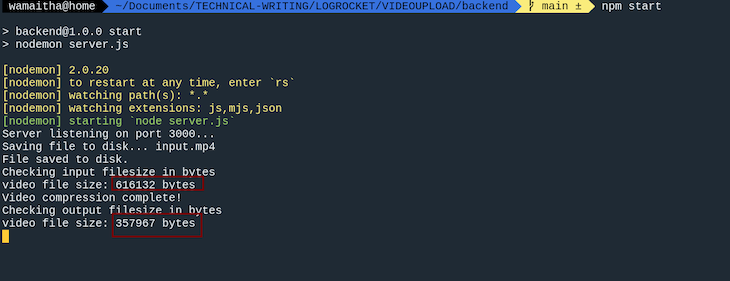
We can see the reduced byte size of the uploaded video after compression from the console logs.
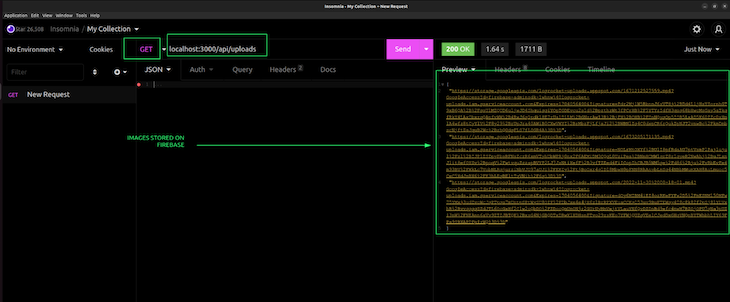
Test the GET request, which should return all the file URLs on the Firebase storage:
ngrok
ngrok is a tool that creates a secure tunnel to a local development server. This allows developers to expose a local web server, application, or service to the internet, making it accessible to other devices or clients.
ngrok generates a publicly accessible URL that maps to the local development server port. Our app will be using the ngrok endpoint to interact with the backend on port 3000. With ngrok installed on your respective OS, start a session on port 3000 on a new terminal with this command:
Ngrok http 3000
This should bring up an interface as shown below:
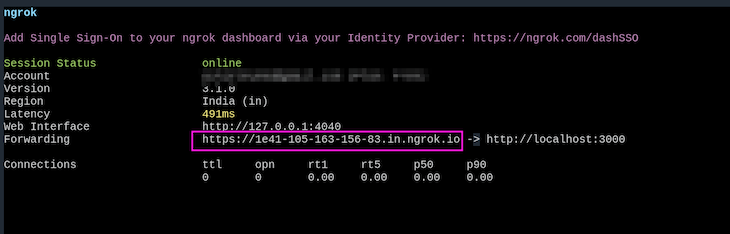
The URL provided will be the BASEURL we use on our app. In a production environment, you will host the backend on a server and have a domain mapped to the backend service. The same URL can also be used on postman to test the ngrok tunnel.
Setting up React Native
Now with the backend API running, we can proceed to the frontend app built with React Native. Start a React Native project on the project root in a new terminal using the following command:
npx react-native init frontend
The command above creates a plain React Native app template with native iOS and Android boilerplates. The updated folder structure on the project root should be:
Project_root |__backend … |__frontend
Now, switch to the frontend directory. Before we get into the video upload implementation, you will need to set up your development server on your laptop. React Native has a helpful guide on how to set up the development server for developing React Native apps on Android and iOS. The code we develop will work for both iOS and Android.
We will use Tailwind for styling purposes. In React Native, we have to install nativewind, which is a package that uses Tailwind CSS to create a universal style system that can be used on whichever platform the app is being built for.
Install Tailwind CSS and nativewind with:
npm install tailwindcss nativewind
Initialize Tailwind using this command:
npx tailwindcss init.
This will create a tailwind.config.js file in the root folder. Edit tailwind.config.js as shown below:
// tailwind.config.js module.exports = {
- content: [],
+ content: ["./App.{js,jsx,ts,tsx}", "./Components/**/*.{js,jsx,ts,tsx}"],
theme: { extend: {},
},
plugins: [],
}
Add the nativewind plugin to babel.config.js:
module.exports = { presets: ['module:metro-react-native-babel-preset'], plugins: ["nativewind/babel"],
};
Then, install the dependencies:
npm i react-native-document-picker react-native-video
react-native-document-picker is a document picker that enables the user to choose files from a user’s device. This package works out of the box for Android and iOS. No further configurations are needed after installations.
Android settings
react-native-video requires some configuration to make it work on Android.
In frontend/android/app/build.gradle, add the following line in the dependencies object:
dependencies{ implementation "androidx.appcompat:appcompat:1.0.0" …
}
In frontend/android/settings.gradle, add the following code:
include ':react-native-video'
project(':react-native-video').projectDir = new File(rootProject.projectDir, '../node_modules/react-native-video/android-exoplayer')
iOS settings
On Mac, run the following command to ensure react-native-video works for iOS:
npx pod-install
With all the dependencies sorted, start the react-native metro:
npx react-native start
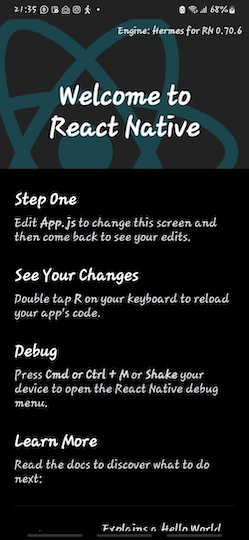
Then, on another terminal, run the app using the following command to run on Android:
npx react-native run-android
You should see the React Native screen as shown below:
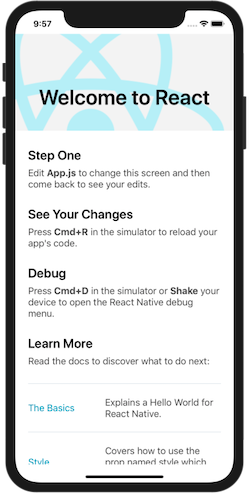
On iOS, run the app using:
npx react-native run-ios
You should see the React Native screen on iOS:
Creating a loader component
Create a component folder and within it, Loader.js. This file contains the code for a loading screen that will display while we waiting for uploads to complete or for documents to be successfully retrieved from Firebase.
Loader.js has the following code:
import { ActivityIndicator, View,Text } from "react-native"; const Loader = () => { return ( <View className="bg-white h-screen flex justify-center"> <ActivityIndicator size="large" color="#4D7902" /> <Text className="text-pink-900 font-bold text-center" >Loading...</Text> </View> )
}
export default Loader
The code above creates a component that shows the loading indicator. The ActivityIndicator is a React Native component that shows a circular loader. Using Tailwind CSS, we center the loader on the View.
Creating the uploading and fetching component
The App.js component will hold the logic for fetching URLs from Firebase and uploading the videos. In App.js we first import the following modules from React Native:
- ScrollView: A scrollable container that can hold multiple components
- RefreshControl: A component used to refresh the content within a ScrollView
- Text: A component for displaying text
- View: A container for holding other components
- Alert: A component for showing alerts to the user
- Pressable: A component for creating touchable elements
Next, we import the video component from react-native-video and the DocumentPicker component from react-native-document-picker.
Then, the useEffect and useState hooks are imported from the React library and used to manage the state of the component and trigger side effects when the state changes.
Next, the Axios library is imported to make server HTTP requests.
Finally, the loader component is imported from the ./Components/Loader.js file. The API_ENDPOINT constant is declared and assigned with the actual endpoint ngrok URL we generated for the API:
import { ScrollView, RefreshControl, Text, View, Alert, Pressable} from 'react-native';
import Video from 'react-native-video';
import DocumentPicker from 'react-native-document-picker'
import { useEffect, useState } from 'react'
import axios from 'axios';
import Loader from './Components/Loader.js'; const API_ENDPOINT = '<paste-ngrok-url-here>/api/uploads ' const App = () => { // upload and fetch URLS logic goes here }; Export default App;
In the App.js, we first declare and initialize state variables that will be used to denote the different changes in state throughout the component. The code for this is:
const App = () => { const [uploading, setUploading] = useState(false) const [files, setFiles] = useState([]) const [fetching, setFetching] = useState(false) const [refreshing, setRefreshing] = useState(false); };
Export default App;
Next, we add a useEffect hook that triggers a side effect when the component mounts. The hook takes two arguments: a callback function and a dependency array.
The callback function is executed whenever the component is updated, and the dependency array is used to determine when the side effect should be triggered. In this case, the dependency array is array, which means that the side effect is only triggered once when the component is first mounted.
The side effect is to fetch all the videos uploaded on Firebase using the getAllMedia function().
When the fetch promise resolves, the URLs update the files’ state:
const App = () => { const [uploading, setUploading] = useState(false) const [files, setFiles] = useState([]) const [fetching, setFetching] = useState(false) const [refreshing, setRefreshing] = useState(false); // —------------use effect —-----------------
useEffect(() => { getAllMedia().then((urls) => { setFiles(urls) setFetching(false) }) }, []) };
Export default App;
After useEffect, we define an error handler function that will be responsible for throwing uploading errors as an alert:
const App = () => { const [uploading, setUploading] = useState(false) const [files, setFiles] = useState([]) const [fetching, setFetching] = useState(false) const [refreshing, setRefreshing] = useState(false); useEffect(() => { getAllMedia().then((urls) => { setFiles(urls) setFetching(false) }) }, []) // —-------- error handler —------------ const handleError = (e) => { if (DocumentPicker.isCancel(e)) { Alert.alert('Upload Cancelled') } else { Alert.alert('Unknown Error: ' + JSON.stringify(e)) } } };
Export default App;
Next, we define an upload handler. The handleUpload function is a callback function that is used to handle the process of uploading a video file to the server.
handleUpload invokes the DocumentPicker component to allow the user to select videos from their phone storage. The video picked is POST to Firebase as multipart form data via the ngrok endpoint. Errors are handled by the handleError function.
The handleUpload function code is as follows:
// —-----upload handler —-
const handleUpload = async () => { try { setUploading(true) const pickerResult = await DocumentPicker.pickSingle({ type: ['video/*'], presentationStyle: 'fullScreen', copyTo: 'cachesDirectory', }) const body = new FormData(); body.append('files', { uri: pickerResult.fileCopyUri, type: pickerResult.type, name: pickerResult.name, }); const config = { headers: { 'Content-Type': 'multipart/form-data', 'Content-Disposition': 'form-data', } } const response = await axios.post(API_ENDPOINT, body, config) if (response.status === 200) { Alert.alert('Upload Successful') } if (response.status === 500) { Alert.alert('Server error') } if (response.status === 403) { Alert.alert('Error uploading document.') } setUploading(false) } catch (e) { console.log(e.response) handleError(e) } }
Next, we define the getAllMedia function. This function will send a get request that returns an array of all the files already uploaded to Firebase. The function sets the state of fetching to true before making the API request, indicating that data is being fetched from the API. If there is an error during the request, an alert with the error message is displayed using the Alert method:
const getAllMedia = async () => { try { setFetching(true) const response = await axios.get(API_ENDPOINT) return response.data } catch (e) { console.log(e) Alert.alert('Unknown Error: ' + JSON.stringify(e)) } }
With all the helper functions and core logic implemented, we can now work on rendering the component. The rendered content will be split into two logical units: an upload button, and a list view rendering all the video files from Firebase:
const App = () => {
// other functions here return ( <View className="h-full p-10 flex justify-start text-md font-bold text-emerald-900 bg-white"> <Pressable onPress={handleUpload} > <Text className=" bg-pink-900 text-white rounded-md p-3 text-center">Upload Media</Text> </Pressable> <ScrollView className="mt-10" refreshControl={ <RefreshControl refreshing={refreshing} onRefresh={ () => { setRefreshing(true); getAllMedia().then((urls) => { console.log(urls) setFiles(urls) setFetching(false) setRefreshing(false); }) } } /> }> {uploading || fetching ? <Loader /> : <> {files.map((file, index) => { return ( <View key={index} className="border border-pink-900 h-60 m-2 "> <Video className="absolute top-0 left-0 bottom-0 right-0" key={index} paused={false} repeat={true} source= controls={true} /> </View> ) })} </> } </ScrollView> </View> );
};
export default App;
The view contains an upload button that triggers handleUpload. When pulled down, scrollView does a refetch of all videos from Firebase by invoking getAllMedia and updating the state. All the video URLs are iterated through and rendered by the Video component from the react-native-video package.
The complete code in the App.js is as follows:
import { ScrollView, RefreshControl, Text, View, Alert, Pressable} from 'react-native';
import Video from 'react-native-video';
import DocumentPicker from 'react-native-document-picker'
import { useEffect, useState } from 'react'
import axios from 'axios'; import Loader from './Components/Loader.js';
const API_ENDPOINT = '<paste-ngrok-url-here>/api/uploads ' const App = () => { const [uploading, setUploading] = useState(false) const [files, setFiles] = useState([]) const [fetching, setFetching] = useState(false) const [refreshing, setRefreshing] = useState(false); useEffect(() => { getAllMedia().then((urls) => { setFiles(urls) setFetching(false) }) }, []) const handleError = (e) => { if (DocumentPicker.isCancel(e)) { Alert.alert('Upload Cancelled') } else { Alert.alert('Unknown Error: ' + JSON.stringify(e)) } } const handleUpload = async () => { try { setUploading(true) const pickerResult = await DocumentPicker.pickSingle({ type: ['video/*'], presentationStyle: 'fullScreen', copyTo: 'cachesDirectory', }) const body = new FormData(); body.append('files', { uri: pickerResult.fileCopyUri, type: pickerResult.type, name: pickerResult.name, }); const config = { headers: { 'Content-Type': 'multipart/form-data', 'Content-Disposition': 'form-data', } } const response = await axios.post(API_ENDPOINT, body, config) if (response.status === 200) { Alert.alert('Upload Successful') } if (response.status === 500) { Alert.alert('Server error') } if (response.status === 403) { Alert.alert('Error uploading document.') } setUploading(false) } catch (e) { console.log(e.response) handleError(e) } } const getAllMedia = async () => { try { setFetching(true) const response = await axios.get(API_ENDPOINT) return response.data } catch (e) { console.log(e) Alert.alert('Unknown Error: ' + JSON.stringify(e)) } } return ( <View className="h-full p-10 flex justify-start text-md font-bold text-emerald-900 bg-white"> <Pressable onPress={handleUpload} > <Text className=" bg-pink-900 text-white rounded-md p-3 text-center">Upload Media</Text> </Pressable> <ScrollView className="mt-10" refreshControl={ <RefreshControl refreshing={refreshing} onRefresh={ () => { setRefreshing(true); getAllMedia().then((urls) => { console.log(urls) setFiles(urls) setFetching(false) setRefreshing(false); }) } } /> }> {uploading || fetching ? <Loader /> : <> {files.map((file, index) => { return ( <View key={index} className="border border-pink-900 h-60 m-2 "> <Video className="absolute top-0 left-0 bottom-0 right-0" key={index} paused={false} repeat={true} source= controls={true} /> </View> ) })} </> } </ScrollView> </View> );
};
export default App;
Conclusion
In this article, we explored how to upload videos from a React Native app. React Native is a powerful tool when building cross-platform tools. Using the same codebase, we can have two separate apps running on different operating systems. Learning React Native is a superpower in itself. The full code for this project is available on GitHub.
The post Build a video upload and compression app with Multer and React Native appeared first on LogRocket Blog.
from LogRocket Blog https://ift.tt/DjLTs0n
Gain $200 in a week
via Read more