What is a Favicon?
Table of Contents
A favicon, short for “favourite icon,” plays a crucial role in website branding and usability, acting as a visual marker for web browsers and tabs. In WordPress, a favicon is often referred to as a “Site Icon.” The favicon enhances your site’s professional appearance, aids in brand recognition, and improves user experience by making it easier for users to locate and identify your website among multiple open tabs or bookmarks.
Understanding Favicons
Favicons are small, typically 16×16 or 32×32 pixels, square icons that appear next to your website’s title in a browser tab, bookmark lists, history archives, and other places depending on the browser and the operating system. They can also be seen on mobile devices when users add your website to their home screen.
Importance of Favicons
- Brand Identity: Favicons contribute to your online identity, allowing users to instantly recognize your website.
- Professionalism: A well-designed favicon gives your site a polished, professional look.
- Usability and User Experience: Favicons make it easier for users to locate and switch between tabs, improving navigation, especially when multiple tabs are open.
Setting Up a Favicon in WordPress
WordPress makes it straightforward to add or change a favicon, or as it’s called in the WordPress dashboard, a Site Icon. Here’s how to do it:
- Prepare Your Icon: Before you upload your favicon, make sure it’s square and ideally 512×512 pixels. You can create a favicon using various online tools or software like Adobe Photoshop. The image should be clear and representative of your brand. It’s often a simplified version of your logo.
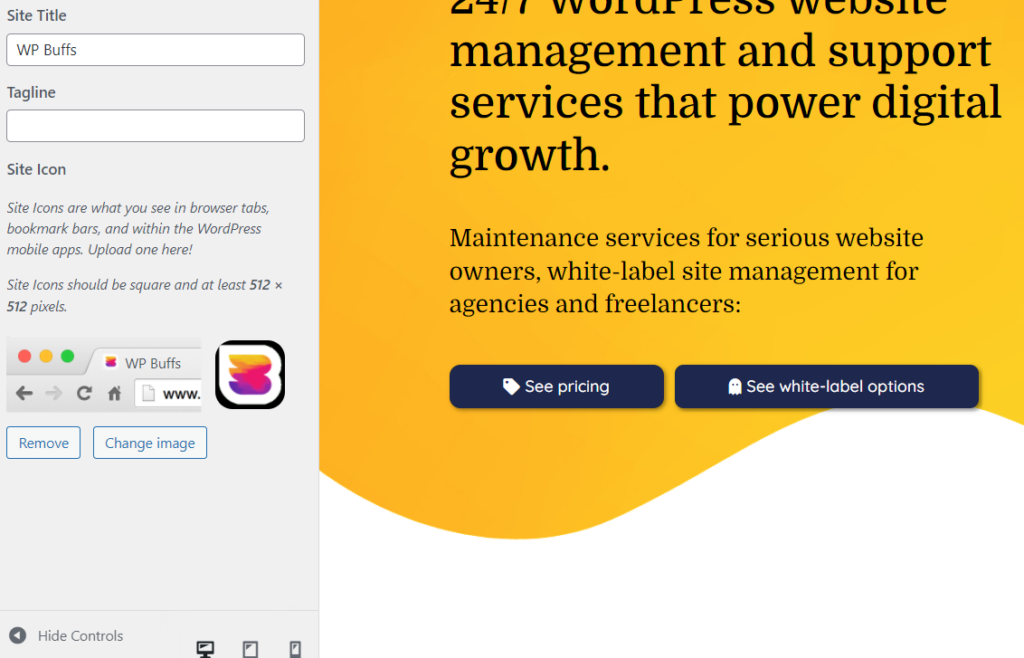
- Access the Customizer: Log in to your WordPress dashboard, navigate to Appearance > Customize to access the WordPress Customizer.
- Site Identity: In the Customizer, click on the Site Identity tab. Here, you’ll find the option to add or change your Site Icon.
- Upload Your Favicon: Click on the Select site icon button. You can upload a new image or select an existing one from your media library. After uploading, WordPress allows you to crop the image if necessary.
- Publish: Once you’re satisfied with how your favicon looks, click the Publish button to save your changes.
Best Practices for Favicons
- Design Simplicity: Given the small size, simple designs work best. Complex logos might need to be simplified or modified to be recognizable at a small scale.
- Consistency: Ensure your favicon is consistent with your brand’s logos and colour schemes.
- File Format and Sizes: While the traditional format is .ico, modern web browsers support PNG and SVG formats, which provide more flexibility and higher quality. However, ensure compatibility across all platforms your audience may use.
Conclusion
A favicon is a small but significant part of your website’s branding and user experience. It’s a visual cue that helps users quickly identify your site among a sea of tabs or bookmarks. WordPress simplifies the process of adding or changing a favicon through the Customizer, making it accessible for website owners of all skill levels. By following the steps outlined above and adhering to best practices, you can ensure your site stands out professionally and memorably.
Why should I use a Favicon?
Businesses should have a favicon to improve familiarity and encourage trust from potential customers. Branding allows visitors to recognize a site instantly. It adds continuity and legitimacy.
Individuals can also use a favicon for similar reasons, though the goal is repeat visitors rather than purchases in most situations.
Favicon Specifications
The favicon size in WordPress is 16×16 pixels. However, some other browsers and applications use a larger size, ranging from 16 to 195 pixels square.
If you stick with the 16×16 size, the applications that use larger sizes will generally enlarge it, often causing pixelation. Because of this, WordPress’ Site Identity requires 512×512 instead.
Some common alternate sizes are:
- 24 pixels – the icon for a pinned site in Internet Explorer 9
- 72 pixels – the icon on an iPad home screen
- 128 pixels – the icon used on the Chrome Web Store
- 195 pixels – the icon shown on Opera Speed Dial
Favicon Formats
A favicon will not display correctly if it is saved in an incorrect format. The most common format is Windows ICO, which was the original requirement. It can hold a variety of sizes and resolutions for use over multiple platforms. It is the only format used by Internet Explorer.
PNG is the most user-friendly option since nearly any graphics program will save in this format, and it provides a small file size and allows the favicon to be transparent if desired.
Opera supports using SVG for favicons, though it is the only browser that does.
GIF, JPG, and APNG are options but are less useful because their resolution is worse, and they can be distracting. Distraction is especially likely with animated GIF files and APNG files, which are also animated.
Creating a Favicon
Designing a WordPress favicon to add recognition to your site is a great idea. You can design one on a graphics program on your computer or use a free website online, such as favicon-generator.org or favicon.cc.

Consider the following factors to improve the value of your favicon.
Identity
The most important reason to have a favicon is to be recognized. Create a design that represents the product or service you offer or a design that matches your brand logo. An image that directly relates to your brand, such as a smaller version of the logo or the main letter or letters of the company name, is ideal.
Simplicity
Because of its small size, simple is best. Basic shapes or letters are a good choice for visibility. When visitors recognize it at a glance, it is most effective. The more detail you attempt to include, the more difficult it is for the visitor to recognize what the icon is. Precision, boldness, and clarity are essential.
Colors
High contrast will improve readability and increase recognition. Consider the favicons of such sites as NBC and Netflix. Their sites are instantly obvious. Sites that have a clear color identity should include that color in their WordPress favicon. Again, keep it simple. Too many colors can cause an unclear image.
How to Add a Favicon to WordPress
Add a WordPress favicon using one of the following methods:
1) Use the built-in Site Icon option in WordPress.
Hover over Appearance and choose Customize, then choose the Site Identity tab. Site Icon is at the bottom of the left panel and allows you to choose any 512 pixels or larger square image, which it then resizes as needed.
If the file you choose is not a square, WordPress provides an interface to crop the image to a square.
2) Edit the header.php
Edit header.php file in your current theme and add this code:
<link rel=”icon” href=”https://www.yourdomain.com/favicon.ico” type=”image/x-icon” >
 <link rel=”shortcut icon” href=”https://www.yourdomain.com/favicon.ico” type=”image/x-icon” />
Replace “yourdomain” with your site’s domain name, and make sure to upload the favicon to the webspace.
If you want to prevent WordPress from undoing the change in an update, create a child theme before editing and edit the child theme file instead of the main theme file.
3) Use a WordPress plugin.
Use one of the plugins we list below.
How to Change a Favicon in WordPress
Changing the WordPress favicon is similar to adding one. The same methods work to upload a new favicon. It is also possible to upload a new one and overwrite the old one, which will change it when visitors clear their cache or do a hard refresh.
Let WP Buffs handle your upgrades and changes if you find the process confusing. The team is available 24/7 to provide service and assistance.
Simplify with a WordPress Favicon Plugin
Ease the process of adding or changing the WordPress favicon by installing a plugin.
- You can use the plugin Insert Headers and Footers to add the code above easily. Paste the code into the header section and save it.
- The plugin All in One Favicon adds the functionality to ease the process of adding a favicon.
- RealFaviconGenerator is a plugin that generates icons based on the browser’s requirements.
- Another popular plugin is Heroic Favicon Generator, which generates a favicon from an uploaded image or one already in your media library. It uses drag-and-drop for uploading image files.
Why is my WordPress Favicon not Showing up?
There are several possible reasons for favicon errors, from user error to browser idiosyncrasies.
Cache
When your website is cached, changes to elements like the favicon take time to show up. You can speed up the process by doing a hard refresh (Ctrl + F5) or by clearing the browser cache. If that does not fix the problem, check the favicon file type. If it is not an .ico file, then it may be incompatible with the browser.
Typos
If you have a typographical error in the code, the favicon is likely to error out rather than display. Simple errors such as a missing quote, slash, or bracket cause errors that mess up the image and possibly the entire web page. Check the code carefully.
WordPress Favicon Location
The file reference is very specific, as well. If the link (the part within the href quotes) points to an image that does not exist, the favicon will not display. Be careful to upload the favicon file and copy the exact link. The best way to do this is to use the Media Library inside WordPress.
Local View
If you are checking the display on a local computer rather than loading up the internet page, the WordPress favicon will not show because most browsers do not look locally for the favicon. Check the page on the internet to be certain it is showing to visitors.
Wrong Image Type
The default file type for the favicon image is .ico (“image/ico”). When another file type is used, such as PNG or SVG, that must be adjusted in the code when using the edit theme method. The file type must match the file type of the image. For example, a PNG file should say “image/png” instead of “image/ico.”
For more information about all sorts of WordPress-related topics, subscribe to the WPBuffs newsletter.
People Also Ask
How do I add a favicon to WordPress?
The easiest way to add a WordPress favicon is to use the Site Identity section of Customize. The second easiest is to use a plugin. You can also add a favicon manually by editing the theme.
Where is the favicon in WordPress?
The icon itself shows in the tab or window title. It also shows up in bookmark lists. The setting is found under Appearance, in the Customize section. From there, click on Site Identity and the Site Icon at the bottom of the left pane is where you upload your favicon.
What size is a WordPress favicon?
16×16 pixels is the default size, but if you use the Site Identity method, the image should be 512×512 pixels, instead. The software will shrink the image to the proper size for each browser or device.
How do I change the favicon in WordPress?
You change the favicon the same way you add one. Either go to Appearance → Customize → Site Identity, change it in your plugin, or upload a new favicon.ico file, overwriting the previous one.
A favicon is a small icon that represents a website and appears in the browser tab, bookmarks, and favorites. It is an essential branding element that helps visitors recognize and remember a website. WordPress allows users to create custom favicons to enhance their website’s identity and improve user experience.
The standard size for a WordPress favicon is 16×16 pixels, but it is recommended to use a 512×512 pixel image to ensure clarity across different platforms and devices. The most common file format for favicons is the Windows ICO format, which supports multiple sizes and resolutions. PNG is also a popular choice due to its small file size and transparency options.
Creating a favicon can be done using graphic design software or online tools like favicon-generator.org or favicon.cc. It is important to keep the design simple, with high contrast colors and a clear representation of the brand or service offered.
Adding a favicon to WordPress can be done through the built-in Site Icon option in the Customizer, by editing the header.php file, or by using a WordPress plugin. Changing a favicon follows the same process as adding one, with the option to overwrite the old file or upload a new one.
If a favicon is not showing up, it could be due to caching issues, typos in the code, incorrect file location, local viewing, or using the wrong image type. Clearing the browser cache or checking the code and file location can help resolve these issues.
WordPress offers several plugins to simplify the process of adding or changing favicons, such as Insert Headers and Footers, All in One Favicon, RealFaviconGenerator, and Heroic Favicon Generator.