
In this tutorial, we’ll walk through how to send emails through your own app using Django. We’ll cover how to configure Django SMTP connections, how to set up an app password to use with a Django project, and how to send emails through the Django shell. We’ll also look at how to set up a contact form for collecting customer emails.
Most web applications use email to manage crucial operations, such as resetting passwords, account activation, receiving customer feedback, sending newsletters and marketing campaigns. Most of these tasks require a dedicated service like SendGrid or Mailgun. But if you don’t expect your site to get a huge quantity of visitors, you can actually get a lot done through your personal email provider.
Sending emails with your personal email is a reasonable option for small or testing projects, so we’ll take that approach here to keep things simple. However, it’s not a good idea to use your personal email service for your production website. You can learn more about Gmail sending restrictions, or refer to the limitations of your email provider.
Note: the full code for this tutorial is available on GitHub.
Understanding SMTP
Table of Contents
SMTP (or the Simple Mail Transfer Protocol) is a set of rules for determining how emails are transferred from senders to recipients. SMTP servers use this protocol to send and relay outgoing emails. (Note that other protocols govern how emails are recieved.)
An SMTP server always has a unique address, and a specific port for sending messages, which in most cases is 587. We’ll see how the port is relevant while sending emails with Django.
Since we’ll be using Gmail, the address we’ll be working with is smtp.gmail.com, and the port will be 587.
Now let’s see how we can send emails with Django.
Creating a Django Project
Every Django project should have a virtual environment, as we don’t want to mess up the project dependencies. To create one, run the following:
python -m venv .venv Note: if you’re unfamiliar with virtual environments, make sure to check our Python virtual environments guide.
The command above creates a virtual environment with the name .venv. To activate this virtual environment, you can use the following:
source .venv/bin/activate Since Django is a third-party package, you have to install it with pip:
pip install django This will install the latest version of Django, which you can check with pip freeze.
To create a Django project, you call the command line utility django-admin:
django-admin startproject EmailProject With the command above, you’re creating a Django project with the name EmailProject, but you can create the project with whatever name you want.
Now, enter to the project directory and run the server:
cd EmailProject python manage.py runserver After running the Django server, visit http://localhost:8000 in your browser. You’ll see an auto-generated page with the latest Django release notes.
Modifying Settings
You’ll need to modify the settings file before sending emails, so let’s locate that file with the command tree:
Note: for simplicity’s sake, we’ll be using only UNIX (macOS or Linux) system commands.
tree The tree command outputs the file structure of a directory. In this case, since we’re not giving it a specific directory path, we’ll get something similar to the following if we’re in the root folder of the project:
├── EmailProject │ ├── asgi.py │ ├── __init__.py │ ├── settings.py │ ├── urls.py │ └── wsgi.py └── manage.py 1 directory, 6 files The file we’ll be constantly modifying through this tutorial is the settings.py inside the EmailProject folder.
settings.py holds all the project configuration you’ll need, and allows you to set custom variables. As the Django docs say, “A settings file is just a Python module with module-level variables”.
Let’s look at the settings required for sending an email with Django. Open the EmailProject/settings.py file and paste the following settings at the bottom of the file:
# EmailProject/settings.py # Bottom of the file EMAIL_BACKEND = 'django.core.mail.backends.smtp.EmailBackend' EMAIL_HOST = '' EMAIL_PORT = 587 EMAIL_USE_TLS = True EMAIL_HOST_USER = '' EMAIL_HOST_PASSWORD = '' Let’s break down the code above by analyzing each one of these settings.
Email Backend
The EMAIL_BACKEND setting declares the backend our Django project will use to connect with the SMTP server.
This variable is pointing to the smtp.EmailBackend class that receives all the parameters needed to send an email. I strongly suggest you take a look at the class constructor directly on the Django source code. You’ll be surprised by how readable this code is.
Note: although this class is the default EMAIL_BACKEND, it’s considered a good practice to be explicit in the Django settings.
All the other email settings will be based on the constructor of this EmailBackend class.
Email host
The EMAIL_HOST setting refers to the SMTP server domain you’ll be using. This depends on your email provider. Below is a table with the SMTP server host corresponding to three common providers:
| Email provider | SMTP server host |
|---|---|
| Gmail | smtp.gmail.com |
| Outlook/Hotmail | smtp-mail.outlook.com |
| Yahoo | smtp.mail.yahoo.com |
We’re leaving this setting blank for now since we’ll use a .env file later to avoid hard-coded sensitive keys or per-site configurations. You should never set credentials directly into code.
We’ll be using Django Environ to solve this problem.
Email Port
The EMAIL_PORT setting must be set to 587 because it’s the default port for most SMTP servers. This remains true for personal email providers.
This port is used along with TLS encryption to ensure the security of email sending.
Email Use TLS
Transport Layer Security (TLS) is a security protocol used across the Web to encrypt the communication between web apps (Django) and servers (SMTP server).
Originally, we set the EMAIL_USE_TLS variable to True. This means Django will use Transport Layer Security to connect to the SMTP server and send emails. (It’s mandatory for personal email providers.)
Email Host User
The EMAIL_HOST_USER setting is your personal email address. Leave it blank for now, since we’ll use django-environ to set up all of these credentials.
Email Host Password
The EMAIL_HOST_PASSWORD setting is the app password you’ll get from your email account — the process we’ll be doing right after this section.
Same story: leave this setting blank, as we’ll use environmental variables later.
Set Up an App Password in Gmail
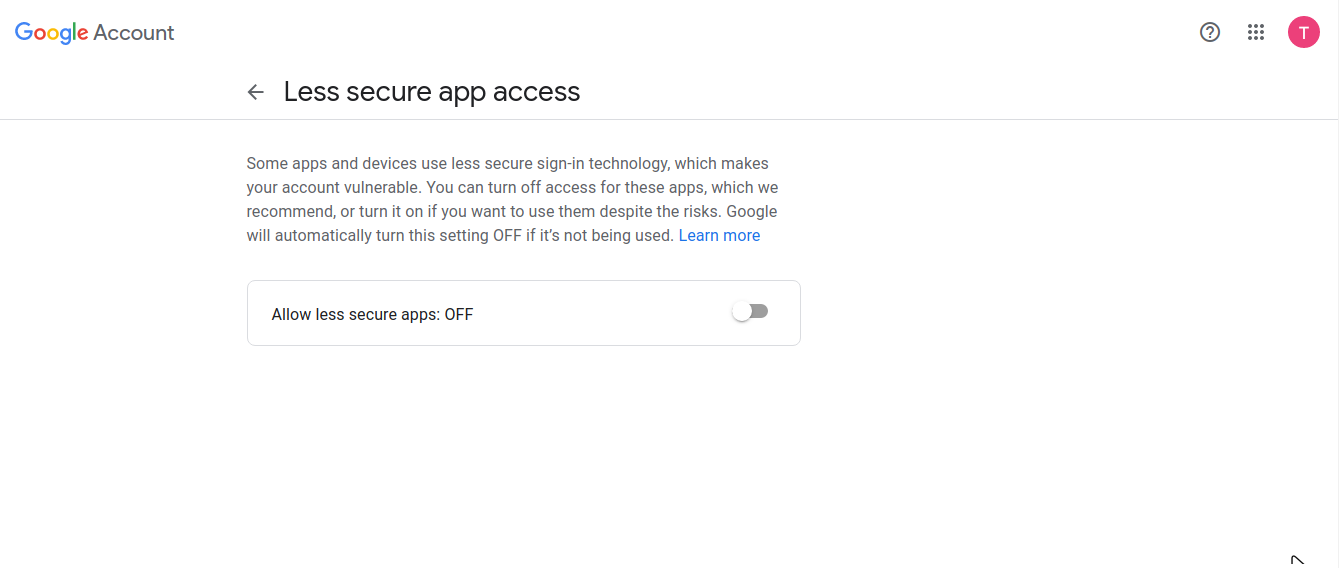
To use the EMAIL_HOST_PASSWORD setting you’ll need to activate the less secure app access and have an app password from your personal email address.
If you don’t activate the less secure app access, you’ll probably get a SMTPAuthenticationError, because Django has no way to comply with Google security protocols.
You may opt to use your normal password, but it would be even more risky than using an app password. My advice is to create a new Gmail account or to use a “testing” email address.
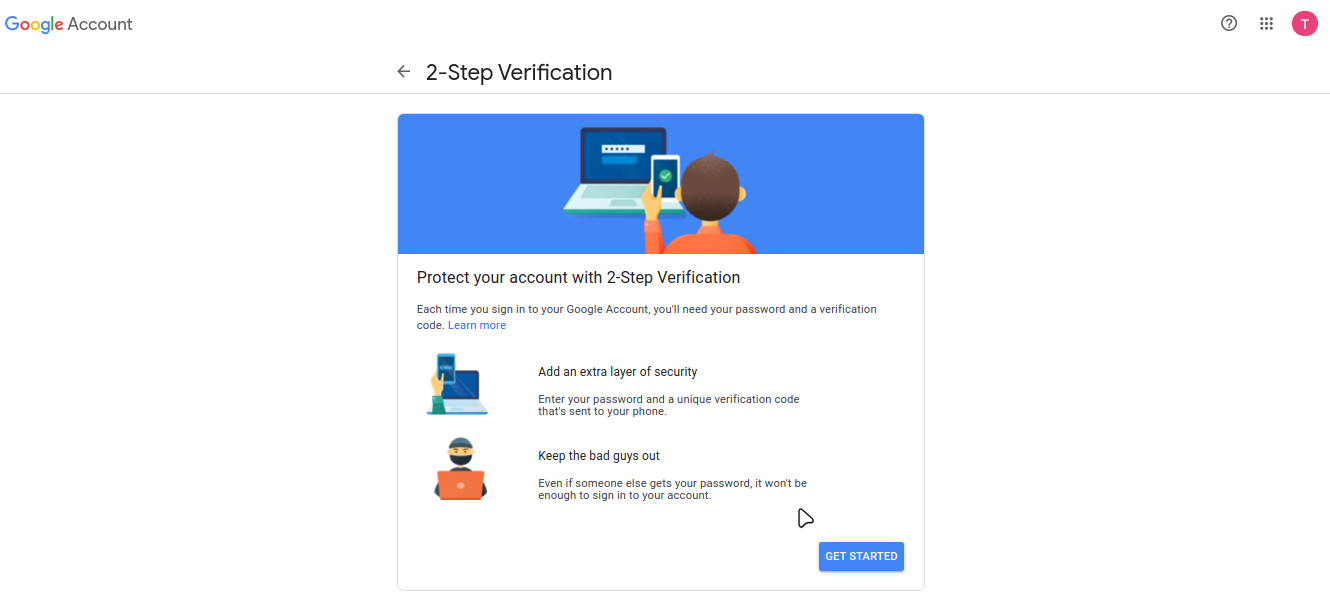
Taking this into account, you can get a Gmail app password with the steps below. Note that if you’re using an existing account and have enabled 2-step verification, you can skip steps 2 and 3:
- Create or Login into a Gmail account
- Go to myaccount.google.com/lesssecureapps and turn on the less secure apps option.
- Enable two-factor authentication, as it’s required to get an app password.
- Now you have two-factor authentication enabled, it’s time to get an app password. You can do this by going to the security section of your google account, scrolling down to the Signing in to Google section, and clicking on App passwords.
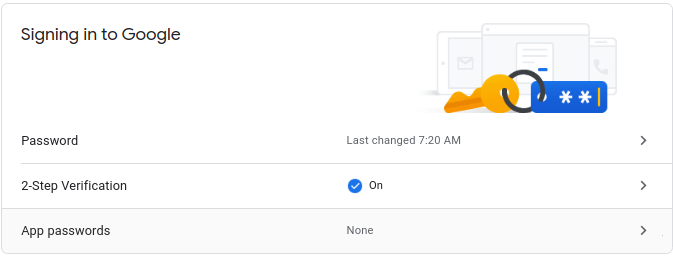
You’ll need to re-prompt your password (account password), before being redirected to the App passwords page.
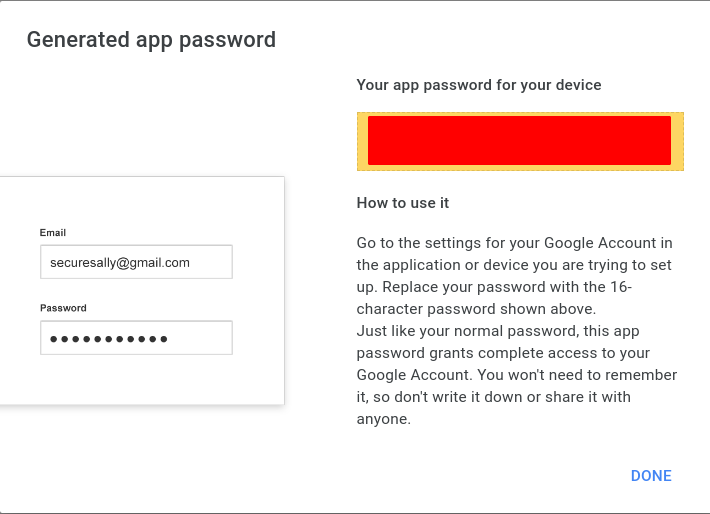
Once you’re in, click on select app, where you’ll choose a custom name for that app password — such as “Django Send Email” — then click on GENERATE.
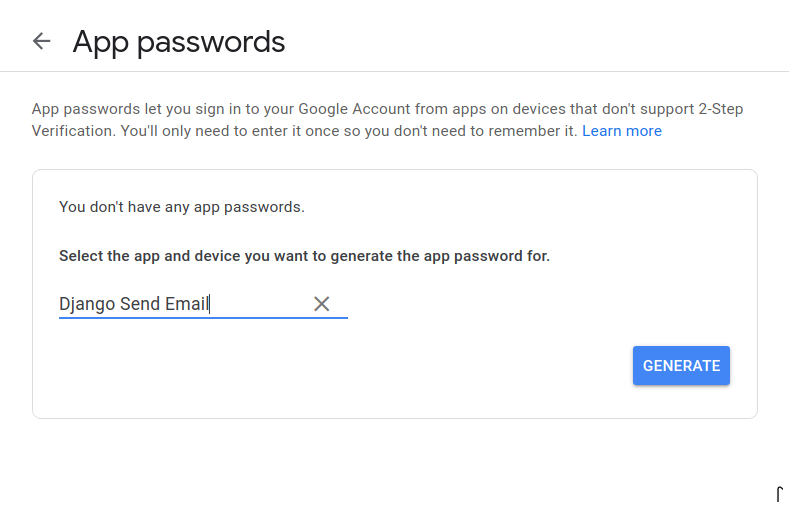
A new window will show up with a sixteen-character password. Copy it, because we’ll need it to configure our Django project.
If you’re using other email providers, make sure to read the following guides:
- Yahoo app password
- Outlook or Hotmail app password
Using Django Environ to Hide Sensitive Keys
Even if you’re just sending emails in development, you shouldn’t write passwords directly into source code. This becomes even more important when using a version control system along with GitHub to host your project. You don’t want people to access your data.
Let’s see how we can prevent this by using Django-environ.
Create a .env file inside the EmailProject directory (where the settings.py file is located) with the command below:
cd EmailProject/ ls settings.py # The settings file must be here touch .env Now, open that .env file and enter the following key–value pairs:
EMAIL_HOST=smtp.gmail.com EMAIL_HOST_USER=YourEmail@address EMAIL_HOST_PASSWORD=YourAppPassword RECIPIENT_ADDRESS=TheRecieverOfTheMails Breaking down the contents of this file:
EMAIL_HOST: your email provider SMTP server address. See the email host table above for quick guidance. In this case, I’m usingsmtp.gmail.com, the Gmail SMTP address.EMAIL_HOST_USER: your email address.EMAIL_HOST_PASSWORD: the app password you just generated. Have in mind it doesn’t include any spaces.RECIPIENT_ADDRESS: the email address in which you’ll receive the messages. This is a custom setting that we’ll create later to send all the emails to the same recipient.
To make use of these environmental variables, we’ll need to install Django-environ:
pip install django-environ Note: make sure your virtual environment is activated.
Now, open the settings.py located at the EmailProject directory and use the code below:
# EmailProject/settings.py # This should be at the start of the file import environ env = environ.Env() environ.Env.read_env() # Previous settings ... EMAIL_BACKEND = 'django.core.mail.backends.smtp.EmailBackend' EMAIL_HOST = env('EMAIL_HOST') EMAIL_PORT = 587 EMAIL_USE_TLS = True EMAIL_HOST_USER = env('EMAIL_HOST_USER') EMAIL_HOST_PASSWORD = env('EMAIL_HOST_PASSWORD') # Custom setting. To email RECIPIENT_ADDRESS = env('RECIPIENT_ADDRESS') First, we’re importing the environ package at the top of the settings file. Remember that all imports should be at the start.
Then we create an env variable which will contain all the key–value pairs available on the .env.
The env('KEY') statement means we’re looking up the value of that key. Make sure you have set up your .env file before proceeding, because you’ll get a Django ImproperlyConfigured error in case some environmental variable wasn’t set.
Note that RECIPIENT_ADDRESS is a custom setting that we’ll use to send the emails to an address we can access.
Don’t forget to include the .env file in your .gitignore in case you’re using Git and GitHub. You can do this just by opening it and adding the following line:
.env Continue reading How to Send Email with Django on SitePoint.