Let’s acknowledge that developing for WordPress is weird right now. Whether you’re new to WordPress or have worked with it for eons, the introduction of “Full-Site Editing” (FSE) features, including the Block Editor (WordPress 5.0) and the Site Editor (WordPress 5.9), have upended the traditional way we build WordPress themes and plugins.
Even though it’s been five years since we met the Block Editor for the first time, developing for it is difficult because documentation is either lacking or outdated. That’s more of a statement on how fast FSE features are moving, something Geoff lamented in a recent post.
Case in point: In 2018, an introductory series about getting into Gutenberg development was published right here on CSS-tricks. Times have changed since then, and, while that style of development does still work, it is not recommended anymore (besides, the create-guten-block project it’s based on is also no longer maintained).
In this article, I intend to help you get started with WordPress block development in a way that follows the current methodology. So, yes, things could very well change after this is published. But I’m going to try and focus on it in a way that hopefully captures the essence of block development, because even though the tools might evolve over time, the core ideas are likely to remain the same.
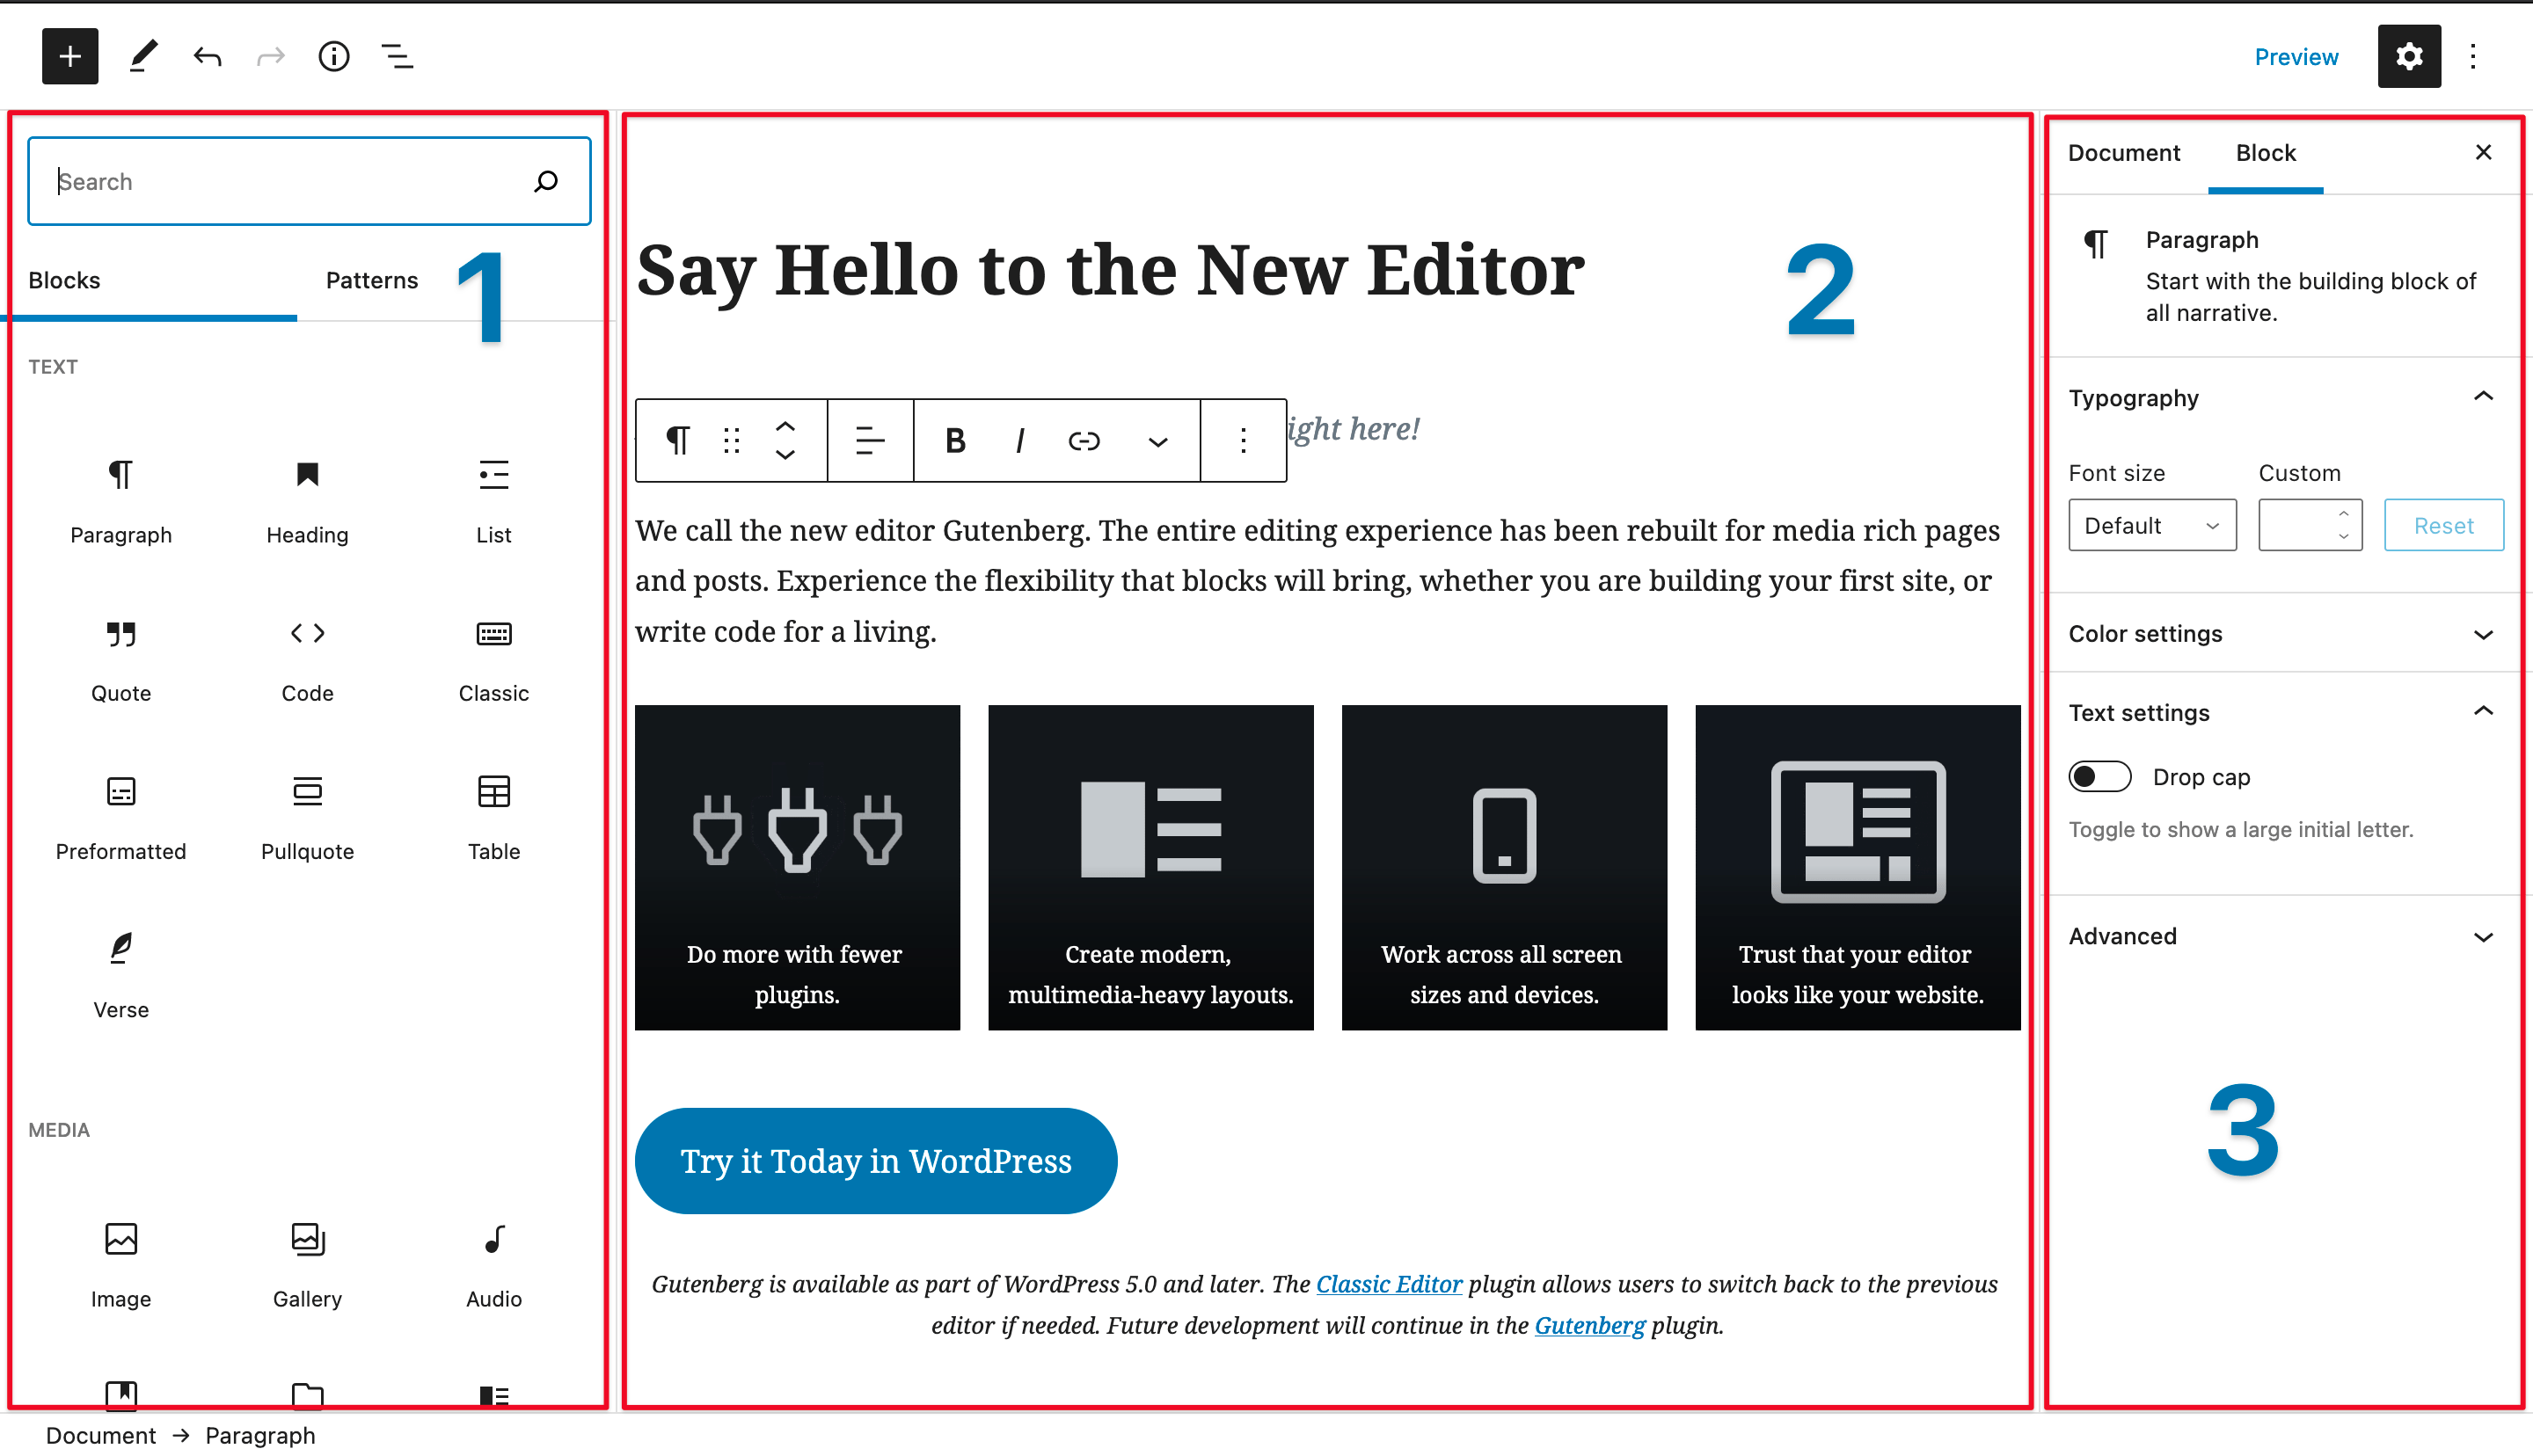
Credit: WordPress Block Editor Handbook
What are WordPress blocks, exactly?
Table of Contents
Let’s start by airing out some confusion with what we mean by terms like blocks. All of the development that went into these features leading up to WordPress 5.0 was codenamed “Gutenberg” — you know, the inventor of the printing press.
Since then, “Gutenberg” has been used to describe everything related to blocks, including the Block Editor and Site Editor, so it’s gotten convoluted to the extent that some folks depise the name. To top it all off, there’s a Gutenberg plugin where experimental features are tested for possible inclusion. And if you think calling all of this “Full-Site Editing” would solve the issue, there are concerns with that as well.
So, when we refer to “blocks” in this article what we mean are components for creating content in the WordPress Block Editor. Blocks are inserted into a page or post and provide the structure for a particular type of content. WordPress ships with a handful of “core” blocks for common content types, like Paragraph, List, Image, Video, and Audio, to name a few.
Apart from these core blocks, we can create custom blocks too. That is what WordPress block development is about (there’s also filtering core blocks to modify their functionality, but you likely won’t be needing that just yet).
What blocks do
Before we dive into creating blocks, we must first get some sense of how blocks work internally. That will definitely save us a ton of frustration later on.
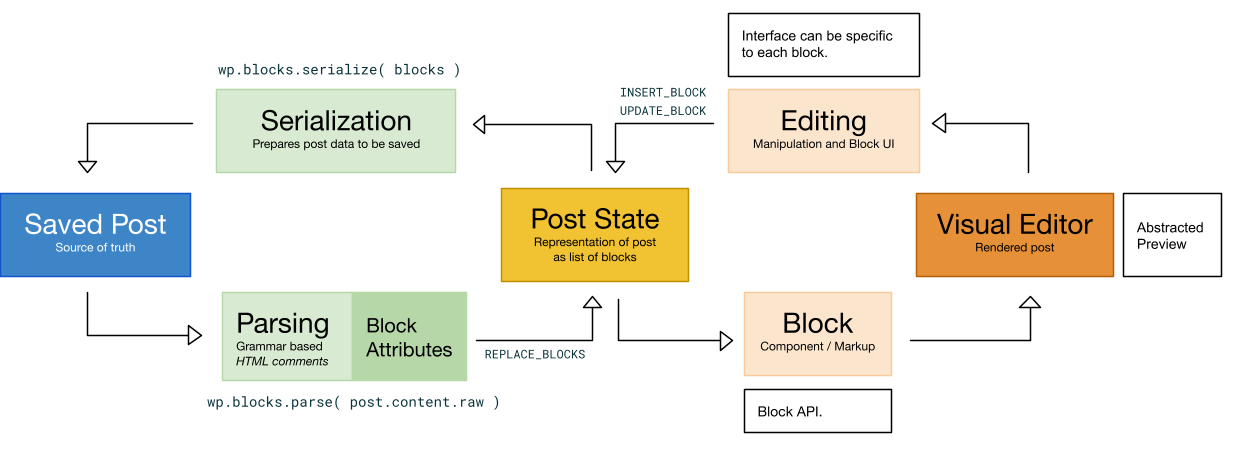
The way I like to think about a block is rather abstract: to me, a block is an entity, with some properties (called attributes), that represents some content. I know this sounds pretty vague, but stay with me. A block basically manifests itself in two ways: as a graphical interface in the block editor or as a chunk of data in the database.
When you open up the WordPress Block Editor and insert a block, say a Pullquote block, you get a nice interface. You can click into that interface and edit the quoted text. The Settings panel to the right side of the Block Editor UI provides options for adjusting the text and setting the block’s appearance.
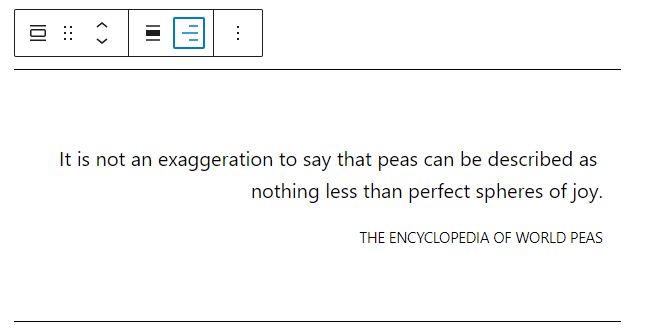
When you are done creating your fancy pullquote and hit Publish, the entire post gets stored in the database in the wp_posts table. This isn’t anything new because of Gutenberg. That’s how things have always worked — WordPress stores post content in a designated table in the database. But what’s new is that a representation of the Pullquote block is part of the content that gets stored in post_content field of the wp_posts table.
What does this representation look like? Have a look:
<!-- wp:pullquote {"textAlign":"right"} -->
<figure class="wp-block-pullquote has-text-align-right"> <blockquote> <p>It is not an exaggeration to say that peas can be described as nothing less than perfect spheres of joy.</p> <cite>The Encyclopedia of world peas</cite> </blockquote>
</figure>
<!-- /wp:pullquote -->
Looks like plain HTML, right?! This, in technical lingo, is the “serialized” block. Notice the JSON data in the HTML comment, "textAlign": "right". That’s an attribute — a property associated with the block.
Let’s say that you close the Block Editor, and then some time later, open it again. The content from the relevant post_content field is retrieved by the Block Editor. The editor then parses the retrieved content, and wherever it encounters this:
<!-- wp:pullquote {"textAlign":"right"} -->...<!-- /wp:pullquote -->…it says out loud to itself:
OK, that seems like a Pullquote block to me. Hmm.. it’s got an attribute too… I do have a JavaScript file that tells me how to construct the graphical interface for a Pullquote block in the editor from its attributes. I should do that now to render this block in all its glory.
As a block developer, your job is to:
- Tell WordPress that you want to register a specific type of block, with so-and-so details.
- Provide the JavaScript file to the Block Editor that will help it render the block in the editor while also “serializing” it to save it in the database.
- Provide any additional resources the block needs for its proper functionality, e.g. styles and fonts.
One thing to note is that all of this conversion from serialized data to graphical interface — and vice versa — takes place only in the Block Editor. On the front end, the content is displayed exactly the way it is stored. Therefore, in a sense, blocks are a fancy way of putting data in the database.
Hopefully, this gives you some clarity as to how a block works.
Blocks are just plugins
Blocks are just plugins. Well, technically, you can put blocks in themes and you can put multiple blocks in a plugin. But, more often than not, if you want to make a block, you’re going to be making a plugin. So, if you’ve ever created a WordPress plugin, then you’re already part-way there to having a handle on making a WordPress block.
But let’s assume for a moment that you’ve never set up a WordPress plugin, let alone a block. Where do you even start?
Setting up a block
We have covered what blocks are. Let’s start setting things up to make one.
Make sure you have Node installed
This will give you access to npm and npx commands, where npm installs your block’s dependencies and helps compile stuff, while npx runs commands on packages without installing them. If you’re on macOS, you probably already have Node and can can use nvm to update versions. If you’re on Windows, you’ll need to download and install Node.
Create a project folder
Now, you might run into other tutorials that jump straight into the command line and instruct you to install a package called @wordpress/create-block. This package is great because it spits out a fully formed project folder with all the dependencies and tools you need to start developing.
I personally go this route when setting up my own blocks, but humor me for a moment because I want to cut through the opinionated stuff it introduces and focus just on the required bits for the sake of understanding the baseline development environment.
These are the files I’d like to call out specifically:
readme.txt: This is sort of like the front face of the plugin directory, typically used to describe the plugin and provide additional details on usage and installation. If you submit your block to the WordPress Plugin Directory, this file helps populate the plugin page. If you plan on creating a GitHub repo for your block plugin, then you might also consider aREADME.mdfile with the same information so it displays nicely there.package.json: This defines the Node packages that are required for development. We’ll crack it open when we get to installation. In classic WordPress plugin development, you might be accustomed to working with Composer and acomposer.jsonfile instead. This is the equivalent of that.plugin.php: This is the main plugin file and, yes, it’s classic PHP! We’ll put our plugin header and metadata in here and use it to register the plugin.
In addition to these files, there’s also the src directory, which is supposed to contain the source code of our block.
Having these files and the src directory is all you need to get started. Out of that group, notice that we technically only need one file (plugin.php) to make the plugin. The rest either provide information or are used to manage the development environment.
The aforementioned @wordpress/create-block package scaffolds these files (and more) for us. You can think of it as an automation tool instead of a necessity. Regardless, it does make the job easier, so you can take the liberty of scaffolding a block with it by running:
npx @wordpress/create-blockInstall block dependencies
Assuming you have the three files mentioned in the previous section ready, it’s time to install the dependencies. First, we need to specify the dependencies we will need. We do that by editing the package.json. While using the @wordpress/create-block utility, the following is generated for us (comments added; JSON does not support comments, so remove the comments if you’re copying the code):
{ // Defines the name of the project "name": "block-example", // Sets the project version number using semantic versioning "version": "0.1.0", // A brief description of the project "description": "Example block scaffolded with Create Block tool.", // You could replace this with yourself "author": "The WordPress Contributors", // Standard licensing information "license": "GPL-2.0-or-later", // Defines the main JavaScript file "main": "build/index.js", // Everything we need for building and compiling the plugin during development "scripts": { "build": "wp-scripts build", "format": "wp-scripts format", "lint:css": "wp-scripts lint-style", "lint:js": "wp-scripts lint-js", "packages-update": "wp-scripts packages-update", "plugin-zip": "wp-scripts plugin-zip", "start": "wp-scripts start" }, // Defines which version of the scripts packages are used (24.1.0 at time of writing) // https://developer.wordpress.org/block-editor/reference-guides/packages/packages-scripts/ "devDependencies": { "@wordpress/scripts": "^24.1.0" }
}
View without comments
{ "name": "block-example", "version": "0.1.0", "description": "Example block scaffolded with Create Block tool.", "author": "The WordPress Contributors", "license": "GPL-2.0-or-later", "main": "build/index.js", "scripts": { "build": "wp-scripts build", "format": "wp-scripts format", "lint:css": "wp-scripts lint-style", "lint:js": "wp-scripts lint-js", "packages-update": "wp-scripts packages-update", "plugin-zip": "wp-scripts plugin-zip", "start": "wp-scripts start" }, "devDependencies": { "@wordpress/scripts": "^24.1.0" }
}
The @wordpress/scripts package is the main dependency here. As you can see, it’s a devDependency meaning that it aids in development. How so? It exposes the wp-scripts binary that we can use to compile our code, from the src directory to the build directory, among other things.
There are a number of other packages that WordPress maintains for various purposes. For example, the @wordpress/components package provides several pre-fab UI components for the WordPress Block Editor that can be used for creating consistent user experiences for your block that aligns with WordPress design standards.
You don’t actually need to install these packages, even if you want to use them. This is because these @wordpress dependencies aren’t bundled with your block code. Instead, any import statements referencing code from utility packages — like @wordpress/components — are used to construct an “assets” file, during compilation. Moreover, these import statements are converted to statements mapping the imports to properties of a global object. For example, import { __ } from "@wordpress/i18n" is converted to a minified version of const __ = window.wp.i18n.__. (window.wp.i18n being an object that is guaranteed to be available in the global scope, once the corresponding i18n package file is enqueued).
During block registration in the plugin file, the “assets” file is implicitly used to tell WordPress the package dependencies for the block. These dependencies are automatically enqueued. All of this is taken care of behind the scenes, granted you are using the scripts package. That being said, you can still choose to locally install dependencies for code completion and parameter info in your package.json file:
// etc. "devDependencies": { "@wordpress/scripts": "^24.1.0"
}, "dependencies": { "@wordpress/components": "^19.17.0"
}
Now that package.json is set up, we should be able to install all those dependencies by navigating to the project folder in the command line and running npm install.

If you’re coming from classic WordPress plugin development, then you probably know that all plugins have a block of information in the main plugin file that helps WordPress recognize the plugin and display information about it on the Plugins screen of the WordPress admin.
Here’s what @wordpress/create-block generated for me in for a plugin creatively called “Hello World”:
<?php
/** * Plugin Name: Block Example * Description: Example block scaffolded with Create Block tool. * Requires at least: 5.9 * Requires PHP: 7.0 * Version: 0.1.0 * Author: The WordPress Contributors * License: GPL-2.0-or-later * License URI: https://www.gnu.org/licenses/gpl-2.0.html * Text Domain: css-tricks * * @package create-block */
That’s in the main plugin file, which you can call whatever you’d like. You might call it something generic like index.php or plugin.php. The create-block package automatically calls it whatever you provide as the project name when installing it. Since I called this example “Block Example”, the package gave us a block-example.php file with all this stuff.
You’re going to want to change some of the details, like making yourself the author and whatnot. And not all of that is necessary. If I was rolling this from “scratch”, then it might look something closer to this:
<?php
/** * Plugin Name: Block Example * Plugin URI: https://css-tricks.com * Description: An example plugin for learning WordPress block development. * Version: 1.0.0 * Author: Arjun Singh * License: GPL-2.0-or-later * License URI: https://www.gnu.org/licenses/gpl-2.0.html * Text Domain: css-tricks */
I won’t get into the exact purpose of each line since that’s already a well-established pattern in the WordPress Plugin Handbook.
The file structure
We’ve already looked at the required files for our block. But if you’re using @wordpress/create-block, you will see a bunch of other files in the project folder.
Here’s what’s in there at the moment:
block-example/
├── build
├── node_modules
├── src/
│ ├── block.json
│ ├── edit.js
│ ├── editor.scss
│ ├── index.js
│ ├── save.js
│ └── style.scss
├── .editorconfig
├── .gitignore
├── block-example.php
├── package-lock.json
├── package.json
└── readme.txt
Phew, that’s a lot! Let’s call out the new stuff:
build/: This folder received the compiled assets when processing the files for production use.node_modules: This holds all the development dependencies we installed when runningnpm install.src/: This folder holds the plugin’s source code that gets compiled and sent to thebuilddirectory. We’ll look at each of the files in here in just a bit..editorconfig: This contains configurations to adapt your code editor for code consistency..gitignore: This is a standard repo file that identifies local files that should be excluded from version control tracking. Yournode_modulesshould definitely be included in here.package-lock.json: This is an auto-generated file containing for tracking updates to the required packages we installed withnpm install.
Block metadata
I want to dig into the src directory with you but will focus first on just one file in it: block.json. If you’ve used create-block , it’s already there for you; if not, go ahead and create it. WordPress is leaning in hard to make this the standard, canonical way to register a block by providing metadata that provides WordPress context to both recognize the block and render it in the Block Editor.
Here’s what @wordpress/create-block generated for me:
{ "$schema": "https://schemas.wp.org/trunk/block.json", "apiVersion": 2, "name": "create-block/block example", "version": "0.1.0", "title": "Block Example", "category": "widgets", "icon": "smiley", "description": "Example block scaffolded with Create Block tool.", "supports": { "html": false }, "textdomain": "css-tricks", "editorScript": "file:./index.js", "editorStyle": "file:./index.css", "style": "file:./style-index.css"
}
There’s actually a bunch of different information we can include here, but all that’s actually required is name and title. A super minimal version might look like this:
{ "$schema": "https://schemas.wp.org/trunk/block.json", "apiVersion": 2, "name": "css-tricks/block-example", "version": "1.0.0", "title": "Block Example", "category": "text", "icon": "format-quote", "editorScript": "file:./index.js",
}$schemadefines the schema formatting used to validate the content in the file. It sounds like a required thing, but it’s totally optional as it allows supporting code editors to validate the syntax and provide other additional affordances, like tooltip hints and auto-completion.apiVersionrefers to which version of the Block API the plugin uses. Today, Version 2 is the latest.nameis a required unique string that helps identify the plugin. Notice that I’ve prefixed this withcss-tricks/which I’m using as a namespace to help avoid conflicts with other plugins that might have the same name. You might choose to use something like your initials instead (e.g.as/block-example).versionis something WordPress suggests using as a cache-busting mechanism when new versions are released.titleis the other required field, and it sets the name that’s used wherever the plugin is displayed.categorygroups the block with other blocks and displays them together in the Block Editor. Current existing categories includetext,media,design,widgets,theme, andembed, and you can even create custom categories.iconlets you choose something from the Dashicons library to visually represent your block in the Block Editor. I’m using the format-quote icon](https://developer.wordpress.org/resource/dashicons/#format-quote) since we’re making our own pullquote sort of thing in this example. It’s nice we can leverage existing icons rather than having to create our own, though that’s certainly possible.editorScriptis where the main JavaScript file,index.js, lives.
Register the block
One last thing before we hit actual code, and that’s to register the plugin. We just set up all that metadata and we need a way for WordPress to consume it. That way, WordPress knows where to find all the plugin assets so they can be enqueued for use in the Block Editor.
Registering the block is a two-fold process. We need to register it both in PHP and in JavaScript. For the PHP side, open up the main plugin file (block-example.php in this case) and add the following right after the plugin header:
function create_block_block_example_block_init() { register_block_type( __DIR__ . '/build' );
}
add_action( 'init', 'create_block_block_example_block_init' );
This is what the create-block utility generated for me, so that’s why the function is named the way it is. We can use a different name. The key, again, is avoiding conflicts with other plugins, so it’s a good idea to use your namespace here to make it as unique as possible:
function css_tricks_block_example_block_init() { register_block_type( __DIR__ . '/build' );
}
add_action( 'init', 'css_tricks_block_example_block_init' );
Why are we pointing to the build directory if the block.json with all the block metadata is in src? That’s because our code still needs to be compiled. The scripts package processes the code from files in the src directory and places the compiled files used in production in the build directory, while also copying the block.json file in the process.
Alright, let’s move over to the JavaScript side of registering the block. Open up src/index.js and make sure it looks like this:
import { registerBlockType } from "@wordpress/blocks"; import metadata from "./block.json";
import Edit from "./edit.js";
import Save from "./save.js"; const { name } = metadata; registerBlockType(name, { edit: Edit, save: Save,
});
We’re getting into React and JSX land! This tells WordPress to:
- Import the
registerBlockTypemodule from the@wordpress/blockspackage. - Import metadata from
block.json. - Import the
EditandSavecomponents from their corresponding files. We’ll be putting code into those files later. - Register the the block, and use the
EditandSavecomponents for rendering the block and saving its content to the database.
What’s up with the edit and save functions? One of the nuances of WordPress block development is differentiating the “back end” from the “front end” and these functions are used to render the block’s content in those contexts, where edit handles back-end rendering and save writes the content from the Block Editor to the database for rendering the content on the front end of the site.
A quick test
We can do some quick work to see our block working in the Block Editor and rendered on the front end. Let’s open index.js again and use the edit and save functions to return some basic content that illustrates how they work:
import { registerBlockType } from "@wordpress/blocks";
import metadata from "./block.json"; const { name } = metadata; registerBlockType(name, { edit: () => { return ( "Hello from the Block Editor" ); }, save: () => { return ( "Hello from the front end" ); }
});
This is basically a stripped-down version of the same code we had before, only we’re pointing directly to the metadata in block.json to fetch the block name, and left out the Edit and Save components since we’re running the functions directly from here.
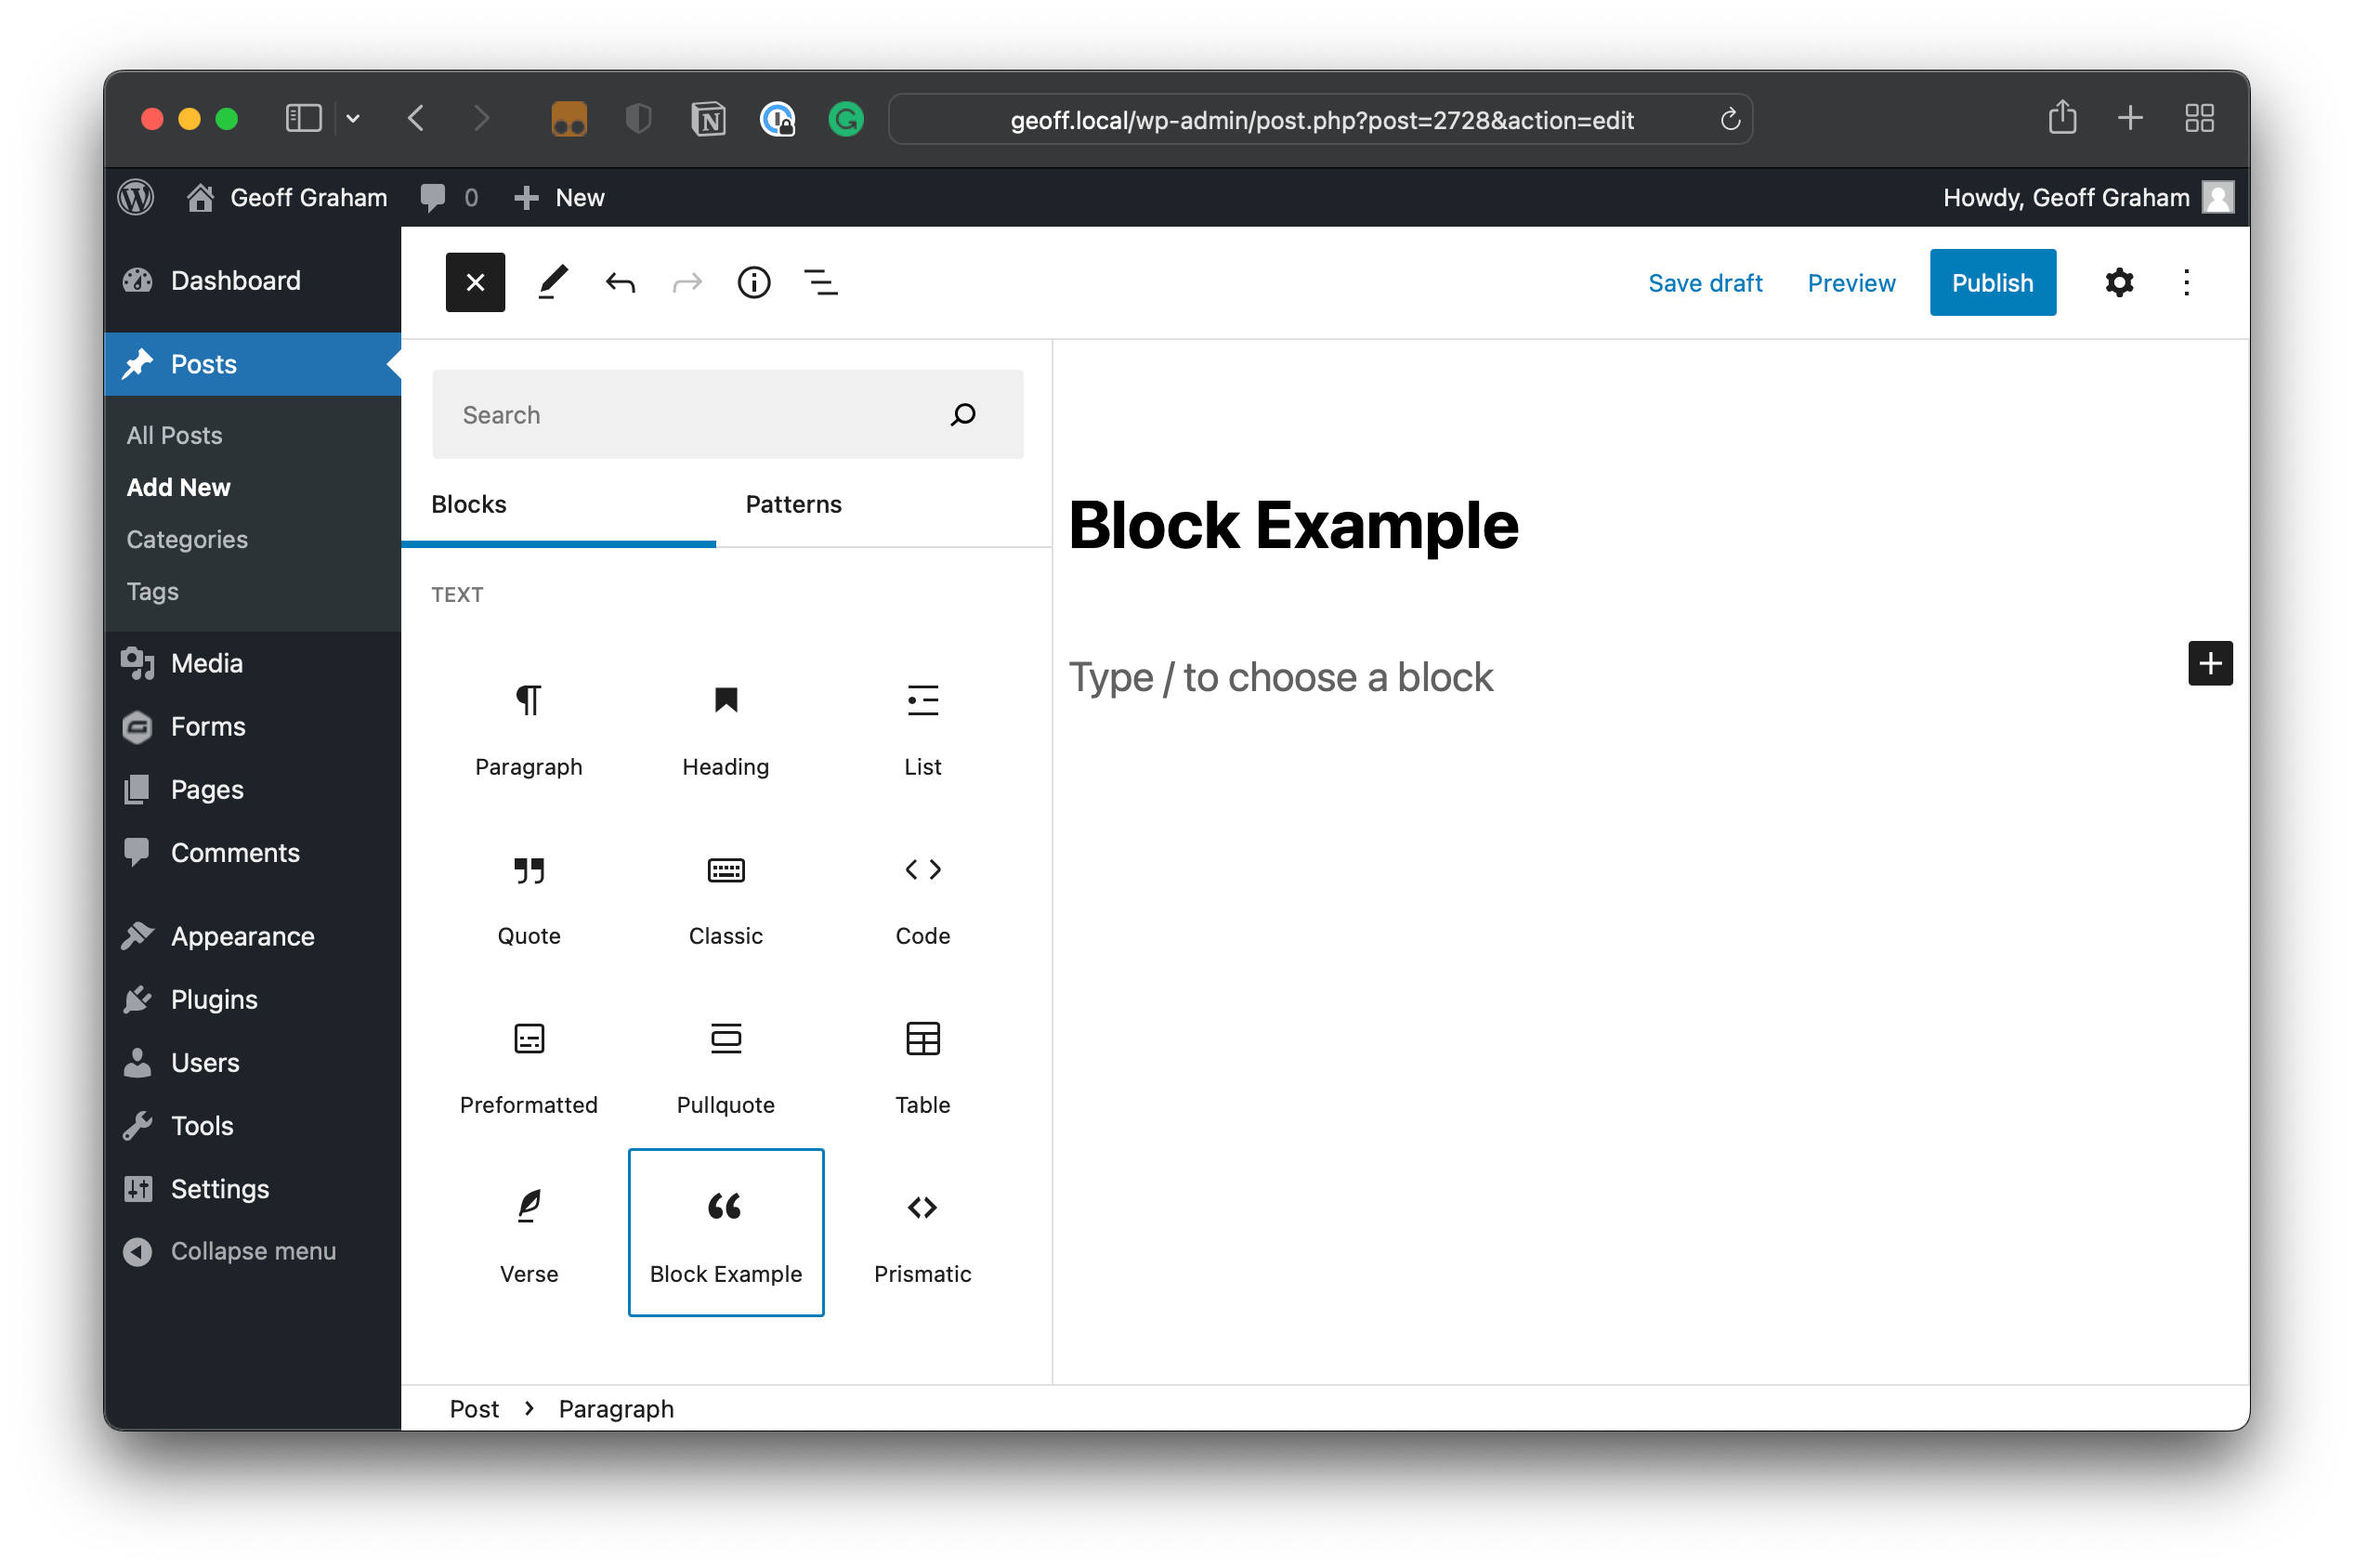
We can compile this by running npm run build in the command line. After that, we have access to a block called “Block Example” in the Block Editor:
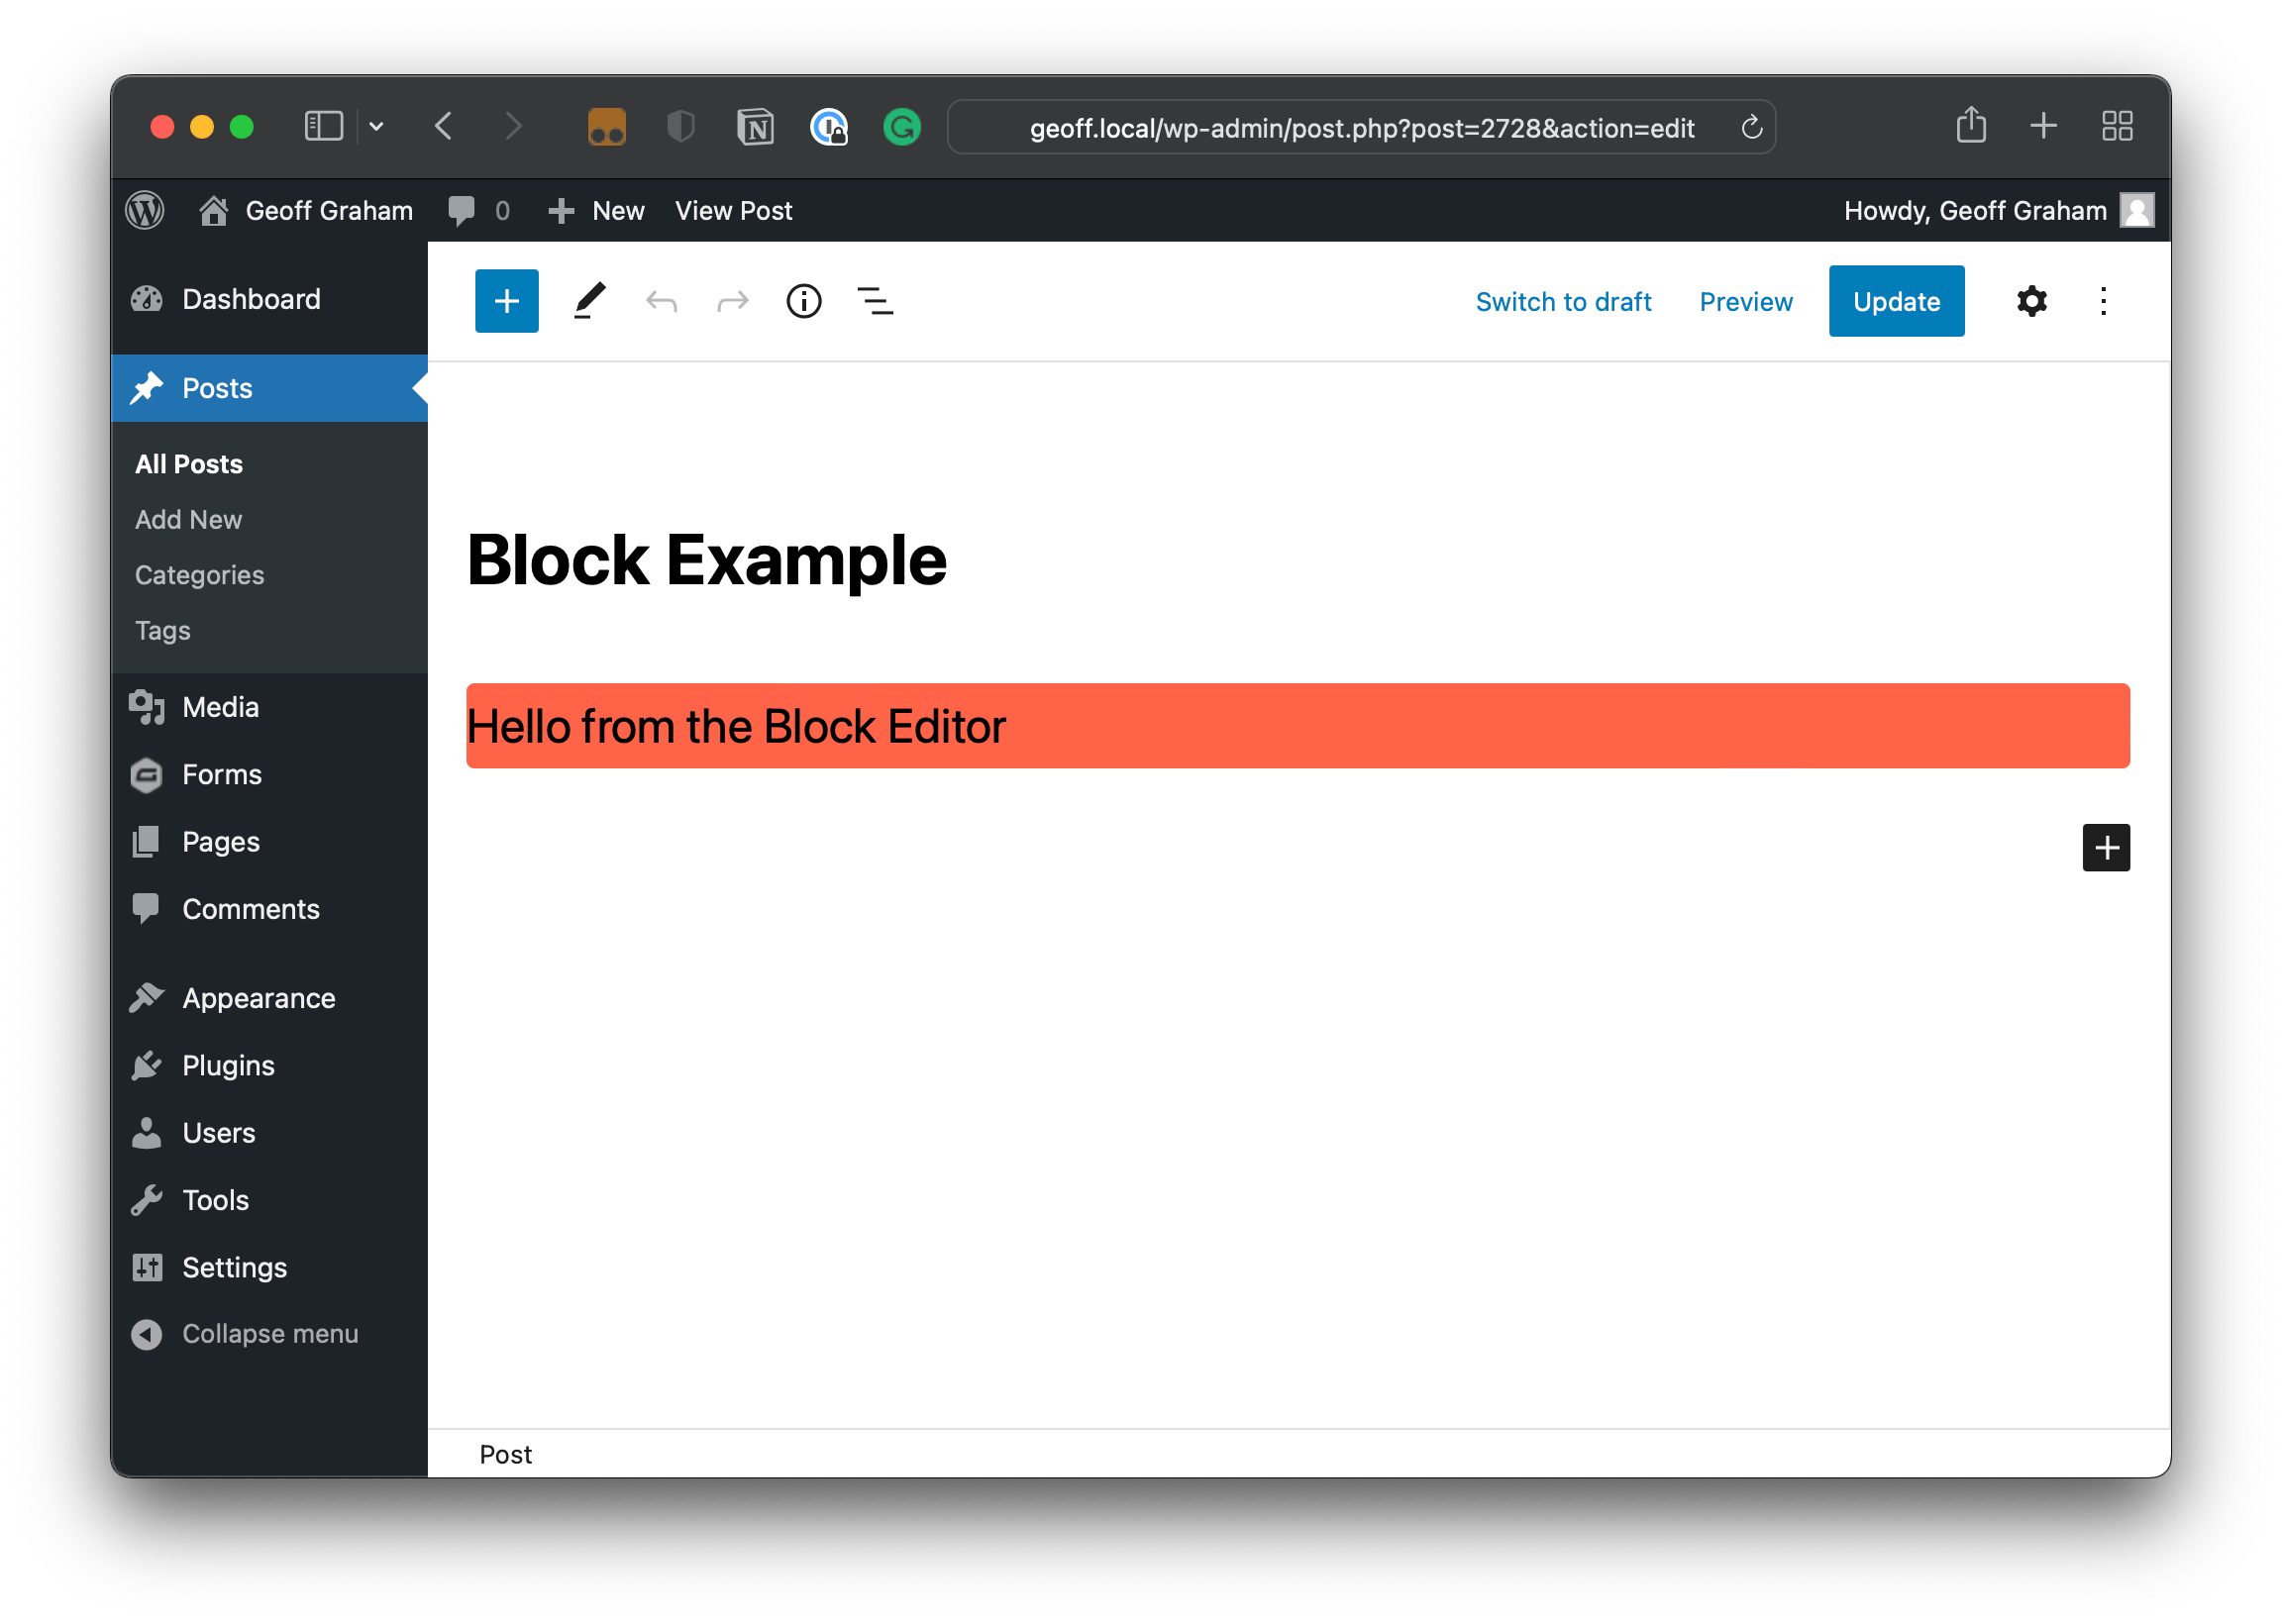
If we drop the block into the content area, we get the message we return from the edit function:
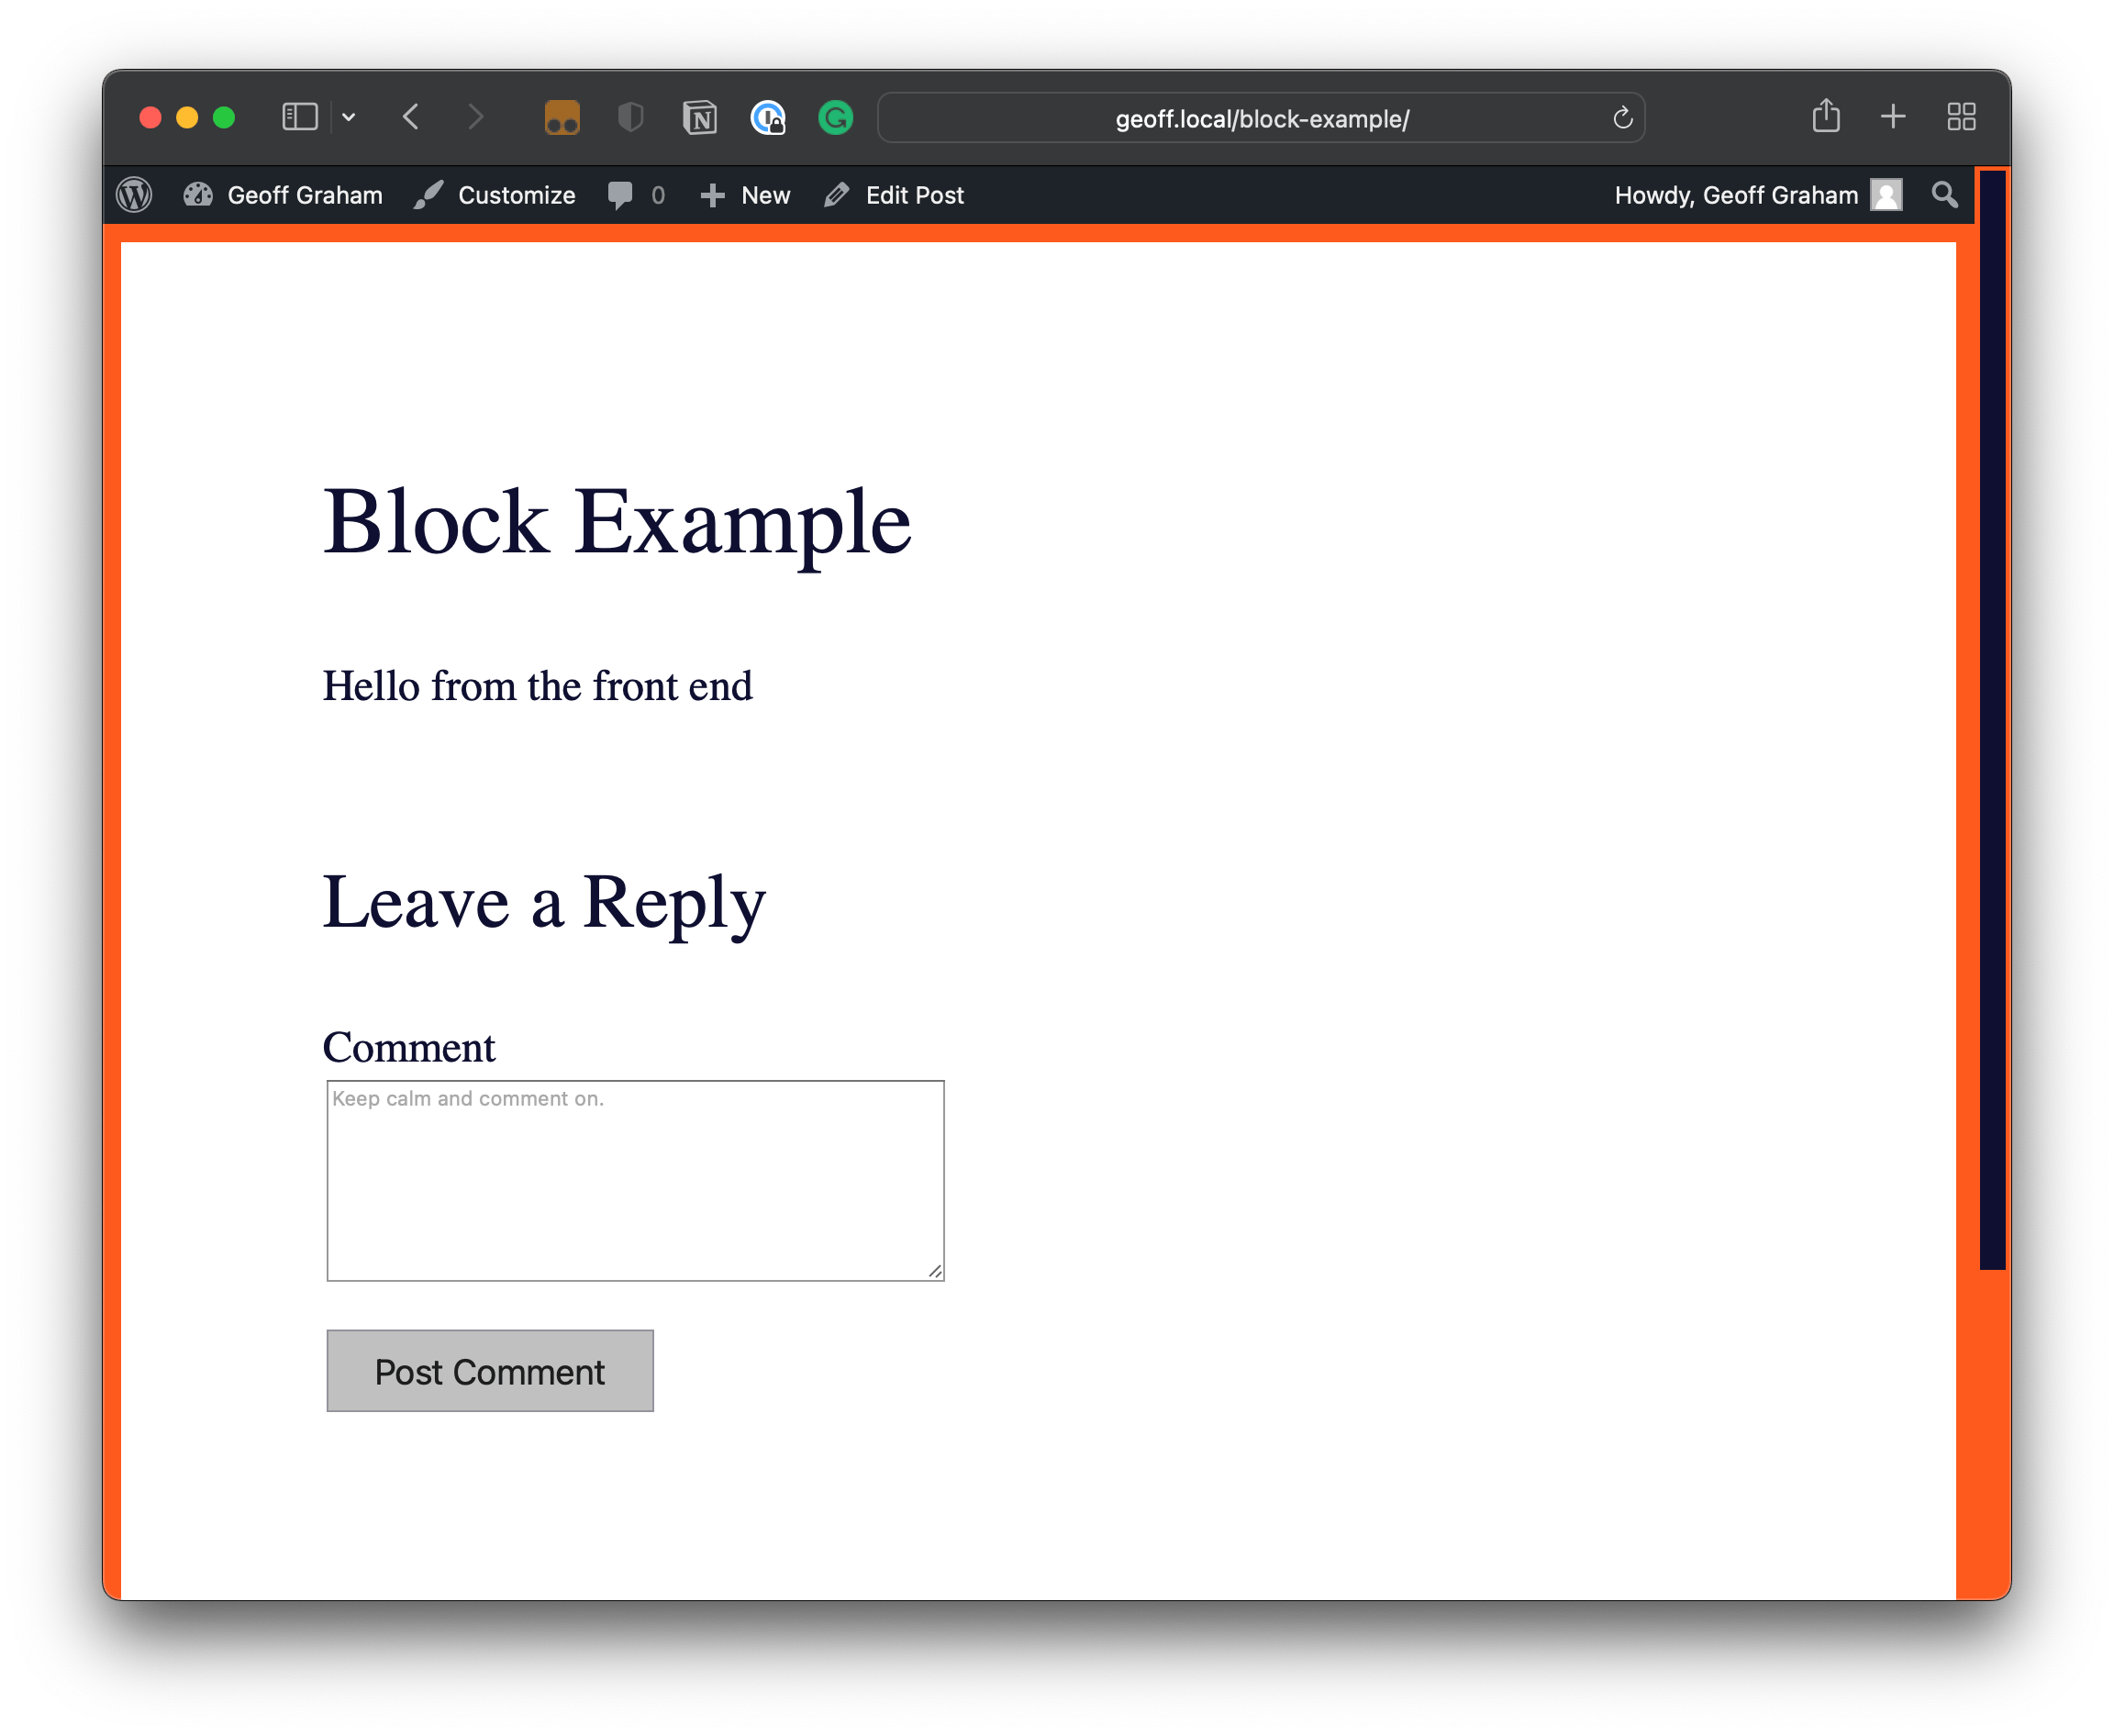
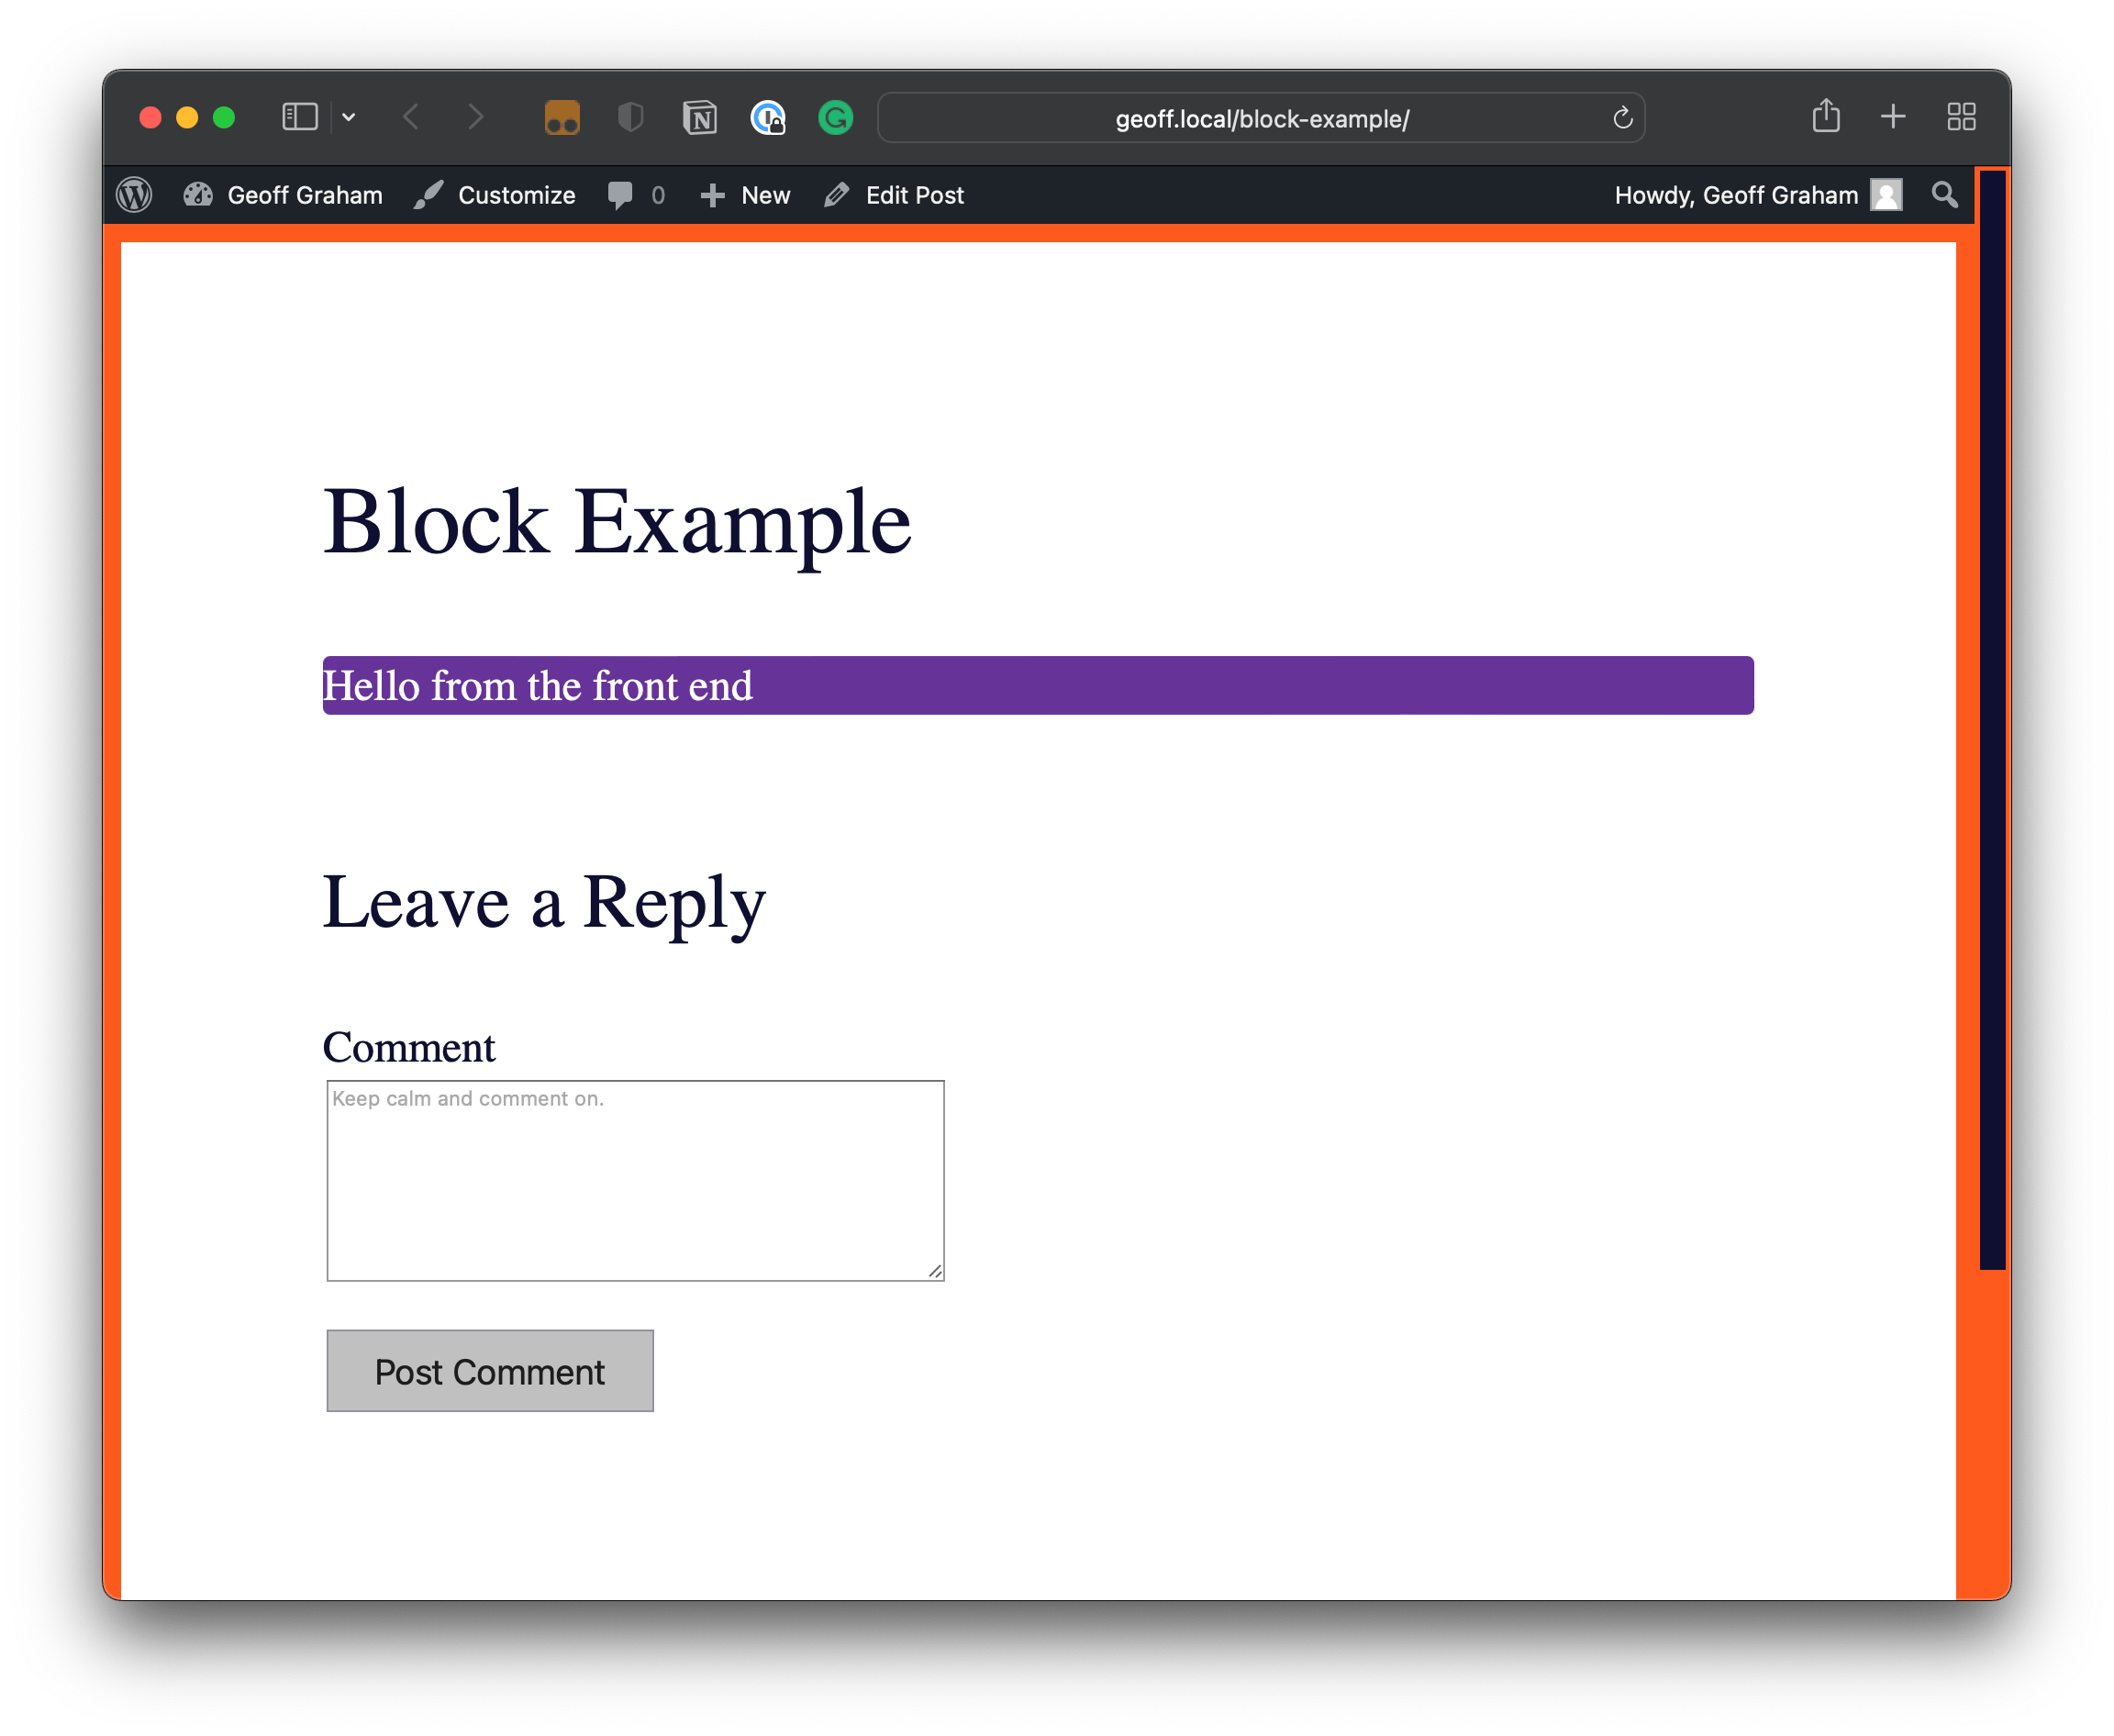
If we save and publish the post, we should get the message we return from the save function when viewing it on the front end:
Creating a block
Looks like everything is hooked up! We can revert back to what we had in index.js before the test now that we’ve confirmed things are working:
import { registerBlockType } from "@wordpress/blocks"; import metadata from "./block.json";
import Edit from "./edit.js";
import Save from "./save.js"; const { name } = metadata; registerBlockType(name, { edit: Edit, save: Save,
});
Notice that the edit and save functions are tied to two existing files in the src directory that @wordpress/create-block generated for us and includes all the additional imports we need in each file. More importantly, though, those files establish the Edit and Save components that contain the block’s markup.
Back end markup (src/edit.js)
import { useBlockProps } from "@wordpress/block-editor";
import { __ } from "@wordpress/i18n"; export default function Edit() { return ( <p {...useBlockProps()}> {__("Hello from the Block Editor", "block-example")} </p> );
}
See what we did there? We’re importing props from the @wordpress/block-editor package which allows us to generate classes we can use later for styling. We’re also importing the __ internationalization function, for dealing with translations.

Front-end markup (src/save.js)
This creates a Save component and we’re going to use pretty much the same thing as src/edit.js with slightly different text:
import { useBlockProps } from "@wordpress/block-editor";
import { __ } from "@wordpress/i18n"; export default function Save() { return ( <p {...useBlockProps.save()}> {__("Hello from the front end", "block-example")} </p> );
}
Again, we get a nice class we can use in our CSS:

Styling blocks
We just covered how to use block props to create classes. You’re reading this article on a site all about CSS, so I feel like I’d be missing something if we didn’t specifically address how to write block styles.
Differentiating front and back-end styles
If you take a look at the block.json in the src directory you’ll find two fields related to styles:
editorStyleprovides the path to the styles applied to the back end.styleis the path for shared styles that are applied to both the front and back end.
Kev Quirk has a detailed article that shows his approach for making the back-end editor look like the front end UI.
Recall that the @wordpress/scripts package copies the block.json file when it processes the code in the /src directory and places compiled assets in the /build directory. It is the build/block.json file that is used to register the block. That means any path that we provide in src/block.json should be written relative to build/block.json.
Using Sass
We could drop a couple of CSS files in the build directory, reference the paths in src/block.json, run the build, and call it a day. But that doesn’t leverage the full might of the @wordpress/scripts compilation process, which is capable of compiling Sass into CSS. Instead, we place our style files in the src directory and import them in JavaScript.
While doing that, we need to be mindful of how @wordpress/scripts processes styles:
- A file named
style.cssorstyle.scssorstyle.sass, imported into the JavaScript code, is compiled tostyle-index.css. - All other style files are compiled and bundled into
index.css.
The @wordpress/scripts package uses webpack for bundling and @wordpress/scripts uses the PostCSS plugin for working for processing styles. PostCSS can be extended with additional plugins. The scripts package uses the ones for Sass, SCSS, and Autoprefixer, all of which are available for use without installing additional packages.
In fact, when you spin up your initial block with @wordpress/create-block, you get a nice head start with SCSS files you can use to hit the ground running:
editor.scsscontains all the styles that are applied to the back-end editor.style.scsscontains all the styles shared by both the front and back end.
Let’s now see this approach in action by writing a little Sass that we’ll compile into the CSS for our block. Even though the examples aren’t going to be very Sass-y, I’m still writing them to the SCSS files to demonstrate the compilation process.
Front and back-end styles
OK, let’s start with styles that are applied to both the front and back end. First, we need to create src/style.scss (it’s already there if you’re using @wordpress/create-block) and make sure we import it, which we can do in index.js:
import "./style.scss";Open up src/style.scss and drop a few basic styles in there using the class that was generated for us from the block props:
.wp-block-css-tricks-block-example { background-color: rebeccapurple; border-radius: 4px; color: white; font-size: 24px;
}
That’s it for now! When we run the build, this gets compiled into build/style.css and is referenced by both the Block Editor and the front end.
Back-end styles
You might need to write styles that are specific to the Block Editor. For that, create src/editor.scss (again, @wordpress/create-block does this for you) and drop some styles in there:
.wp-block-css-tricks-block-example { background-color: tomato; color: black;
}
Then import it in edit.js, which is the file that contains our Edit component (we can import it anywhere we want, but since these styles are for the editor, it’s more logical to import the component here):
import "./editor.scss";Now when we run npm run build, the styles are applied to the block in both contexts:
Referencing styles in block.json
We imported the styling files in the edit.js and index.js, but recall that the compilation step generates two CSS files for us in the build directory: index.css and style-index.css respectively. We need to reference these generated files in the block metadata.
Let’s add a couple of statements to the block.json metadata:
{ "$schema": "https://schemas.wp.org/trunk/block.json", "apiVersion": 2, "name": "css-tricks/block-example", "version": "1.0.0", "title": "Block Example", "category": "text", "icon": "format-quote", "editorScript": "file:./index.js", "editorStyle": "file:./index.css", "style": "file:./style-index.css"
}
Run npm run build once again, install and activate the plugin on your WordPress site, and you’re ready to use it!
You can use npm run start to run your build in watch mode, automatically compiling your code every time you make a change in your code and save.
We’re scratching the surface
Actual blocks make use of the Block Editor’s Settings sidebar and other features WordPress provides to create rich user experiences. Moreover, the fact that there’s essentially two versions of our block — edit and save — you also need to give thought to how you organize your code to avoid code duplication.
But hopefully this helps de-mystify the general process for creating WordPress blocks. This is truly a new era in WordPress development. It’s tough to learn new ways of doing things, but I’m looking forward to seeing how it evolves. Tools like @wordpress/create-block help, but even then it’s nice to know exactly what it’s doing and why.
Are the things we covered here going to change? Most likely! But at least you have a baseline to work from as we keep watching WordPress blocks mature, including best practices for making them.
References
Again, my goal here is to map out an efficient path for getting into block development in this season where things are evolving quickly and WordPress documentation is having a little hard time catching up. Here are some resources I used to pull this together:


