Authentication is one of the cornerstones of information security in full-stack applications. The main purpose of it is to prove the user’s identity by checking if the provided credentials match the records in the database. Creating a secure authentication system can take a lot of time and effort.
In this article, we will take a closer look at how you can simplify the implementation of authentication in Next.js by using AWS Amplify. It is a complete solution to create feature-rich full-stack web and mobile apps that are easy to set up and scale as the business grows.
Jump ahead:
Getting started with the authentication methods
Table of Contents
One of the most common authentication methods is using a username and password. However, there are many other methods like Magic Links, biometric data, or security tokens, to name a few. It is also worth mentioning that authentication is often confused with authorization, which is a different process that determines a user or service’s level of access inside the app.
Amplify has its own CLI, visual interface studio, Amplify UI components, and open source client libraries to provide a smooth setup for implementing authentication. We will use all of them in this tutorial.
Setting up the Next.js project
First, open your terminal and run npm create-next-app amplify-auth. This scaffold command will create a fully functional Next.js project. Next, change the current working directory to the newly created project by running cd amplify-auth. Then, install the Amplify library and the Amplify component UI by running npm install aws-amplify @aws-amplify/ui-react.
After that, start the development server by running npm run dev. Finally, open your browser and navigate to http://localhost:3000. You should be presented with the Next.js welcome screen:

Create an AWS account and set up the CLI
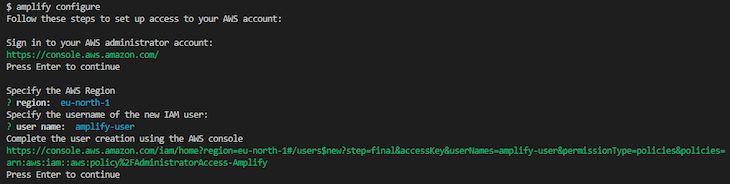
First, create a free AWS account if you already do not have one. Switch back to your project, and run npm install -g @aws-amplify/cli in your terminal. Next, run amplify configure. This will automatically open up the AWS console to make sure you have an account and are signed in. After that, you can switch back to your code editor, press enter, and select your region and username for your AWS IAM.
Next, hold the Control key on your keyboard and click the given link to open up the AWS console and finish configuring the setup using the GUI:
You will first be presented with the username you chose in the terminal wizard. Click Next: Permissions to continue. It should look like this:
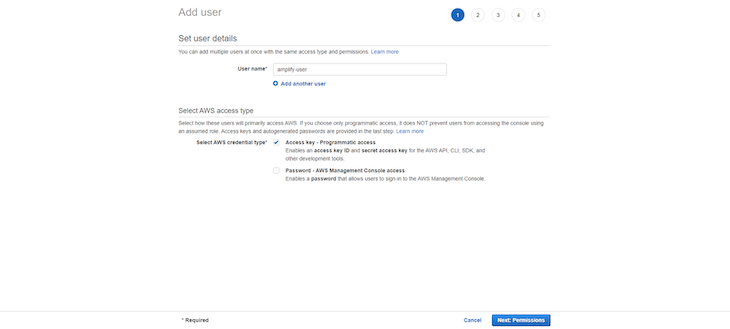
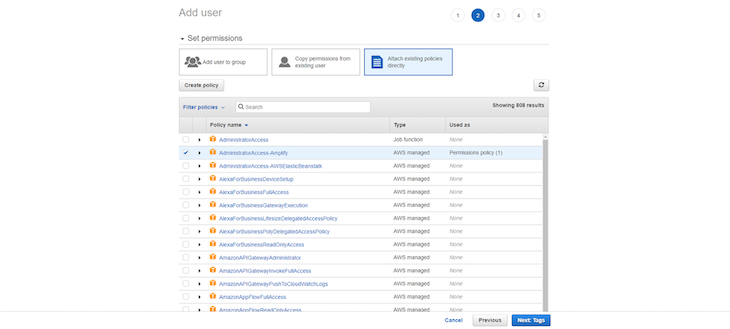
In the next step, you will see the permission level. For our Amplify app, we will go with AdministratorAccess-Amplify (set by default). Select Next: Tags to continue:
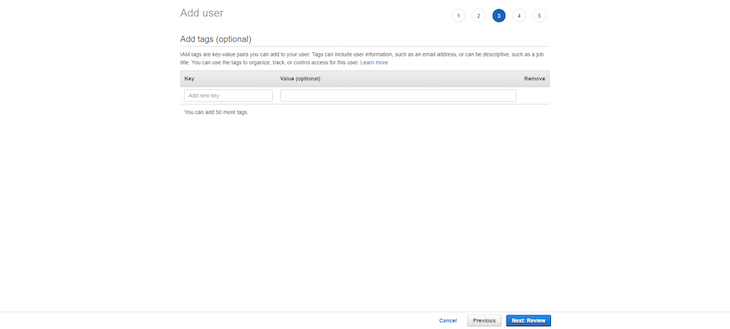
AWS offers to use additional tags to make it easier to organize the users when the app scales up. This is an optional step, and we will not set any for now. Click Next: Review to continue:
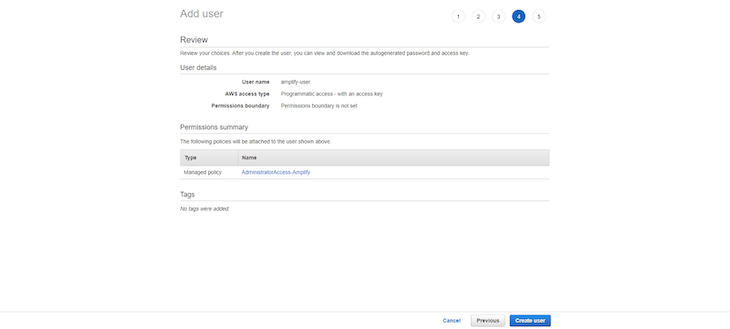
In this step, you will see the summary of the configuration options you chose to create a new user. Click Create user to continue:
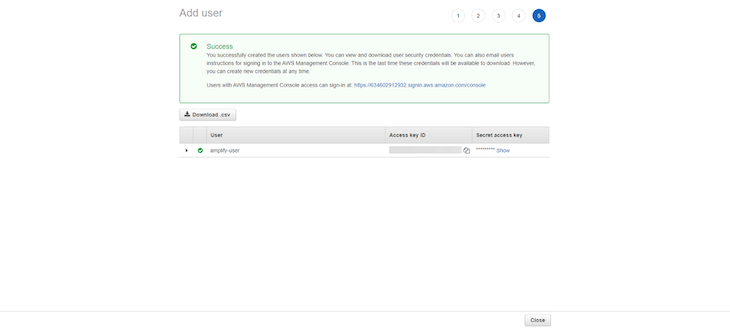
Finally, you will be presented with the Success message, the Access Key ID, and the Secret Access key. Leave this tab open for now:
Now, open your terminal and paste both values from the browser into the terminal wizard. Set the username for your local AWS profile, and you should receive a Success message in your terminal, as shown below:

Build a new Amplify backend
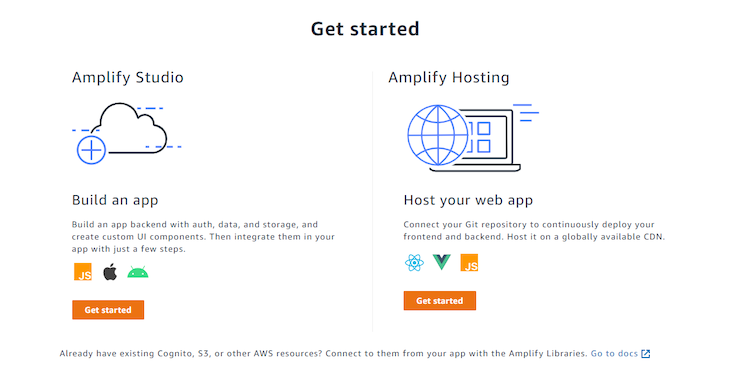
Now, to build a new Amplify backend, make sure you are still logged in in the AWS and navigate to the Amplify console and scroll down and click Get started under the Build an app message:
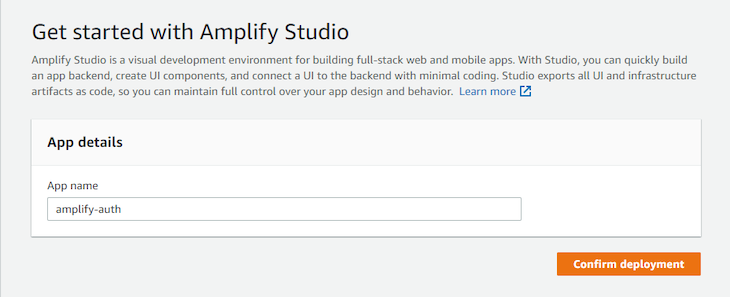
Next, give your app a name and select Confirm Deployment. We will use amplify-auth for the purpose of this tutorial:
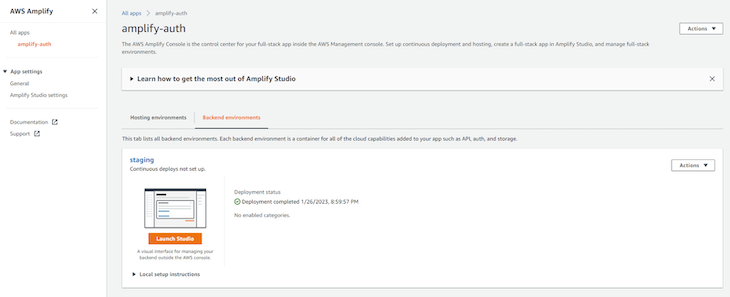
Wait for the deployment to complete, and click Launch studio to open a visual interface to manage your project:
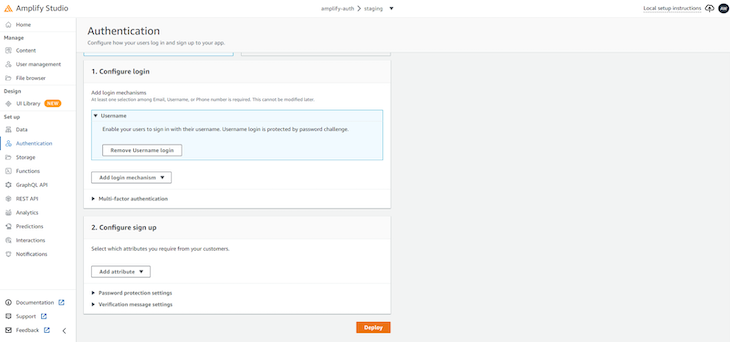
Next, select Authentication in the left sidebar. Click Remove Email login because we will choose to log in via username and password:
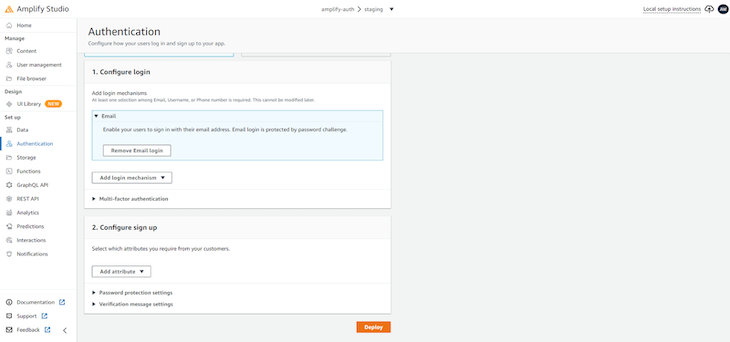
Now, select Username from the Add Login mechanism dropdown and select Deploy to set up authentication for your project, as shown below:
Once the process is done, you will be presented with the screen that will include a terminal command to set up the configuration files. Copy the command and click Done:
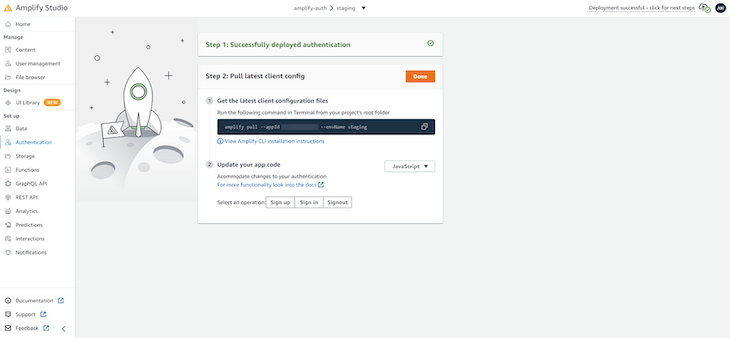
Pull the configuration files
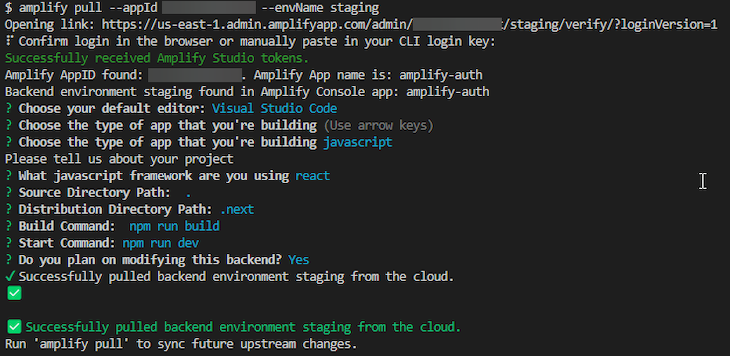
Now, execute the command you just copied from the Amplify Studio in your terminal. It will get the latest client configuration files for your Next.js project.
This will ask you to log in to the Amplify CLI. Click Yes and return to the terminal to continue configuring the Amplify app. You will be asked to select your code editor, the type of project that you are building, and the JavaScript framework that you are using. Press enter to select the default values for these. Set the rest of the wizard options manually, as shown below:
Set up Amplify in Next.js
In order to make the Amplify library and UI accessible throughout the whole app, navigate to the pages folder and change the _app.js file to the following:
import { Amplify } from "aws-amplify";
import awsExports from "../aws-exports"; import "@aws-amplify/ui-react/styles.css";
import "../styles/globals.css"; Amplify.configure({ ...awsExports, ssr: true }); function MyApp({ Component, pageProps }) { return <Component {...pageProps} />;
} export default MyApp;
We first imported the Amplify library, settings, and style sheet for the login UI and the global style sheet for the Next.js project itself. Then, we configured Amplify to use imported parameters and set the server-side rendering to true. At this point, we are ready to start using Amplify to control the user authentication state in our pages and components.
Create and protect the frontend
Open index.js in the pages folder and include the following code:
import { Authenticator } from "@aws-amplify/ui-react"; export default function Home() { return ( <Authenticator> {({ signOut, user }) => ( <main> <h1>Hello, {user.username}!</h1> <button onClick={signOut}>Sign out</button> </main> )} </Authenticator> );
}
We created an Authenticator component for the homepage so that the user is required to create an account or log in to see the content. Run npm run dev to start the developer server again and open http://localhost:3000:
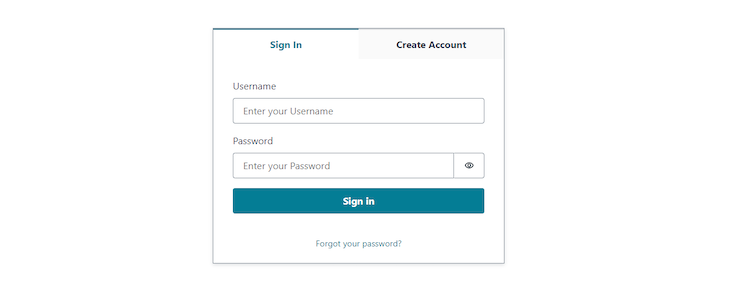
Now, create an account and try to sign in. You will be presented with the greeting indicating that you have successfully authenticated:

Build and protect SSR pages
Change the index.js in the pages folder to the code below:
import { Authenticator } from "@aws-amplify/ui-react"; export function getServerSideProps() { const renderedAt = new Date(); const buildTime = renderedAt.toLocaleTimeString("en-US"); return { props: { renderedAt: buildTime, }, };
} export default function Home({ renderedAt }) { return ( <Authenticator> {({ signOut, user }) => ( <main> <h1>Hello, {user.username}!</h1> <button onClick={signOut}>Sign out</button> <p>This page was server-side rendered on {renderedAt}</p> </main> )} </Authenticator> );
}
Then, check if your developer server is still working. If not, run npm run dev to start it again. You will be presented with the same sign-in screen:

Log in again, and you will be provided with the render timestamp data coming from the server:

Implementing sign-up and log-in customization
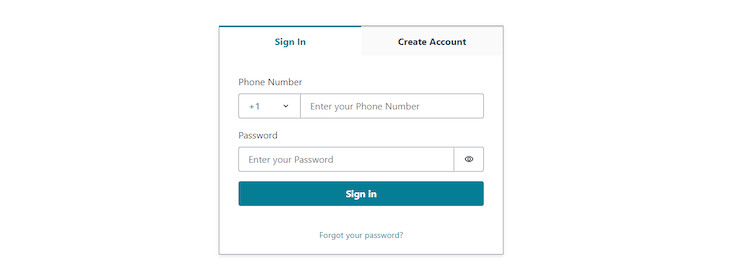
Oftentimes, you would want different login methods other than just the username and password. Fortunately, Amplify offers full customization and allows you to switch between different login mechanisms. These supported ways are username, email, and phone_number.
Here’s an example of this:
import { Authenticator } from "@aws-amplify/ui-react"; export default function Home() { return ( <Authenticator loginMechanisms={["phone_number"]}> ... </Authenticator> );
}
Now, the sign-in screen should look like this:
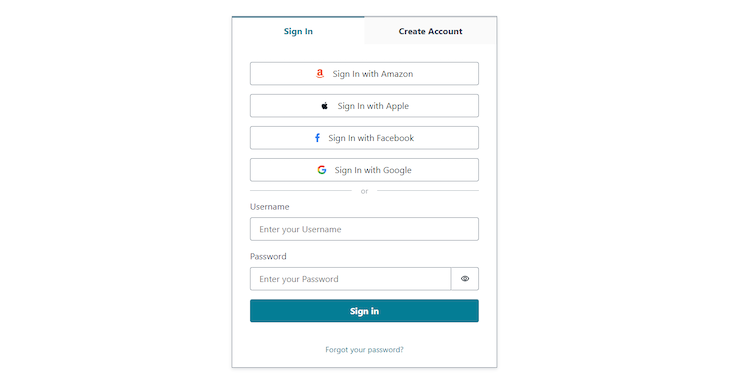
You can also add a social provider for your login page. The supported options are amazon, apple, facebook, and google. Here’s an example of this:
import { Authenticator } from "@aws-amplify/ui-react"; export default function Home() { return ( <Authenticator socialProviders={['amazon', 'apple', 'facebook', 'google']}> ... </Authenticator> );
}
The code above will turn the sign-in screen into this:
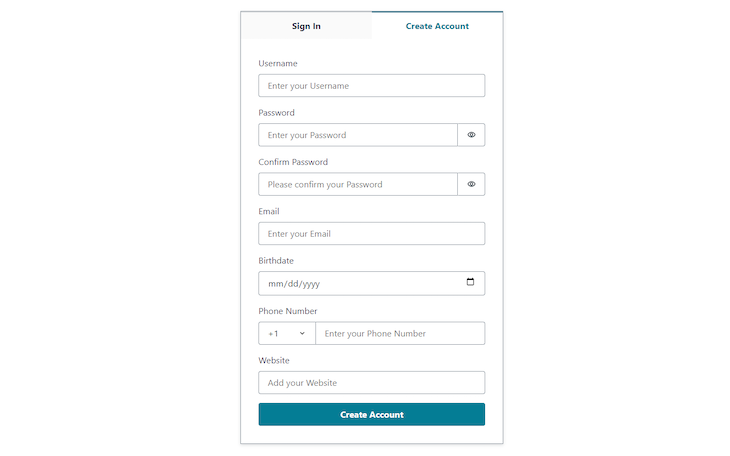
You can also ask for more user details on the sign-up screen. The supported atributes are address, birthdate, email, family_name, gender, given_name, locale, middle_name, name, nickname, phone_number, picture, preferred_username, profile, updated_at, website, zoneinfo.
The use would look like this:
import { Authenticator } from "@aws-amplify/ui-react"; export default function Home() { return ( <Authenticator signUpAttributes={['email', 'address', 'birthdate', 'phone_number', 'website']}> ... </Authenticator> );
}
This would turn the sign-up view into this:
Conclusion
In this tutorial, we implemented a fully functional authentication system in Next.js using AWS Amplify. We started by setting up the project itself, creating an AWS account, and configuring the CLI. Then, we created the Amplify backend and paired it with the Next.js project.
We reviewed both cases of how to protect both the client and the server-side rendering. We also reviewed various customization options for the log-in and sign-up screens so you can always adjust the authentication for the specific data model you have in mind. To summarize, Amplify can significantly speed up the creation of authentication, and now you will know how to use it for your own projects.
The post How to use AWS Amplify for Next.js authentication appeared first on LogRocket Blog.
from LogRocket Blog https://ift.tt/XpT1wRo
Gain $200 in a week
via Read more