You have just finished creating an Android-based application and attempt to execute it. As far as you know, the application is fine, there are no syntax errors and the code should just work fine. But when you run it now, your application quits saying an uncaught RuntimeException was thrown. Attempting to dig up the cause, you find something that gives you a clue: a NullPointerException has occurred.
With this, you begin your journey into the world of exception handling with Android, in particular, handling NullPointerException. In this post, we’ll discuss how to fix NullPointerExceptions in Android apps.
Jump ahead:
What is a NullPointerException?
Table of Contents
First, let’s quickly refresh ourselves on exceptions. They are events or abnormal conditions in a program that occur during execution and disrupt the normal flow of the program.
An exception can occur for different reasons, such as:
- A user enters invalid data to a field
- A file that must be opened cannot be found
- A network connection is lost in the middle of communication
- The JVM has run out of memory
When an error occurs inside a method, it throws an exception. A NullPointerException is one of the most common runtime exceptions.
In Java, null is a special value that represents the absence of a value. When you try to use a null value, you get a NullPointerException because the operation you are trying to perform cannot be completed on a null value.
In Kotlin, null is not a value, but a type of its own called nullable. By default, every object in Kotlin is non-null, which means it cannot have a null value.
Why do NullPointerExceptions occur?
You might encounter a NullPointerException when trying to access a view, resource, or data that hasn’t been properly initialized or loaded yet. Some of the situations in which a NullPointerException can occur in Java, according to the Java Language Specification, include:
- Attempting to access elements of a
nullarray - Using
switchwith a null expression - Accessing instance fields of
nullreferences - Invoking instance methods of a
nullreference - Using an integer or floating point operator that has one of its operands as a boxed
nullreference - Attempting an unboxing conversion with the boxed value as
null - Calling
superon anullreference
Avoiding NullPointerExceptions in Java
Below are some best practices to avoid NullPointerExceptions in Java:
- String comparison with literals
- Avoid returning null from your methods
- Keep checking arguments of methods
- Use
String.valueOf()rather thantoString() - Using primitives data types as much as possible
- Avoid chained method calls
- Use ternary operator
By contrast, Kotlin is a smarter, more modern language that has been designed to avoid NullPointerExceptions through several mechanisms, such as:
- Using nullable and non-nullable types
- Using the SmartCast feature
- Safe calls
- The Elvis operator
In Kotlin, all regular types are non-nullable unless you explicitly mark them as nullable with a question mark ?, i.e., String?.
Consider the below Kotlin code:
fun getlen(name: String) = name.length
The parameter name has a type of String, which means it must always contain a String instance and cannot contain null. This code ensures that a NullPointerException at runtime is unlikely to occur.
Instead, any attempt to pass a null value to the getlen(name: String) function will cause a compile-time error: Null cannot be a value of a non-null type String. This is because the compiler has enforced the rule that arguments of getlen() cannot be null.
Consider the below snippet, in which the code is obvious to us but may not be immediately obvious to the compiler:
class TestNPE { companion object { @JvmStatic fun main(args: Array<String>) { var m : String? // here, m is declared as nullable
println("m is : $m")
var x: Int
x = 150
if (x == 150) println("Value of m is : $m") } }
}
The compiler raises a compiler error because m is not initialized:![]()
Thus, instead of proceeding to runtime and then raising an exception, it stops at the compilation stage with a compiler error.
Using SmartCast
In order to use nullable types, Kotlin has an option called safe cast, or smart cast. Through this feature, the Kotlin compiler will trace situations inside if and other conditional expressions. So, if the compiler finds a variable belonging to a non-null type, it will allow you to access this variable safely.
In certain cases, it is not possible for the compiler to cast types, in which case it will throw an exception; this is called unsafe casting. Consider a nullable string (String?) which cannot be cast to a non-nullable string (String). It will throw an exception.
Kotlin addresses this by providing a safe cast operator as? to cast safely to another type. If casting is not possible, it returns a null rather than throwing a ClassCastException.
Example:
val aInt: Int? = a as? Int
Using the Elvis operator
Kotlin also has an advanced operator called the Elvis operator (?:) that returns either a non-null value or the default value, even if the conditional expression is null. It also checks the null safety of values.
Consider an example:
val count = attendance?.length ?: -1
This means:
val count: Int = if (attendance != null) attendance.length else -1
Despite this, an NullPointerException could still occur in Kotlin-based Android applications.
Consider the earlier example of class TestNPE. Now, the code is modified such that m is initialized but is used with a non-null assertion operator (!!), which converts a given value to a non-null type and throws an exception if the value is null.
class TestNPE { companion object { @JvmStatic fun main(args: Array<String>) { var m: String?=null // here, m is declared
//as nullable var x: Int x = 150 if (x == 150) println("m is : $m") var mlen = m!!.length println("length of m is : $mlen") } }
}
In this case, a NullPointerException will be thrown, as shown here: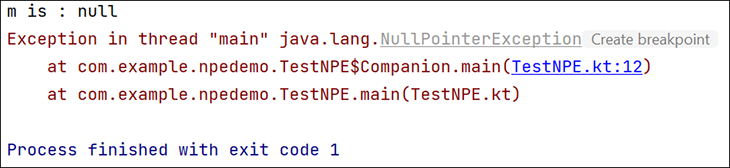
Avoiding NullPointerExceptions in Kotlin
A few causes of a NullPointerException in Kotlin are:
- Explicitly calling
throw NullPointerException() - Using the
!!operator - Data inconsistency with regard to initialization
- Java interoperation
To prevent NullPointerExceptions, you should always ensure that your variables and objects are properly initialized before you use them. You can also use null checks or try … catch blocks to handle possible null values and prevent your app from crashing.
An extremely simplified example of using try … catch is given below:
class TestNPE { companion object { @JvmStatic fun main(args: Array<String>) { var m: String?=null // here, m is declared //as nullable try { var x: Int x = 150 if (x == 150) println("m is : $m") var mlen = m!!.length println("length of m is : $mlen") }catch( ne: NullPointerException) { println("Null Pointer Exception has occurred. ") } } }
}
The code that is likely to cause a NullPointerException is enclosed in a try … catch block.
The advantage here is that the developer has control over what must be done when the exception is thrown. Here, a simple message is displayed. In practical scenarios, one can close any currently open resources, such as files, before terminating the program.
Using logcat to detect and fix a NullPointerException in Android Studio
Whenever an Android application crashes, a stack trace is written to the console that contains vital information that can help identify and solve the issue. There are two ways to get to this stack trace:
- Using Google’s
adbshell utility to obtain alogcatfile, which can help explain why the application crashed:adb logcat > logcat.txt
Open
logcat.txtand search for the application name. It will have information on why the application failed along with other details such as line number, class name, and so on- In Android Studio, either press
Alt+6, or click theLogcatbutton in the status bar. Make sure your emulator or device is selected in theDevicespanel, then locate the stack trace.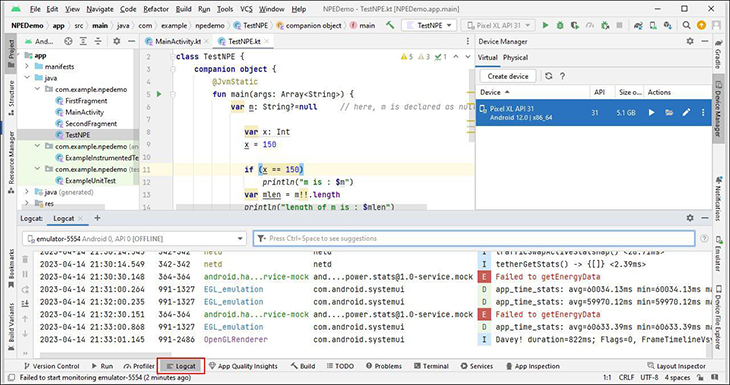
- In Android Studio, either press
There may be a lot of stuff logged into logcat, so you may need to scroll a bit, or you can clear the logcat through the Recycle Bin option and let the app crash again to bring the most recent stack trace in the log to the top.
An important point of note is that if your app is already live, then you cannot use logcat.
Android Studio Electric Eel’s latest version has an updated logcat, which facilitates easier parsing, querying, and tracking of logs. The new logcat also:
- Formats logs for easy scanning for tags, messages, and other useful information
- Identifies various types of logs, such as warnings and errors.
- Makes it easier to track logs from your app across app crashes and restarts
When logcat notices that your app process has stopped and restarted. you’ll see a message in the output similar to below:
PROCESS ENDED
Or:
PROCESS STARTED
Developers can fine tune the command to give the message timestamp, for example:
adb logcat -v time
Using logcat, you can determine whether a widget or component is declared but not defined yet, or a variable is null and being used. Sometimes, it could happen that a context is null during navigation between screens, and you are attempting to use that context without realizing it’s null.
Setting breakpoints to debug NullPointerExceptions
If you have a large application, it can be quite cumbersome to debug it. You can set breakpoints in your code that let you debug your code block by block.
A breakpoint serves as a stop sign for the marked piece of code. When a breakpoint is encountered during application debugging, it will pause execution, thus enabling allowing developers to examine in detail what’s happening and use other debugging tools as required.
To use breakpoints:
- Add a breakpoint by clicking the gutter in the code editor next to the line number where you want execution to pause
- A dot will appear next to the line number, and the line will be highlighted. See below; two breakpoints are added:

- Click Run > Debug ‘app’
The program halts at the first breakpoint and you can examine the values in the Debug window at the bottom of Android Studio.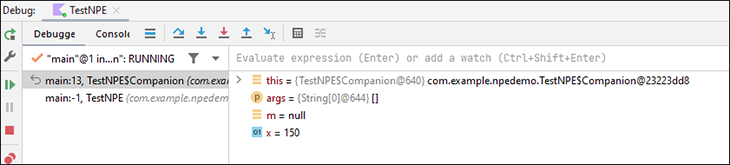
There are various buttons such as Step Over and Step Into that can help you navigate further.
Besides examining the current values of certain operands and expressions, you can also evaluate expressions using the Evaluate option.
In the below example, I wanted to know what the value of x added to 100 would be. The window shows me the result based on the current value of x: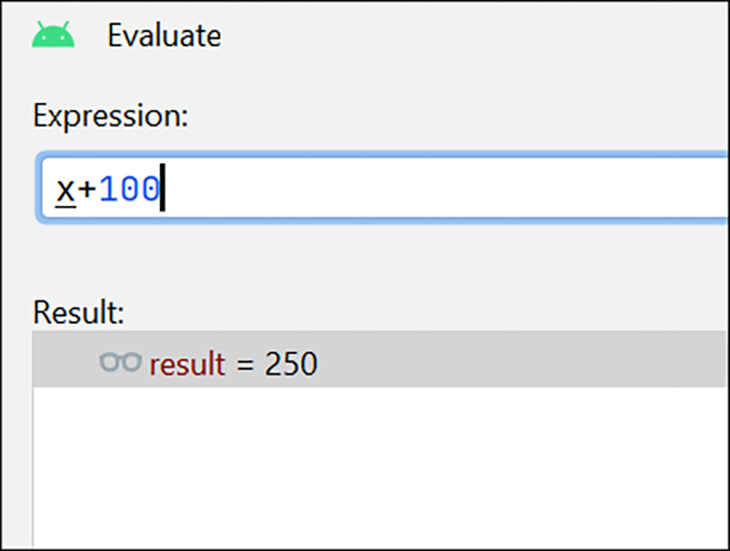
Here is a detailed explanation of various terms related to debugging in Android Studio.
Conclusion
To conclude, in Android development, there are various mechanisms available with Java and Kotlin that are designed to aid developers in avoiding NullPointerExceptions. In the cases these exceptions still occur, you should now have a variety of tools that help identify the cause and debug code.
The post How to fix NullPointerExceptions in Android appeared first on LogRocket Blog.
from LogRocket Blog https://ift.tt/cZABQeu
Gain $200 in a week
via Read more