Get ready to share your custom chatbot with the whole world. Well, at least with other ChatGPT Plus subscribers.
OpenAI recently launched its GPT Store, after it delayed the project following the chaos of CEO Sam Altman’s firing and reinstatement late in 2023.
While OpenAI’s GPT Store shares some similarities to smartphone app marketplaces, it currently functions more like a giant directory of tweaked ChatGPTs. Similar to OpenAI’s GPT-4 model and web browsing capabilities, only those who pay $20 a month for ChatGPT Plus can create and use “GPTs.” The GPT acronym in ChatGPT actually stands for “generative pretrained transformers,” but in this context, the company is using GPT as a term that refers to a unique version of ChatGPT with additional parameters and a little extra training data.
Curious about adding your AI creation to the marketplace? Here’s how to make your GPT public and some advice to help you get started with the GPT Store.
Before you can add a custom chatbot to the GPT Store, you’ve got to make one. No specialized knowledge or weird coding language is required to get started. To learn more about the process, check out my previous article about GPTs, where I created Reece’s Replica by feeding 50 of my articles into the system as training data, so my bot could learn to mimic my phrasing and tone. Since this will be available to all ChatGPT Plus subscribers, remember that the custom data you upload could leak. Don’t upload any documents that contain sensitive information.
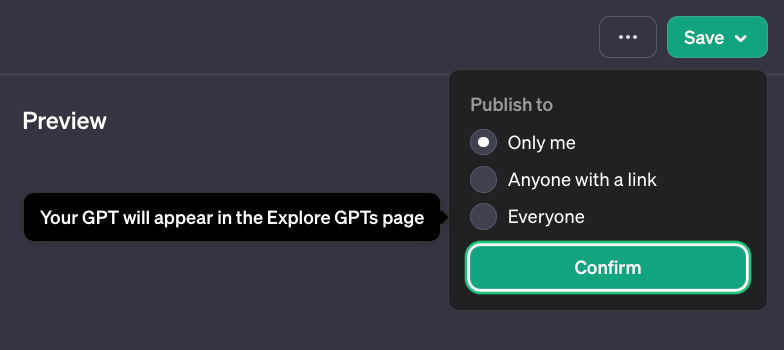
When you’re ready to publicly list your custom version of the popular chatbot, visit the ChatGPT homepage, choose Explore GPTs on the left side of the screen, then select My GPTs in the top right. Click on the pencil icon to edit the GPT you’d like to publish. After double-checking the potential output in the Preview section, click Save in the right corner, set it to publish to Everyone, and click Confirm.
The basic rules that apply to ChatGPT, like the prohibition of violent content, apply to your GPT. There are additional limitations too. One crucial differentiator for OpenAI from companies, like Replika, that encourage intimate human-AI relationships is a ban on creating GPTs for “romantic companionship.”
You also can’t create a GPT that impersonates a celebrity or company without their consent. Law enforcement agencies aren’t allowed to make GPTs that automate their decisions. Political campaigners in the 2024 election can’t make a GPT to target more voters. And students aren’t allowed to list GPTs designed for academic cheating. The full list of what is and isn’t allowed in the GPT Store is available on OpenAI’s website.
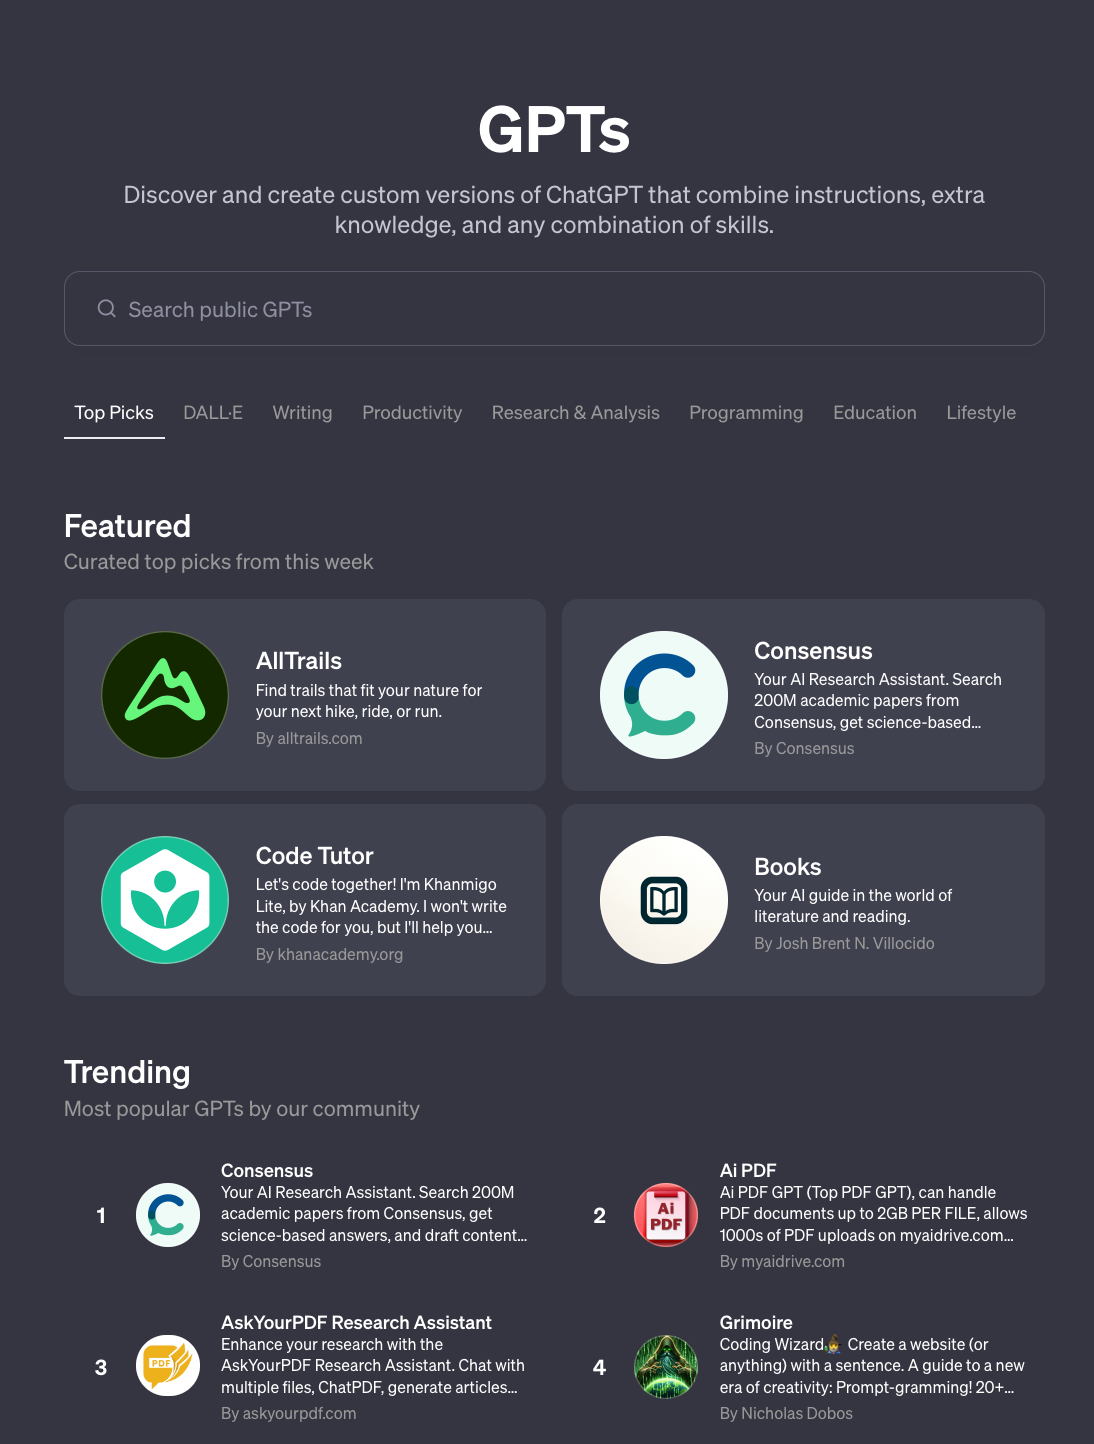
What makes a good GPT? Before you add your own twist on ChatGPT and list it publicly, think about what sorts of bots people might actually want to use. First, spend some time exploring the GPT Store to see what subscribers are interacting with the most. When you search for a GPT, pay attention to the number to the right of the creator’s name. This displays how many times the custom chatbot has been used and can help gauge popularity.

Stay open-minded as you brainstorm ideas for your own GPT. Yes, many of the most popular options right now are utilitarian, like Grimoire for coding help and AI PDF for searching documents, but more whimsical applications are also possible, like an unofficial text adventure game, The Secret of Monkey Island: Amsterdam. Sam Altman highlighted the Everything Is Waifus chatbot on social media the morning of the GPT Store launch.
If you’re hoping to build a side-hustle business in the GPT Store, there are two major speed bumps that could give you pause. First, this new feature rolls out during an uncertain time for OpenAI, as the company faces copyright litigation from The New York Times and the US Congress is holding hearings about data licensing for AI models like ChatGPT. The company may be forced to pay licensing fees and follow additional regulations in the near future. These developments could affect people’s access to your creation.
The second downside, if you want to make money off the GPT Store, is the lack of details currently available from OpenAI about the creator payment plan. All that’s known right now is that payments to US-based creators are likely to start in the next couple of months, and the payouts will be based on unspecified engagement metrics. So, it remains murky how much money is really to be made in OpenAI’s marketplace.
A Step-by-Step Guide to Launching a Custom Chatbot on OpenAI’s GPT Store
Chatbots have become increasingly popular in recent years, revolutionizing the way businesses interact with their customers. They provide a seamless and efficient way to handle customer inquiries, offer support, and even automate certain tasks. OpenAI’s GPT Store is a platform that allows developers to create and launch their own custom chatbots using OpenAI’s powerful language model, GPT-3. In this step-by-step guide, we will walk you through the process of launching your own custom chatbot on OpenAI’s GPT Store.
Step 1: Understand the Basics
Before diving into the process, it’s important to have a basic understanding of what chatbots are and how they work. Chatbots are computer programs designed to simulate human conversation through text or voice interactions. They use natural language processing (NLP) algorithms to understand and respond to user queries. OpenAI’s GPT-3 is a state-of-the-art language model that can generate human-like responses based on the input it receives.
Step 2: Define Your Use Case
To create an effective chatbot, you need to define its purpose and use case. Determine what tasks your chatbot will handle and what kind of conversations it will engage in. For example, you might want to create a customer support chatbot that can answer frequently asked questions or a virtual assistant that can help users with various tasks. Defining your use case will help you tailor your chatbot’s responses and make it more useful to your target audience.
Step 3: Gather Training Data
To train your chatbot, you will need a dataset of conversations that are relevant to your use case. This dataset will be used to fine-tune OpenAI’s GPT-3 model and make it more specific to your chatbot’s purpose. You can gather training data from various sources such as customer support logs, chat transcripts, or even by creating your own synthetic conversations. The more diverse and representative your training data is, the better your chatbot will perform.
Step 4: Prepare Your Data
Once you have gathered your training data, you need to preprocess and format it to make it suitable for training. This involves cleaning the data, removing any irrelevant or sensitive information, and organizing it into a format that can be easily fed into the GPT-3 model. OpenAI provides detailed guidelines on how to format your data for training, so make sure to follow their instructions carefully.
Step 5: Train Your Chatbot
Now it’s time to train your chatbot using OpenAI’s GPT-3 model. OpenAI provides an API that allows you to interact with the model and fine-tune it using your training data. You will need to write code to interface with the API and handle the training process. OpenAI provides comprehensive documentation and code examples to help you get started. Training can take some time depending on the size of your dataset and the complexity of your use case, so be patient and monitor the progress closely.
Step 6: Test and Evaluate
Once your chatbot is trained, it’s important to thoroughly test and evaluate its performance. Engage in conversations with your chatbot and simulate different scenarios to ensure it responds accurately and appropriately. Pay attention to any areas where the chatbot may struggle or provide incorrect information. This feedback will help you fine-tune your chatbot further and improve its performance.
Step 7: Launch on GPT Store
After testing and refining your chatbot, you are ready to launch it on OpenAI’s GPT Store. The GPT Store is a marketplace where developers can publish and monetize their custom chatbots. You will need to create a listing for your chatbot, including a description, pricing details, and any additional information that potential users might find useful. OpenAI provides guidelines on how to create a listing that meets their requirements.
Step 8: Maintain and Update
Launching your chatbot is just the beginning. To ensure its continued success, you need to regularly maintain and update it. Monitor user feedback and address any issues or bugs that arise. Keep track of user interactions and analyze data to identify areas for improvement. Regularly update your chatbot’s training data and retrain it to keep it up-to-date with the latest information and user preferences.
Launching a custom chatbot on OpenAI’s GPT Store can be a rewarding experience. It allows you to leverage the power of OpenAI’s GPT-3 model and bring your own unique chatbot idea to life. By following this step-by-step guide, you can navigate the process with confidence and create a chatbot that provides valuable assistance to users in various domains.