In this guide, you will find out how to make a photo look like a painting using Photoshop. There are two ways to do it: through professional actions or in-built filters and effects.
The first method will teach you how to add a ready-made action to a picture to turn it into a painting in a few seconds.
The second way is applying Photoshop filters. This option usually takes a bit longer. Whichever option you choose, you will get a bright picture looking as if it was hand-drawn by an artist.
1. Make a Photo Look Like a Painting Using Photoshop Actions
Table of Contents
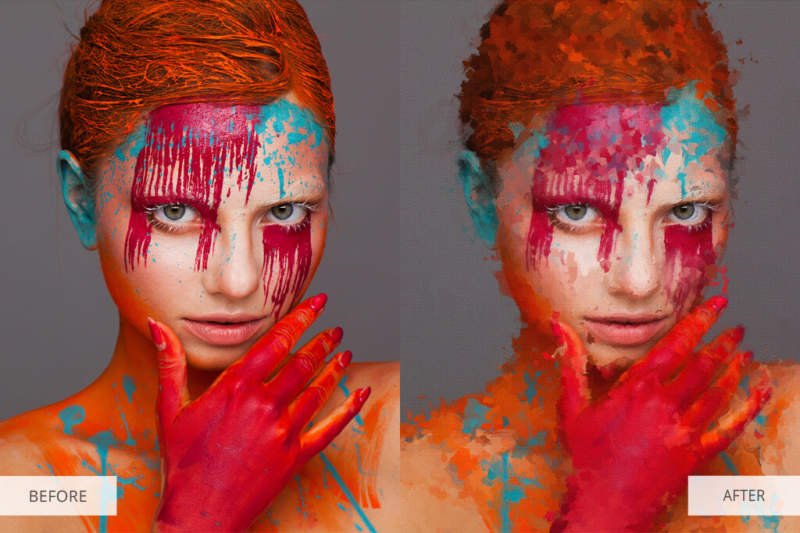
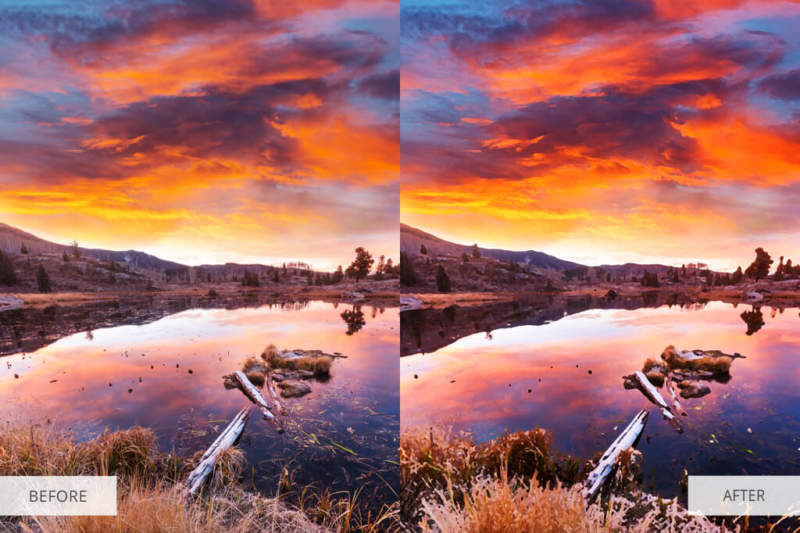
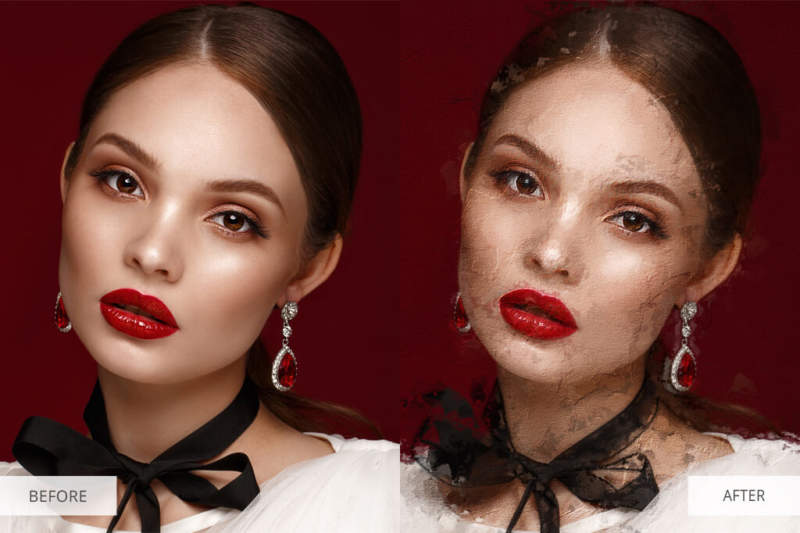
You can fully transform your photo using the Oil Painting Photoshop Actions Pack created by professional designers. With it, you can turn your studio portrait or wedding photo into an oil painting with deep and vibrant colors in a few seconds.
Ready-made actions can be used not only in Photoshop. They are also compatible with other graphics editors, for example, with Free Turn Photo Into Painting Editor. It’s possible to use them when you are editing RAW and JPG files. The set contains actions that simulate different drawing techniques. Besides, it allows you to enhance a photo by adjusting shades and contrast.
Step 1. Open the Photo and Install Actions
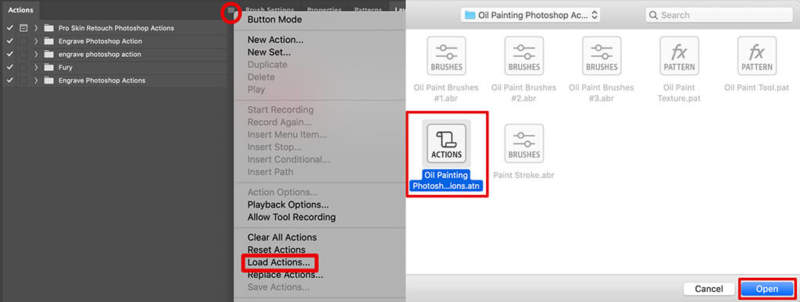
After you have downloaded actions, install them in a graphics editor. For this, open the Action panel and select the “Window” > “Actions” tab. In a new panel, choose “Load Actions” in the upper right corner. Select the actions you like and add them to Photoshop.
Step 2. Add the Action
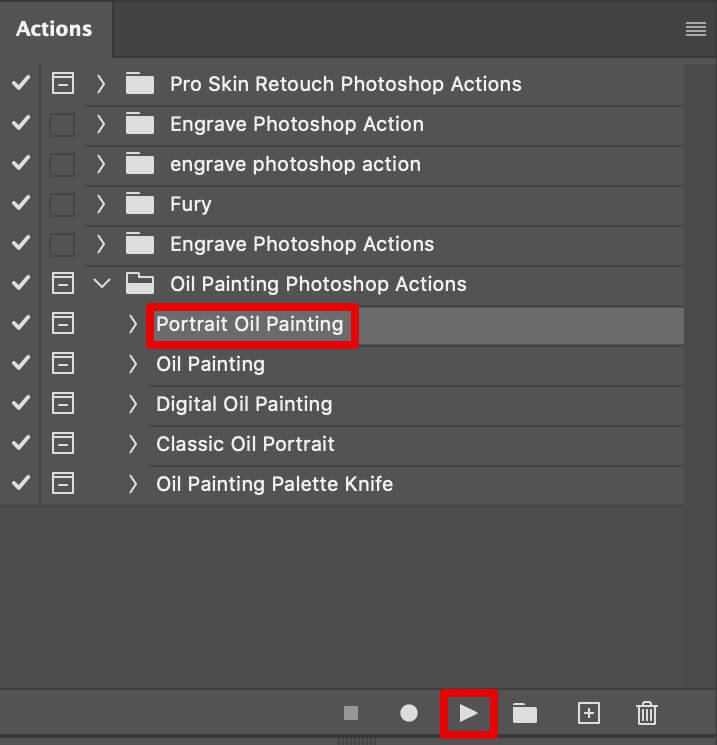
Find the needed action on the panel and click on it. Then click on the “Play” button at the bottom part of the Actions panel and wait for the plug-in to appear in the Layers panel. You can enable or disable the action by clicking on the “eyeball” icon that can be found opposite to the layer you have just created.
Step 3. Adjust an Image
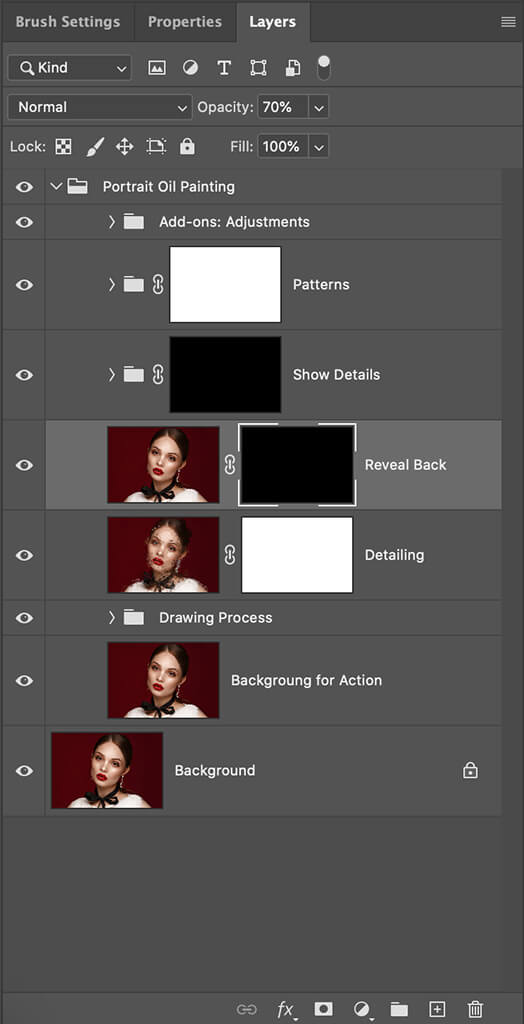
The final thing you need to do to make a photo look like a painting is to change the action settings to achieve an ideal look of the picture. To do it, you can adjust the opacity of the group of layers.
Choose a layer group by clicking on the “Folder” icon next to the action in the Layers palette. After that, increase or decrease the opacity. Similarly, you can customize separate layers in a group to enhance details.
2. Make a Photo Look Like a Painting Using Photoshop Filters
Using the built-in filters and effects, you can create a hand-drawn image and the result will depend on the chosen filter. For instance, with the Rough Pastels filter, you can create a texture effect, and the Colored Pencil filter will help you turn a photo into a sketch.
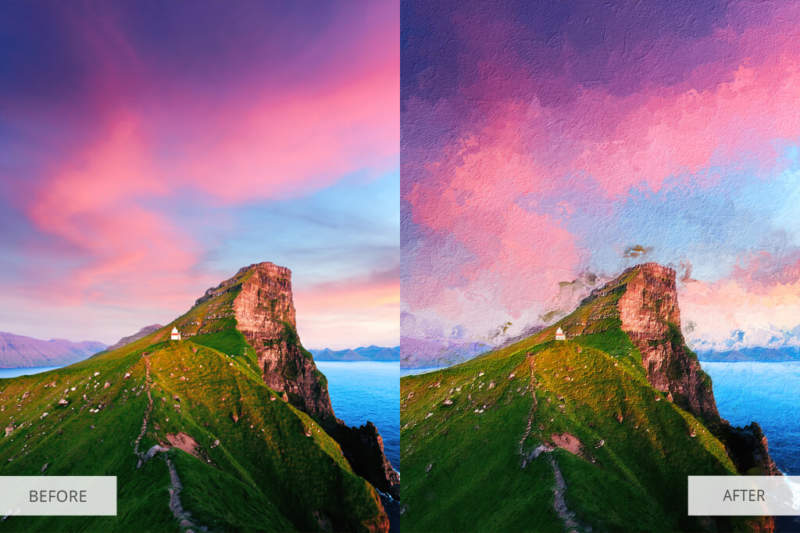
We will show you how to make a photo look like a painting using Dry Brush and Oil Paint filters. For a better effect, choose a landscape or still-life image. If you can’t master this method, you can outsource your photos to the turn online photo into painting service.
Step 1. Open the Image
Open the base image in Photoshop. For this, go to the “File”> “Open” menu and pick the picture that you like.
Step 2. Apply Smart Filter
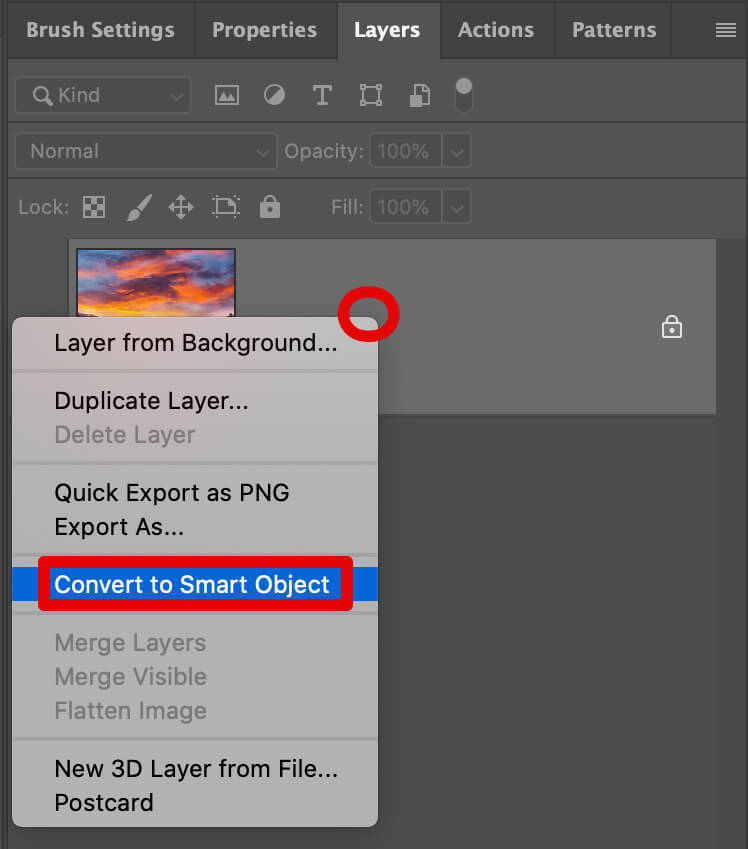
This step lets you edit the filter without changing the original photo. In the Layers panel, right-click on the background layer and choose “Convert to Smart Object”.
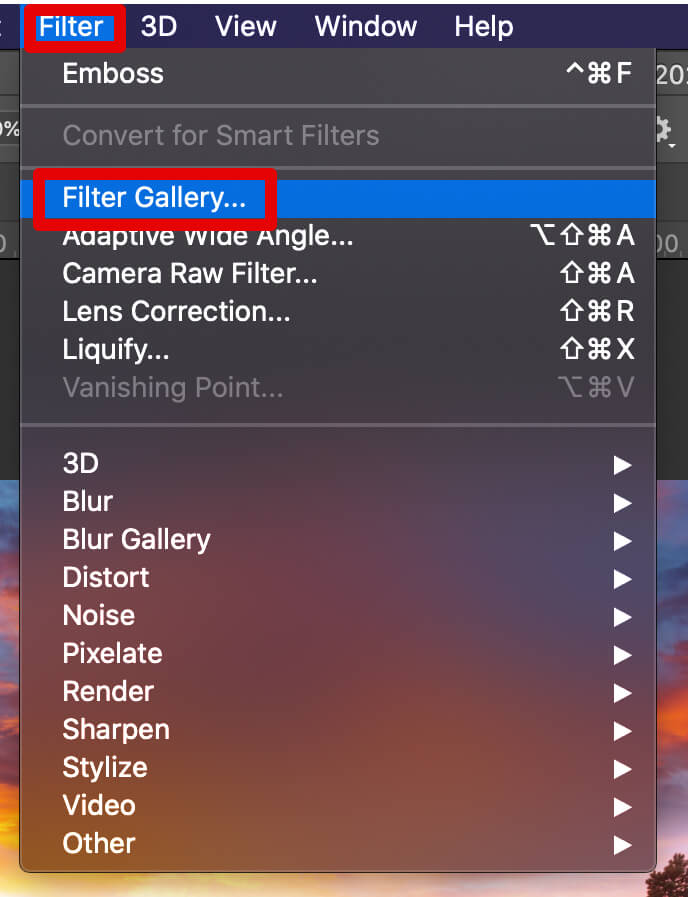
Step 3. Choose a Filter
The next thing you should do to make a photo look like a painting is to go to the Filter tab and select the “Filter Gallery”. We’ve tried several filters and the first of them was Oil Paint. After choosing a filter, you can set such parameters as style, clarity, scale, etc.
Style helps you customize the length and curves of brushstrokes. The smaller the parameters are, the better an image looks. Long strokes make a photo look more like a painting.
Clarity helps adjust the smoothness of strokes. You can also control the size of a brushstroke and the level of detail. Besides, you can set the direction of the light sources and make the flare shiny or white.
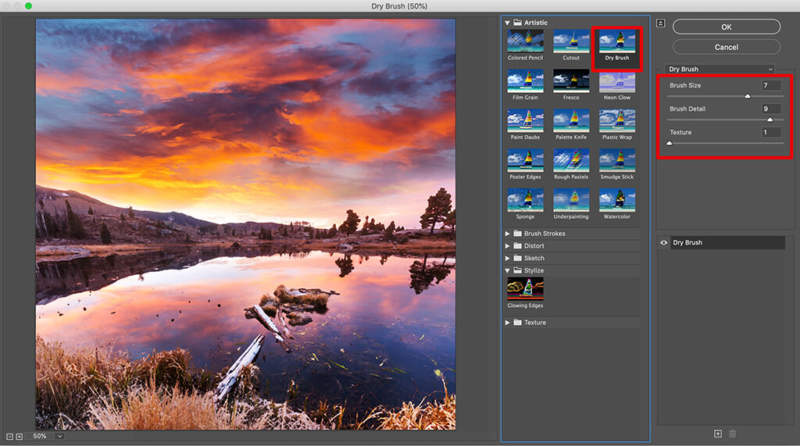
The second filter that helps you create a painting is Dry Brush. You can find it in the Artistic folder. For this filter, set the brush size to 7, detail to 9 and texture to 1.
Before applying one of the filters, preview your image using the “Fit to Screen” option. When you have finished, press “OK”.
Step 4. Adjust Colors
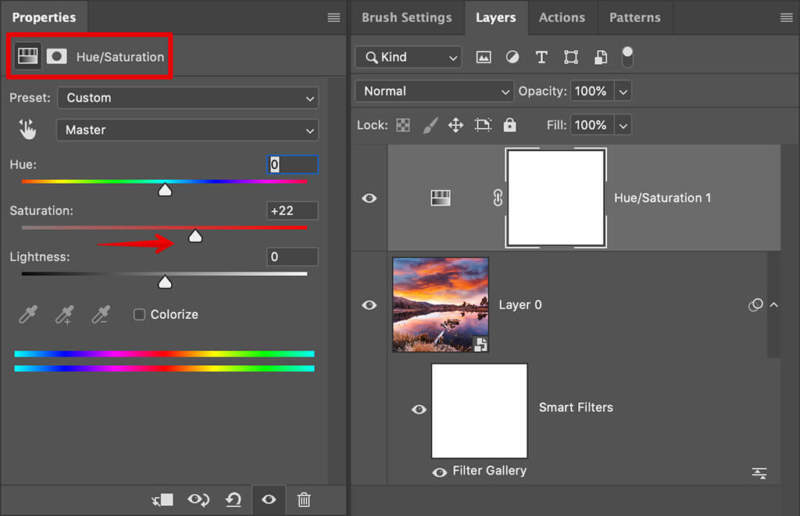
Above the Layers, find the Adjustments panel. You will see a few rows of icons. Select the hue/saturation adjustment icon in the second row. There, you can set the saturation, change the shade or improve the light. By adjusting the saturation, you will enhance the intensity of the hues in the picture. When you’re finished, close the settings window.
Step 5. Change Settings
If you want, you can go back to the settings and change them in the Layers panel. This is exactly what we’ve used the Smart filter for. You can turn filters on or off, experiment with saturation and color gamut without changing the source image.
You can change the saturation settings by clicking on the corresponding icon to the left of the layer. If you want to edit the filter, select the “Filter Gallery” on the Layers panel.