
One of the most effective and fun ways to boost your web development skills is by cloning an existing web page or website. In this tutorial, we’ll be cloning the Hacker News home page, making use of React and HarperDB.
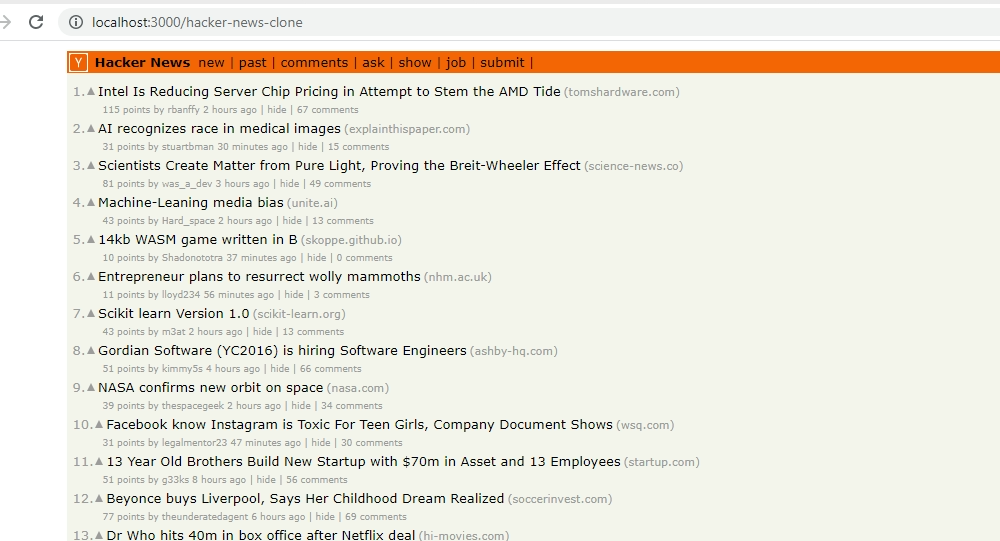
By the time we’re done, our cloned version of the Hacker News home page should look like this:
The code for this project can be found in its GitHub repository.
The Benefits of Cloning
Table of Contents
Building a clone of a web page has the following benefits:
-
It helps you to give attention to design intricacies and nuances. This makes you a more comprehensive designer.
-
It helps you get familiar with color and typography. These are very important concepts that every front-end developer/designer should be proficient with.
-
It allows you learn about new technologies. You get to use new tech stacks and broaden the scope of your knowledge and skills.
About the React/useHarperDB Tech Stack
The stack we’ll be using for this project is primarily is the React/useHarperDB stack.
HarperDB is a data management software. It’s great for cases where you need NoSQL and SQL capabilities, rapid application development, integration, edge computing, distributed computing, and real-time operational analytics.
HarperDB is also flexible. It allows you do the following:
- make queries to a single endpoint
- use both SQL and NoSQL to query your database
- upload data in JSON and with SQL queries
- upload bulk data in a single CSV file
It’s very fast, simple to use and allows you to set up in a serverless way. The serverless architecture entails the abstraction of the back-end tasks to another service.
In simpler terms, as the developer you don’t have to implement a back end and a database for the web application on your local machine. Instead, a platform like HarperDB takes care of the back-end operations and provides you with a way to access and manage data from its infrastructure, through the cloud. That way, you can focus on front-end development.
Throughout the development process, we’ll be using the following tools.
React
We’ll be using the React library for our home page clone. React is a front-end JavaScript library for building reusable user interface components. For example, say you want to use a similar button in two or more places on your website. With HTML, you’d define the markup for that button in every section you want to use it. This isn’t consistent with the DRY (don’t repeat yourself) principle. With React, all you need to do is define a single button component and then register that component in every section you intend to use it within the app. This simplifies the entire building process and cleans up your code.
Instead of manually installing React and setting up the tedious configurations, we’ll use the create-react-app tool to instantly build out a working framework for us. This will help save time.
Node and npm
The React, React DOM and thousands of other packages all live inside of the npm registry. To be able to install these dependencies on our local machine, we’ll need to have Node and npm installed. You can install Node from here.
If you’re not sure if Node is already installed on your computer, or you’re unsure of which version is currently installed, simply open a command terminal on your machine and type in node -v. If you have Node installed, it should display the version of Node you have installed. Note that you should have a node version of at least 12.xx to run this project.
A HarperDB Cloud account
To set up a database, we’ll need to create an instance for our app. To create an instance, we’ll first need to sign up to Harper. After setting up our database cloud instance, we’ll need to use the username, password and database URL later in our React app. In the database, we’ll create a table that holds the list of Hacker News posts that will be displayed later on the web page.
useHarperDB
This is a React hook provided by Harper. This hook essentially acts as a bridge between our React App and the database. By calling this function inside our React component and passing in some important parameters — including an SQL query — we’ll be able to access the posts from our cloud database. This package will be installed using the Node package manager and details on it can be found here.
SQL
In this project, we’ll only be using a single basic SQL query, so having broad knowledge isn’t required.
CSS
Finally, we’ll be styling our clone using pure CSS with no libraries. Every style we apply will be geared towards mimicking the Harper News home page.
Hacker News logo
Since we’re going to be creating an exact replica of the real Hacker News home page, we’ll need the logo image. You can download the logo in SVG format here.
Creating a HarperDB Cloud Instance
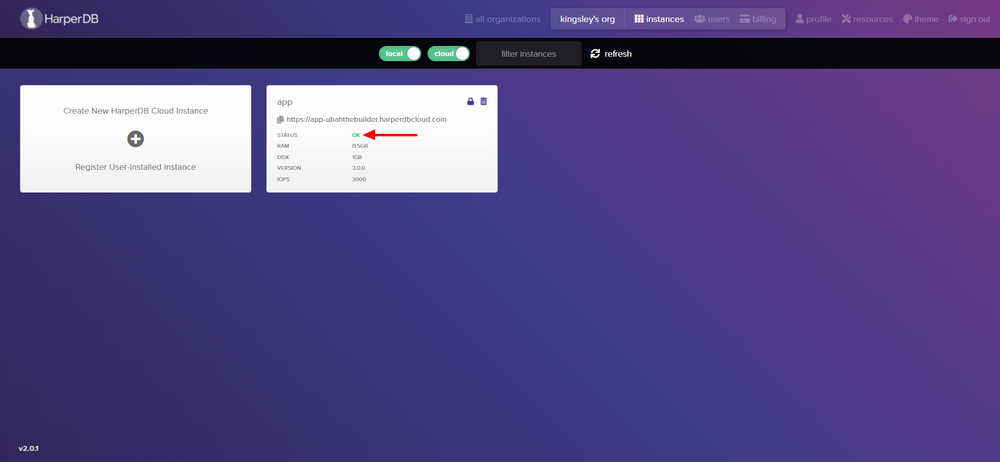
First, we need to set up our cloud instance. We go over to the HarperDB home page and sign up for a free account.
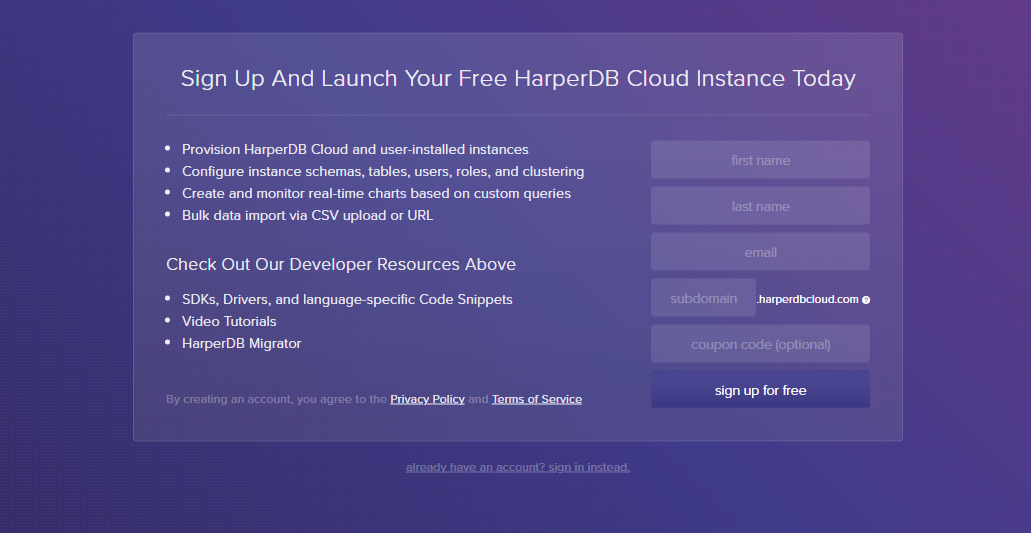
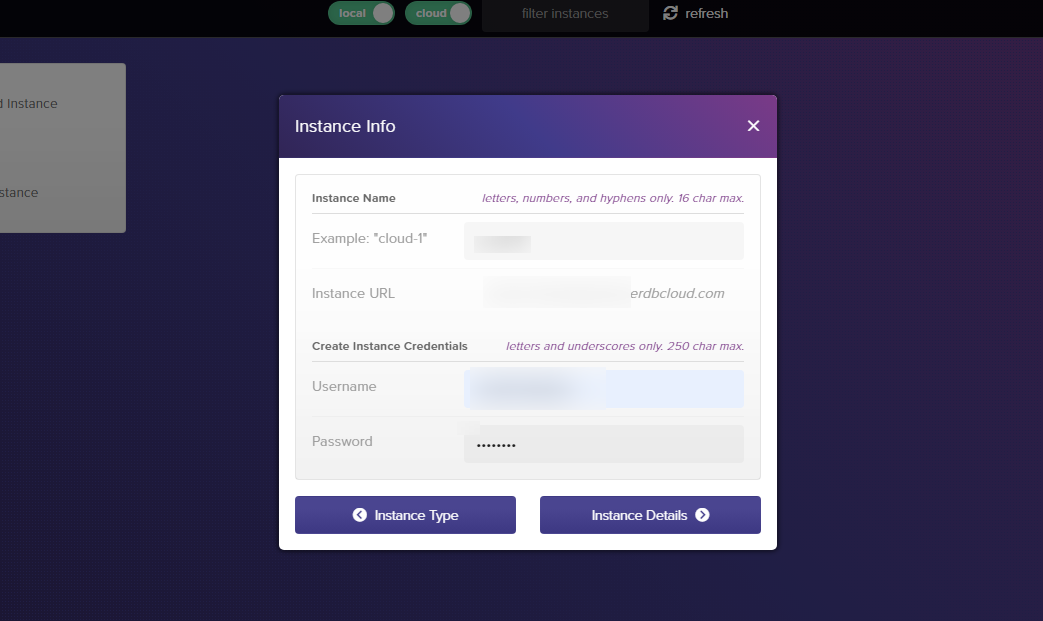
After signing up, we’ll create a HarperDB Cloud instance for our app. Follow the instructions, fill in your username, a password for your instance and your instance name. After doing so, a URL will be generated for you.
In the following page, we’ll be told to select our specs. Since this is a tutorial, we’ll go for the free plans.
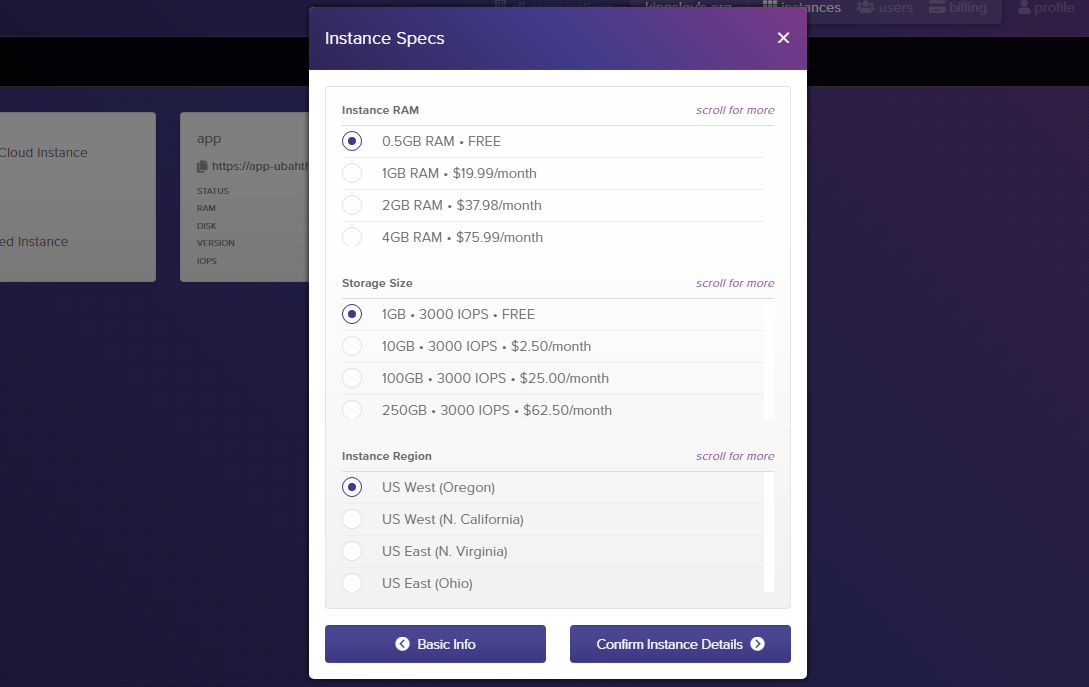
Click on “Confirm Instance Details” and you’ll be moved to a page which contains all your instance’s information. Now, copy your instance URL, your username, and your password and save it somewhere, as you’ll need them later.

Finally, we confirm the instance. You’ll immediately see the “creating instance” label on the card. This indicates that HarperDB is working on our instance and that it will be all set in a few minutes.

It’s important that we store our instance credentials in an accessible place, since we’ll be requiring it later in the tutorial. The credentials are your username, password and instance URL.
Setting Up Our Project Directory
Our database is now spinning up on the side. Now it’s time to create the directory for our app and install dependencies.
First, we go over to the terminal and run the following command:
npx create-react-app hacker-news-clone This will create a folder named hacker-news-clone and install the React library into the project. Since create-react-app is a code generator, all configurations will be done for us automatically. That way, we can focus more on building our app.
Creating the Database and Supplying it with Data
Going back to HarperDB, we’ll need to provide it with the data for our page. This data will be a list of Hacker news posts which we’ll display on our front end.
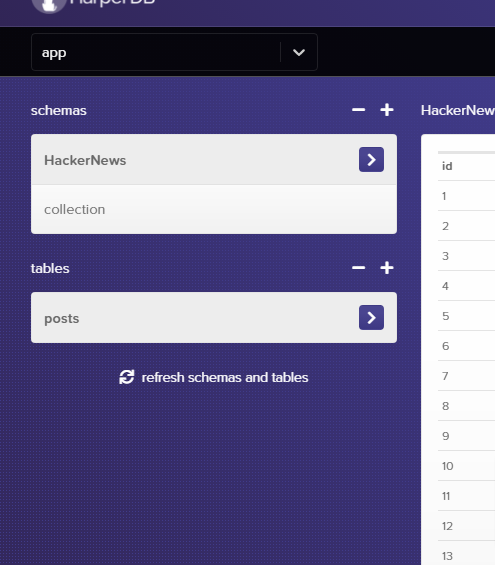
Creating a schema and a table within the database
We’ll need to define a schema for our database. A schema is the structural form of a database. It defines how data is going to be organized inside the database. In HarperDB, you can simply think of the schema as a collection of tables. We can define multiple tables inside a schema and access those tables from different places within our app.
From your HarperDB dashboard, click on the card. You’ll be directed to a new page.
To create a schema, simple click on the + icon beside it.
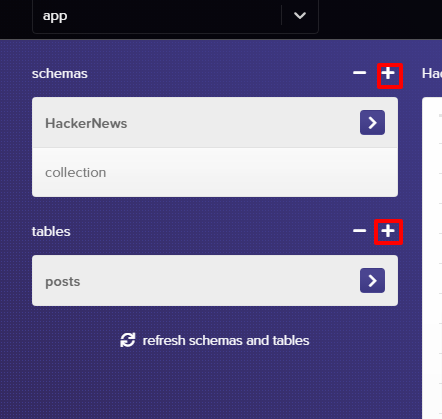
For our tutorial, we’ll be naming our schema “HackerNews”.
Inside the schema, we’ll define our first table, named posts. This table will hold all of the posts data that will be showing on our page. In addition to the table’s name, we’ll also have to pass in a hash attribute for our table. A hash attribute is a unique value that distinguishes one row (post) from another row of data inside the table.
For our posts table, we’ll set the hash attribute to id. This means the id column will hold unique data for every row in the table.
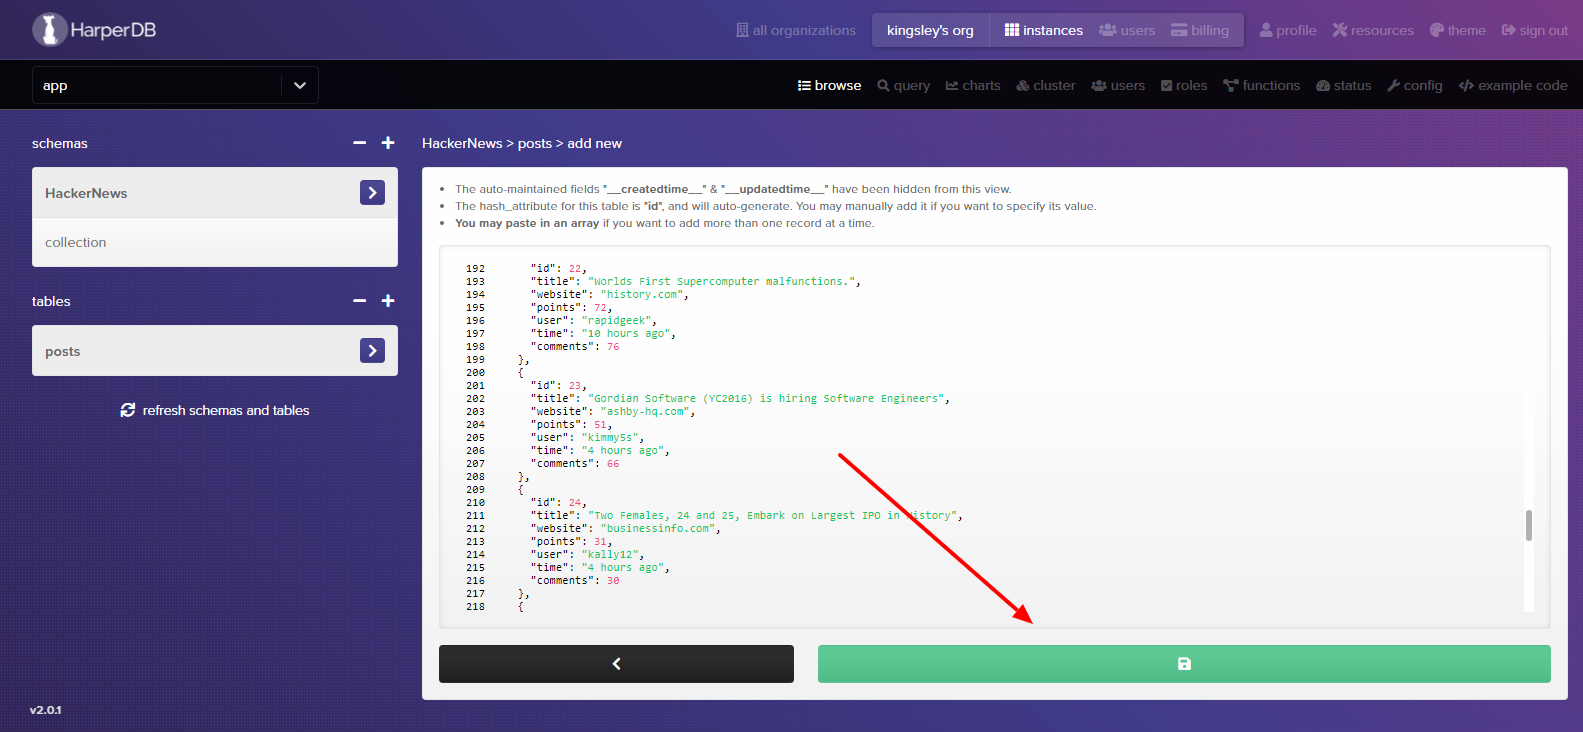
Populating our table with data
At this point, the table is empty. We’ll have to populate the table with data. HarperDB provides us with various ways of doing this:
- by making SQL or NoSQL queries to create data on our database
- by defining a single JSON object (for only one record) and an array of JSON data (for multiple records)
- by importing and loading data with a CSV file
In this tutorial, we’ll be supplying data via JSON. Since we’re inserting multiple records of posts, we’ll be using an array of JSON object, with each object holding information of a single post.
Click the little + icon on the top right corner and paste in the following JSON data:
[ { "id": 1, "title": "Intel Is Reducing Server Chip Pricing in Attempt to Stem the AMD Tide", "website": "(tomshardware.com)", "url": "https://www.tomshardware.com", "points": 115, "user": "rbanffy", "time": "2 hours ago", "comments": 67 }, { "id": 2, "title": "AI recognizes race in medical images", "website": "(explainthispaper.com)", "url": "https://www.explainthispaper.com", "points": 31, "user": "stuartbman", "time": "30 minutes ago", "comments": 15 } ] Note: this data is just for two Hacker News posts. You can get data for 30 posts from the GitHub repository.
Go and click on the green button to insert them into the table. This should dynamically populate our table with the two posts.
With that, we’ve finished our work on the HarperDB cloud. It’s now time to focus on the front-end part of our website.
Integrating HarperDB and Our App with HarperDBProvider
Right now, our front end is isolated from our back end. We have to connect our HarperDB cloud instance to our React app. Thankfully, HarperDB provides us with a hook for that: use-harperdb.
We need to install useharperdb into our project. To do so, we run the following command:
npm install use-harperdb For security reasons, we’ll need to store our instance credentials inside an environmental variable. We’ll create a file named .env inside the root app (hacker-news-clone) and pass in the following variables:
REACT_APP_DB_URL=** REACT_APP_USER=** REACT_APP_PASSWORD=** Please make sure to follow the same format and replace the double asterisks with your own instance information. Pass in your database’s URL, your username and your password.
After that, we’ll go inside the index.js file by navigating to hacker-news-clone/src/index.js. Then we import HarperDBProvider and wrap our entire app inside it:
import React from 'react'; import ReactDOM from 'react-dom'; import './index.css'; import App from './App'; import { HarperDBProvider } from 'use-harperdb'; ReactDOM.render( <React.StrictMode> <HarperDBProvider url={process.env.REACT_APP_DB_URL} user={process.env.REACT_APP_USER} password={process.env.REACT_APP_PASSWORD} > <App /> </HarperDBProvider> </React.StrictMode>, document.getElementById('root') ); Inside the <HarperDBProvider> we pass in our environmental variables. This is a very important step to take, because it essentially makes sure our entire app has the context of our cloud instance and can, therefore, pull data from it.
Continue reading Build a Hacker News Clone using React and HarperDB on SitePoint.