In this tutorial, I’ll show you my favorite workflow for deploying database-driven web apps. It’s meant for developers who want to go full-stack on their side projects without having to set up and maintain a complex multi-service infrastructure.
We’ll deploy a very rudimentary web app written in Node.js and Express. It allows visitors to write and save notes, and to read previously written notes. The data is stored in a MongoDB database. We’ll use GitHub Actions to create a CI/CD workflow that deploys our app on AWS Lambda.
The focus is on simplicity, pragmatism and cost saving. Since AWS and MongoDB have very generous free tiers, you can follow along free of charge. Remember, though, to undeploy the application afterwards if you don’t want to end up paying a few cents. Since your application will be publicly available, its usage can theoretically pass the free tiers in the long run. However, if you intend to extend this application for your own purposes, I can recommend this setup as being very affordable for a website with moderate traffic.
You can find all the code for this tutorial on our GitHub account.
Prerequisites
Table of Contents
You’ll need a few things to build the app. Make sure you have Node and Docker installed on your system. To install Node, you can use the Node Version Manager (nvm) (see some instructions here). For Docker, install the latest version of Docker Desktop for your operating system.
Note that we’ll use Docker to run an instance of MongoDB on our machines. Alternatively, you can also manually install the MongoDB Community Edition. You can find some instructions here.
You’ll also need to have accounts at GitHub, MongoDB, and Amazon Web Services (AWS). When registering on AWS, you have to enter a credit card number. As mentioned above, taking the steps in this tutorial won’t exceed the free tier.
Some previous knowledge in Node and Express might be helpful.
Local Develpoment
Okay, let’s get started. We first need an empty folder with a new package.json file. You can create one if you execute npm init.
We’ll need to install the following dependencies:
- express, to react to HTTP requests from the client side
- mongoose, to communicate with our MongoDB database
- aws-serverless-express, for AWS Lambda to be able to invoke our application
- concurrently (as dev dependency), to execute npm scripts in parallel
Run the following command to install them:
npm install --save express mongoose aws-serverless-express && npm install --save-dev concurrently 1. MongoDB and mongoose
Since we use a MongoDB database to store our data in, it’s helpful for development to have a database instance running on our local machine. That’s where we use the latest mongo Docker image. If you have Docker installed on your machine, this is as easy as typing docker run mongo in your terminal. The image gets pulled from dockerhub and starts in a new container. If you’re not familiar with Docker, that’s okay. All you need to know is that there’s a MongoDB instance running on your computer that you can communicate with.
For our app to communicate with the database, we need to initialize a connection. We do that in a new file named mongoose.js. Mongoose is the library that helps us do the MongoDB object modeling:
// mongoose.js const mongoose = require("mongoose"); const uri = process.env.MONGODB_URL; let connection; const connect = async () => { try { connection = await mongoose.createConnection(uri, { useNewUrlParser: true, useFindAndModify: false, useUnifiedTopology: true, bufferCommands: false, // Disable mongoose buffering bufferMaxEntries: 0, // and MongoDB driver buffering }); return connection; } catch (e) { console.error("Could not connect to MongoDB..."); throw e; } }; function getConnection() { return connection; } module.exports = { connect, getConnection }; This file exports an object with two functions. connect() creates a connection to a MongoDB in the location that we specify in an environment variable. The connection is being stored in a variable called connection. getConnection() simply returns the connection variable. You might wonder why we don’t just return the connection variable itself. This is due to the fact that Node.js caches required modules after they’re first loaded. Therefore, we use a function to pull out the latest connection variable from our mongoose.js module.
Now that our app will be able to connect to the database, we’ll also want to store data in it — more specifically, the notes that we can write in our user interface. Therefore, we’ll create a data model for our notes. This is done in a new file named Notes.js inside a models folder:
// models/Notes.js const mongoose = require("mongoose"); const { getConnection } = require("../mongoose"); const conn = getConnection(); const Schema = mongoose.Schema; module.exports = conn.model( "Note", new Schema({ text: { type: String, required: true } }) ); Here, we pull out the current connection from our mongoose.js module and register a model called Note onto it. It has a very basic schema which only contains a required property text of type String. With this model, we can construct documents that we store in our database.
2. Express application
Next, we create a simple Express application. Create a file called app.js in your project root. It has the following content:
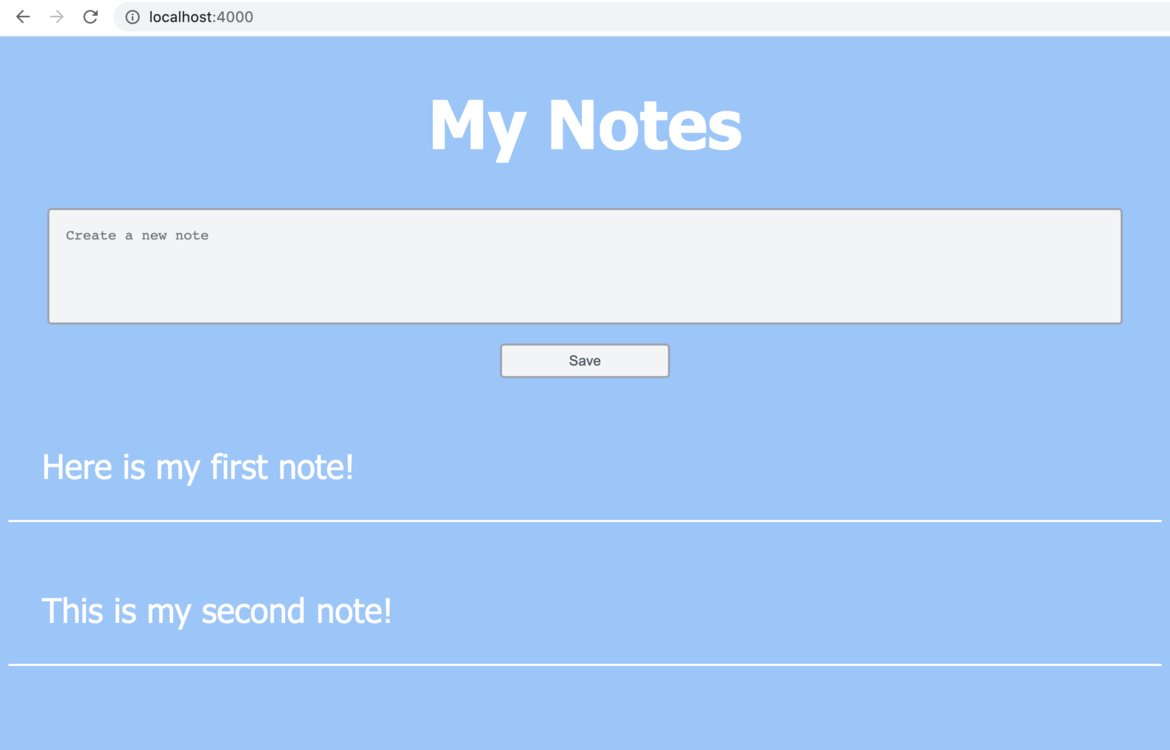
// app.js const express = require("express"); const app = express(); app.use(express.urlencoded({ extended: false })); app.get("/", async (req, res) => { try { const Note = require("./models/Note"); const notes = await Note.find({}); return res.status(200).send( `<!DOCTYPE html> <html lang="en"> <head> <title>My Notes</title> <style> html { text-align: center; background-color: #93c5fd; font-family: "Segoe UI", Tahoma, Geneva, Verdana, sans-serif; color: white; font-size: 2rem; } textarea { resize: none; border: 2px solid #9ca3af; border-radius: 4px; background-color: #f3f4f6; padding: 0.5rem; width: 90%; } button { padding-left: 2rem; padding-right: 2rem; padding-top: 7px; padding-bottom: 7px; background-color: #f3f4f6; border: 2px solid #9ca3af; color: #4b5563; border-radius: 4px; } p { border-bottom: 2px solid; padding: 1rem; text-align: left; } </style> </head> <body> <h1>My Notes</h1> <form method="POST"> <textarea required name="text" rows="5" cols="50" placeholder="Create a new note"></textarea> <button type="submit">Save</button> </form> ${notes.map((n) => `<p>${n.text}</p>`).join("")} </body> </html>` ); } catch (e) { return res.send(e); } }); app.post("/", async (req, res) => { try { const Note = require("./models/Note"); const note = new Note(req.body); await note.save(); return res.send("Note saved. <a href=''>Refresh</a>"); } catch (e) { return res.send(e); } }); module.exports = app; As I said, the application is very rudimentary and serves as a demo. First, we initiate an Express app. Then we tell it to parse incoming request bodies with the built-in, urlencoded middleware for us to be able to work with submitted form data. The app has two method handlers for requests on the application root:
-
app.get("/", ...)handles HTTP GET requests. It’s invoked when our users load the page. What we want to show them is a simple page where they can type in a note and save it. Also, we want to display previously written notes. In the callback function of the request handler, we require ourNotemodel. The model has to be required inside the callback function of our POST request handler, since it needs a current database connection – which might not exist when theapp.jsfile gets first loaded. Then, we apply thefindmethod to receive all notes from the database. This method returns a promise. Therefore, we wait for it to resolve. Last but not least, we use thesendmethod of the response object (res) to send a string back to the client. The string contains HTML syntax that the browser renders into actual HTML elements. For each note in our database, we simply add a paragraph element containing its text.This is the point where you can transform this very rudimentary example into a beautiful user interface. You’re free to choose what to send to the client. This could, for example, be a fully bundled client-side React application. You might also choose a server-side–rendered approach — for example, by using an Express view engine like handlebars. Depending on what it is, you might have to add more routes to your application and serve static files like JS bundles.
-
app.post("/", ...)handles HTTP POST requests. It’s invoked when users save their notes. Again, we first require ourNotemodel. The request payload can be accessed through the body property of the request object (req). It contains the text our users submit. We use it to create a new document and save it with thesavemethod provided by Mongoose. Again, we wait for this asynchronuous operation to finish before we notify the user and give them the possibility to refresh the page.
For our app to actually start listening to HTTP requests, we have to invoke the listen method provided by Express. We’ll do this in a separate file named dev.js that we add to our project root:
// dev.js const app = require("./app"); const { connect } = require("./mongoose"); connect(); const port = 4000; app.listen(port, () => { console.log(`app listening on port ${port}`); }); Here, we invoke the connect function from our mongoose.js file. This will initiate the database connection. Last but not least, we start listening for HTTP requests on port 4000.
It’s a little cumbersome to start the mongo Docker image and our app with two separate commands. Therefore, we add a few scripts to our package.json file:
"scripts": { "start": "concurrently 'npm:mongoDB' 'npm:dev'", "dev": "MONGODB_URL=mongodb://localhost:27017 node dev.js", "mongoDB": "docker run -p 27017:27017 mongo" } mongoDB initiates a MongoDB instance and maps the container port 27017 to port 27017 of our local machine. dev starts our application and sets the environment variable MONGODB_URL that’s being loaded in the mongoose.js file to communicate with our database. The start script executes both scripts in parallel. Now, all we need to do to start our app is run npm start in the terminal.
You can now load the application by visiting http://localhost:4000 in your browser.

Continue reading A Guide to Serverless Deployment with Express and MongoDB on SitePoint.


